

3 mins read
|
06-30-2026
How to Create Custom Product Collections with Layered Navigation
Vinh Jacker
|
03-17-2025


A custom product collection in Magento 2 is a curated group of items built around a theme, like “Summer Sale,” “Shoes under $100,” or “Apple Accessories.” It helps store owners highlight trending, seasonal, or best-selling products in one place.
These collections not only improve product discovery but also boost conversions by guiding customers straight to what they want. However, shoppers today want more than just simple “Sale” or “New Arrivals” pages; they expect to filter by size, color, brand, or price to refine results instantly. Without smart filtering, large collections quickly become overwhelming.
In this blog, you’ll learn how to create a custom product collection in Magento 2 with Layered Navigation, helping you build faster, more personalized shopping experiences that keep customers engaged.
💡 Key Takeaways:
- Learn what a custom product collection is in Magento 2 and why it helps shoppers browse faster.
- Follow step-by-step instructions to create custom product collections.
- See how to enable layered navigation filters (price, size, color) on these collections for a better shopping experience.
How to Create a Custom Product Collection in Magento 2?
Magento’s default setup lets you group products by category, but it doesn’t offer an easy way to build dynamic, theme-based collections or display them with advanced filters.
That’s where Mageplaza Layered Navigation Ultimate becomes a powerful solution. It allows you to create unlimited custom product pages that highlight specific products, such as Sale Items, New Arrivals, etc. To add or edit a custom product page, go to:
To add or edit a custom product page, go to: Admin Panels > Mageplaza > Layered Navigation > Custom Product Pages.
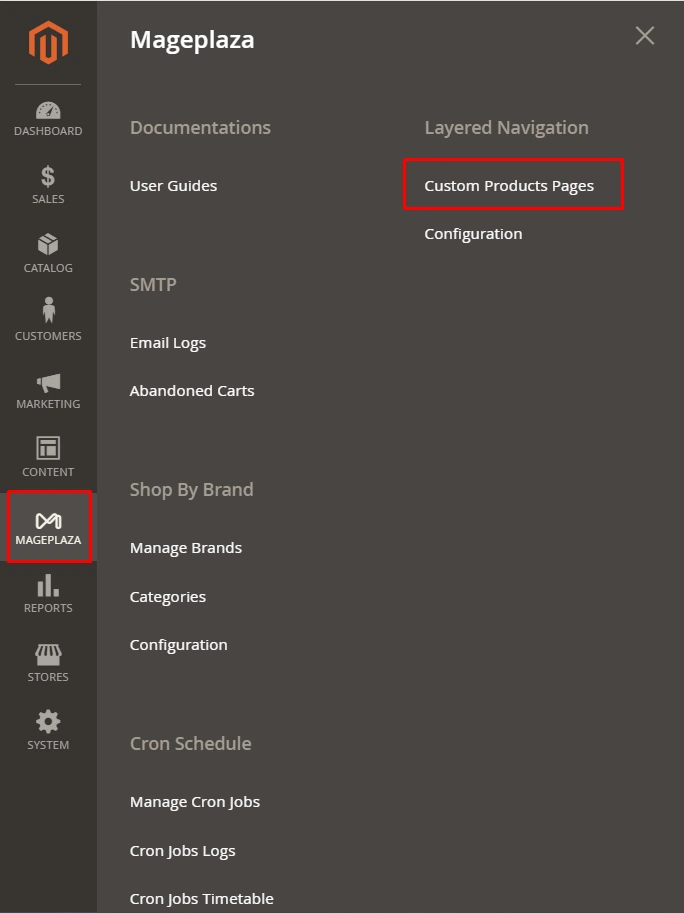
Here, you’ll find two main configuration sections:
Page information
After choosing/creating a new custom product page, open the Page Information tab and scroll down to see some essential information:
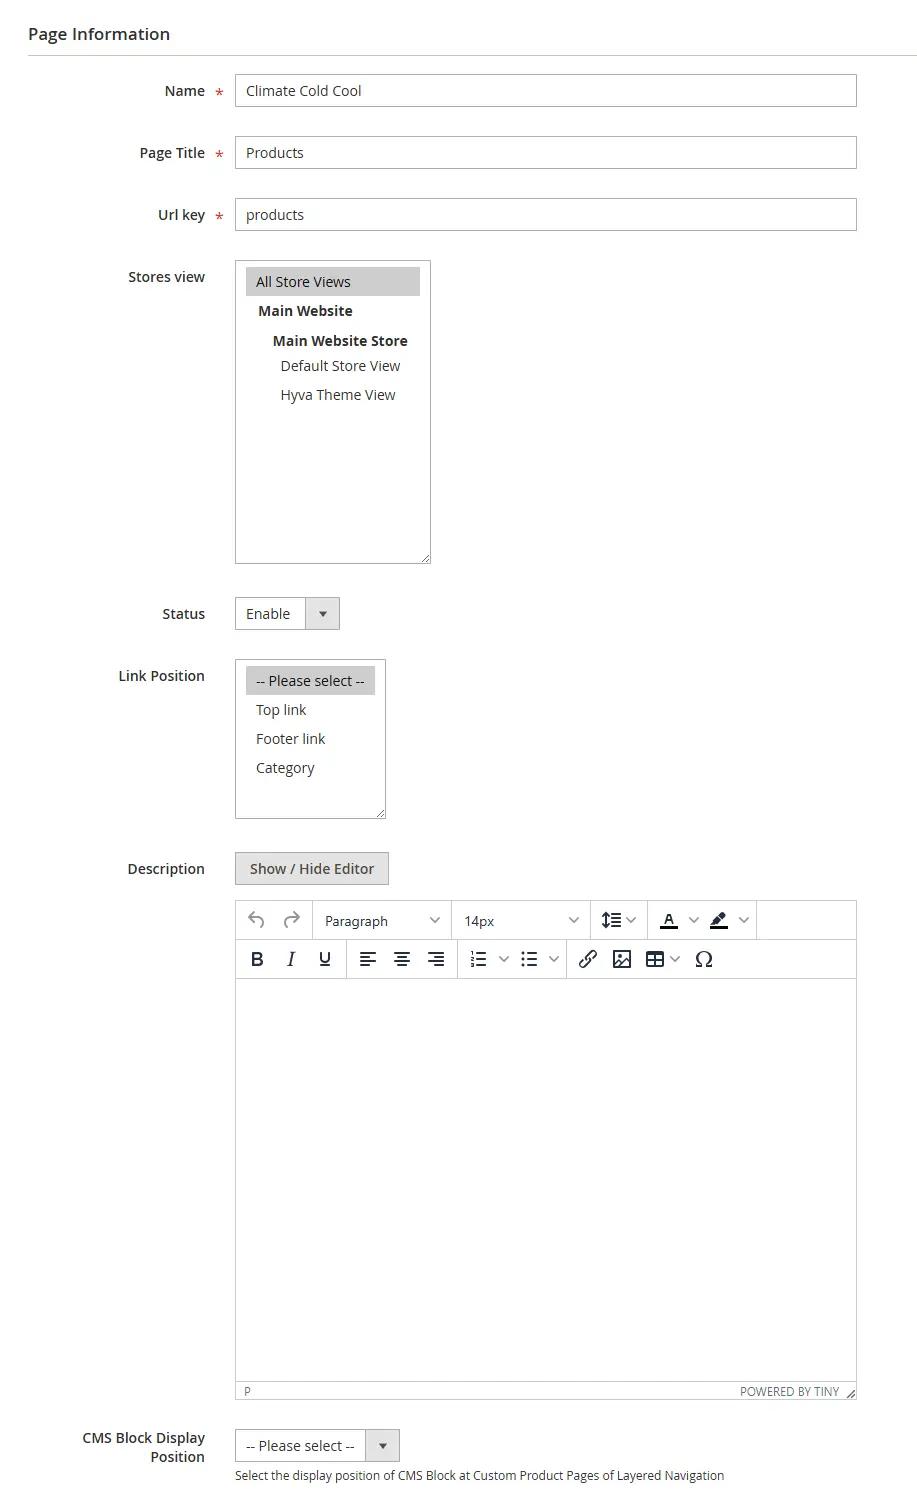
There are three fields related to SEO performance.
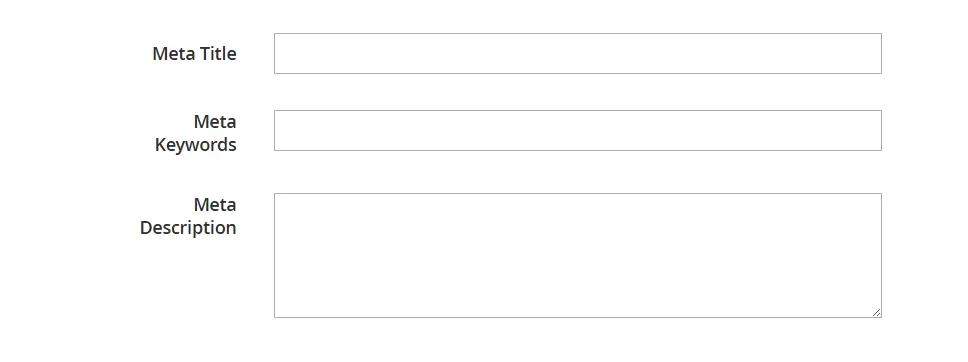
💡 Tip: Use clear, keyword-rich names such as “Summer Sale” or “Shop by Brand” to attract both shoppers and search engines.
Default attribute
This outstanding feature allows you to set the default attribute for each collection page. That means when shoppers open the all products page, you can decide which products will be displayed first.
For example, if you set the attribute Climate = Cool and Cold as the default, the “All Products” page will prioritize showing items matching those conditions.

💡 Pro Tips:
- Keep collections simple and focused, don’t overwhelm shoppers with too many options!
- Promote your custom pages in the main menu, homepage banners, or promotional sliders for maximum visibility.
- Allow customers to use product filters like price, color, and brand so they can find what they want instantly.
Enable Layered Navigation for Custom Product Collections
Once you’ve created your custom product pages, the next step is to make them fully filterable. By enabling Layered Navigation, shoppers can refine products by price, color, size, brand, or any other attribute right on your custom collection pages, just like in a category view. This section walks you through how to configure the files needed to display filters correctly for your custom collections using Mageplaza Layered Navigation Ultimate.
1. Create di.xml with the following code under Mageplaza/LayeredNavigation/etc/ folder
<?xml version="1.0"?>
<config xmlns:xsi="http://www.w3.org/2001/XMLSchema-instance" xsi:noNamespaceSchemaLocation="../../../../../lib/internal/Magento/Framework/ObjectManager/etc/config.xsd">
    <preference for="Magento\Catalog\Model\Layer\ContextInterface" type="Magento\Catalog\Model\Layer\Context" />
    <preference for="Magento\Catalog\Model\Layer\ItemCollectionProviderInterface" type="Magento\Catalog\Model\Layer\Category\ItemCollectionProvider" />
    <preference for="Magento\Catalog\Model\Layer\StateKeyInterface" type="Magento\Catalog\Model\Layer\Category\StateKey" />
    <preference for="Magento\Catalog\Model\Layer\CollectionFilterInterface" type="Magento\Catalog\Model\Layer\Category\CollectionFilter" />
    <preference for="Magento\Catalog\Model\Layer\FilterableAttributeListInterface" type="Magento\Catalog\Model\Layer\Category\FilterableAttributeList" />
    <preference for="Magento\Catalog\Model\Layer\AvailabilityFlagInterface" type="Magento\Catalog\Model\Layer\Category\AvailabilityFlag" />
    <preference for="Magento\Catalog\Model\ResourceModel\Layer\Filter\Price" type="Mageplaza\LayeredNavigation\Model\ResourceModel\Layer\Filter\Price" />
</config>
2. Add the following in the layout file which in my case is layerednavigation_index_index.xml under Mageplaza/LayeredNavigation/view/frontend/layout/ folder
<?xml version="1.0"?>
<page xmlns:xsi="http://www.w3.org/2001/XMLSchema-instance" layout="2columns-left" xsi:noNamespaceSchemaLocation="urn:magento:framework:View/Layout/etc/page_configuration.xsd">
    <body>
        <attribute name="class" value="page-products"/>
        <referenceContainer name="content">
            <block class="Mageplaza\LayeredNavigation\Block\Product\ListProduct" name="layerednavigation_index_index" as="product_list" template="Magento_Catalog::product/list.phtml">
                <container name="category.product.list.additional" as="additional" />
                <block class="Magento\Framework\View\Element\RendererList" name="category.product.type.details.renderers" as="details.renderers">
                    <block class="Magento\Framework\View\Element\Template" name="category.product.type.details.renderers.default" as="default"/>
                </block>
                <block class="Magento\Catalog\Block\Product\ProductList\Item\Container" name="category.product.addto" as="addto">
                    <block class="Magento\Catalog\Block\Product\ProductList\Item\AddTo\Compare"
                        name="category.product.addto.compare" as="compare"
                        template="Magento_Catalog::product/list/addto/compare.phtml"/>
                </block>
                <block class="Magento\Catalog\Block\Product\ProductList\Toolbar" name="product_list_toolbar" template="Magento_Catalog::product/list/toolbar.phtml">
                    <block class="Magento\Theme\Block\Html\Pager" name="product_list_toolbar_pager"/>
                </block>
                <action method="setToolbarBlockName">
                    <argument name="name" xsi:type="string">product_list_toolbar</argument>
                </action>
            </block>
        </referenceContainer>
        <referenceContainer name="sidebar.main">
            <block class="Mageplaza\LayeredNavigation\Block\Navigation" name="catalog.leftnav" as="navigation" before="-" template="Magento_LayeredNavigation::layer/view.phtml">
                <block class="Mageplaza\LayeredNavigation\Block\Navigation\State" name="catalog.navigation.state" as="state" template="Magento_LayeredNavigation::layer/state.phtml" />
                <block class="Magento\LayeredNavigation\Block\Navigation\FilterRenderer" name="catalog.navigation.renderer" as="renderer" template="Magento_LayeredNavigation::layer/filter.phtml">
                  <arguments>
                      <argument name="product_layer_view_model" xsi:type="object">Magento\LayeredNavigation\ViewModel\Layer\Filter</argument>
                  </arguments>
                </block>
            </block>
        </referenceContainer>
        <referenceBlock name="layerednavigation_index_index">
             <arguments>
                  <argument name="viewModel" xsi:type="object">Magento\Catalog\ViewModel\Product\OptionsData</argument>
             </arguments>
        </referenceBlock>
    </body>
</page>
In the above code, we have added class page-products to the body tag to inherit the default styling.
3. Then, we will override the model files to get required data. Create Layer.php under Mageplaza/LayeredNavigation/Model/ folder with following code
<?php
namespace Mageplaza\LayeredNavigation\Model;

use Magento\Catalog\Api\CategoryRepositoryInterface;
use Magento\Catalog\Model\ResourceModel\Product\Attribute\CollectionFactory as AttributeCollectionFactory;
use Magento\Catalog\Model\ResourceModel\Product\CollectionFactory;

class Layer extends \Magento\Catalog\Model\Layer
{
    public function __construct(
        \Magento\Catalog\Model\Layer\ContextInterface $context,
        \Magento\Catalog\Model\Layer\StateFactory $layerStateFactory,
        AttributeCollectionFactory $attributeCollectionFactory,
        \Magento\Catalog\Model\ResourceModel\Product $catalogProduct,
        \Magento\Store\Model\StoreManagerInterface $storeManager,
        \Magento\Framework\Registry $registry,
        CategoryRepositoryInterface $categoryRepository,
        CollectionFactory $productCollectionFactory,
        array $data = []
    ) {
        $this->productCollectionFactory = $productCollectionFactory;
        parent::__construct(
            $context,
            $layerStateFactory,
            $attributeCollectionFactory,
            $catalogProduct,
            $storeManager,
            $registry,
            $categoryRepository,
            $data
        );
    }

    public function getProductCollection()
    {
        if (isset($this->_productCollections['mageplaza_custom'])) {
            $collection = $this->_productCollections['mageplaza_custom'];
        } else {
            //here you assign your own custom collection of products
            $collection = $this->productCollectionFactory->create();
            $this->prepareProductCollection($collection);
            $this->_productCollections['mageplaza_custom'] = $collection;
        }
        return $collection;
    }

}
4. After that, create Resolver.php under Mageplaza/LayeredNavigation/Model/Layer/ folder with following code
<?php
namespace Mageplaza\LayeredNavigation\Model\Layer;

class Resolver extends \Magento\Catalog\Model\Layer\Resolver
{
    public function __construct(
        \Magento\Framework\ObjectManagerInterface $objectManager,
        \Mageplaza\LayeredNavigation\Model\Layer $layer,
        array $layersPool
    ) {
        $this->layer = $layer;
        parent::__construct($objectManager, $layersPool);
    }

    public function create($layerType)
    {

    }
}
5. Then under Mageplaza/LayeredNavigation/Model/ResourceModel/Layer/Filter/ folder create Price.php file
<?php
namespace Mageplaza\LayeredNavigation\Model\ResourceModel\Layer\Filter;

use Magento\Framework\App\Http\Context;
use Magento\Framework\Indexer\DimensionFactory;
use Magento\Framework\Search\Request\IndexScopeResolverInterface;

class Price extends \Magento\Catalog\Model\ResourceModel\Layer\Filter\Price
{
    public function __construct(
        \Magento\Framework\Model\ResourceModel\Db\Context $context,
        \Magento\Framework\Event\ManagerInterface $eventManager,
        \Mageplaza\LayeredNavigation\Model\Layer\Resolver $layerResolver,
        \Magento\Customer\Model\Session $session,
        \Magento\Store\Model\StoreManagerInterface $storeManager,
        $connectionName = null,
        IndexScopeResolverInterface $priceTableResolver = null,
        Context $httpContext = null,
        DimensionFactory $dimensionFactory = null
    ) {
        parent::__construct($context, $eventManager, $layerResolver, $session, $storeManager, $connectionName, $priceTableResolver, $httpContext, $dimensionFactory);
    }
}
So, we are done with the model and we will override the block to show proper data.
6. Now create Navigation.php file under Mageplaza/LayeredNavigation/Block/ folder with following content
<?php
namespace Mageplaza\LayeredNavigation\Block;

class Navigation extends \Magento\LayeredNavigation\Block\Navigation
{
    public function __construct(
        \Magento\Framework\View\Element\Template\Context $context,
        \Mageplaza\LayeredNavigation\Model\Layer\Resolver $layerResolver,
        \Magento\Catalog\Model\Layer\FilterList $filterList,
        \Magento\Catalog\Model\Layer\AvailabilityFlagInterface $visibilityFlag,
        array $data = []
    ) {
        parent::__construct($context, $layerResolver, $filterList,
            $visibilityFlag);
    }
}
7. Create State.php file under Mageplaza/LayeredNavigation/Block/Navigation/ folder with following code
<?php
namespace Mageplaza\LayeredNavigation\Block\Navigation;

class State extends \Magento\LayeredNavigation\Block\Navigation\State
{
    public function __construct(
        \Magento\Framework\View\Element\Template\Context $context,
        \Mageplaza\LayeredNavigation\Model\Layer\Resolver $layerResolver,
        array $data = []
    ) {
        parent::__construct($context, $layerResolver, $data);
}
}
8. Then under Mageplaza/LayeredNavigation/Block/Product/ folder create ListProduct.php and add following code
<?php
namespace Mageplaza\LayeredNavigation\Block\Product;

class ListProduct extends \Magento\Catalog\Block\Product\ListProduct
{
    public function __construct(
        \Magento\Catalog\Block\Product\Context $context,
        \Magento\Framework\Data\Helper\PostHelper $postDataHelper,
        \Mageplaza\LayeredNavigation\Model\Layer\Resolver $layerResolver,
        \Magento\Catalog\Api\CategoryRepositoryInterface $categoryRepository,
        \Magento\Framework\Url\Helper\Data $urlHelper,
        array $data = []
    ) {
        parent::__construct($context, $postDataHelper, $layerResolver,
            $categoryRepository, $urlHelper, $data);
    }
}
That’s all, we have overridden all the required files.
💡 Pro Tips:
- Always activate the price filter for large collections to make browsing easier.
- Avoid showing attributes that don’t apply to the collection to keep the sidebar clean and user-friendly.
- Ensure filter labels are clear and mobile-friendly so shoppers can refine products easily on all devices.
Final Words
A custom product collection is one of the most effective ways to organize and showcase products that match your customers’ interests. When paired with Layered Navigation in Magento 2, it turns browsing into a smooth, personalized experience that helps shoppers find exactly what they need faster.
By combining curated collections with powerful filtering options, your store can deliver better user experience, higher conversion rates, and improved SEO performance. Follow the steps in this guide to set up your custom product collections properly, and keep monitoring their performance to continually optimize results.
Smart navigation doesn’t just help customers shop; it drives engagement, builds loyalty, and keeps your eCommerce store growing.
Table of content

Jacker is the Chief Technology Officer (CTO) at Mageplaza, bringing over 10 years of experience in Magento, Shopify, and other eCommerce platforms. With deep technical expertise, he has led numerous successful projects, optimizing and scaling online stores for global brands. Beyond his work in eCommerce development, he is passionate about running and swimming.
Related Post


How to Enable DebugView in GA4 for your Magento 2 store - Mageplaza
Step-by-step guide to enabling GA4 DebugView for Magento 2 merchants — verify your GA4 events are firing correctly before trusting your data.
8 mins read
|
06-09-2026

Table Rate Shipping in eCommerce: A Practical Guide
Master Magento 2 Table Rate Shipping. Learn how to configure an accurate, automated shipping matrix to optimize your checkout and boost sales.
10 mins read
|
06-02-2026
3 mins read
|
05-30-2026

Google Analytics Ecommerce Reports for Magento Merchants: What to track & Tips
A practical guide to GA4 ecommerce reports for Magento merchants, covering what to track, how to read each report, and specific tips to turn data into revenue decisions.
18 mins read
|
05-20-2026

5 Ways to Hide Products on Shopify (2026 Guide)
Explore the best 5 ways to hide products on Shopify. Learn how to manage visibility, protect pricing, and create a tailored shopping experience for buyers.
18 mins read
|
05-16-2026
3 mins read
|
06-30-2026
How to Enable DebugView in GA4 for your Magento 2 store - Mageplaza
Step-by-step guide to enabling GA4 DebugView for Magento 2 merchants — verify your GA4 events are firing correctly before trusting your data.
8 mins read
|
06-09-2026
Table Rate Shipping in eCommerce: A Practical Guide
Master Magento 2 Table Rate Shipping. Learn how to configure an accurate, automated shipping matrix to optimize your checkout and boost sales.
10 mins read
|
06-02-2026
3 mins read
|
05-30-2026
Google Analytics Ecommerce Reports for Magento Merchants: What to track & Tips
A practical guide to GA4 ecommerce reports for Magento merchants, covering what to track, how to read each report, and specific tips to turn data into revenue decisions.
18 mins read
|
05-20-2026
5 Ways to Hide Products on Shopify (2026 Guide)
Explore the best 5 ways to hide products on Shopify. Learn how to manage visibility, protect pricing, and create a tailored shopping experience for buyers.
18 mins read
|
05-16-2026