


5 mins read
|
07-30-2026
Magento 2 Checkout Customization: 10 Tips to Optimize Your Checkout
Vinh Jacker
|
03-09-2026

While Magento 2’s default checkout is stable, its standard design often lacks the optimization needed for specific business models. To achieve a revenue breakthrough, a customized One-Step Checkout is the ultimate key: it eliminates friction for lightning-fast conversions while building professional trust through a unique brand identity. This solution perfectly empowers businesses to personalize the experience - from scheduling delivery dates to integrating exclusive offers - to win over even the most demanding customers.
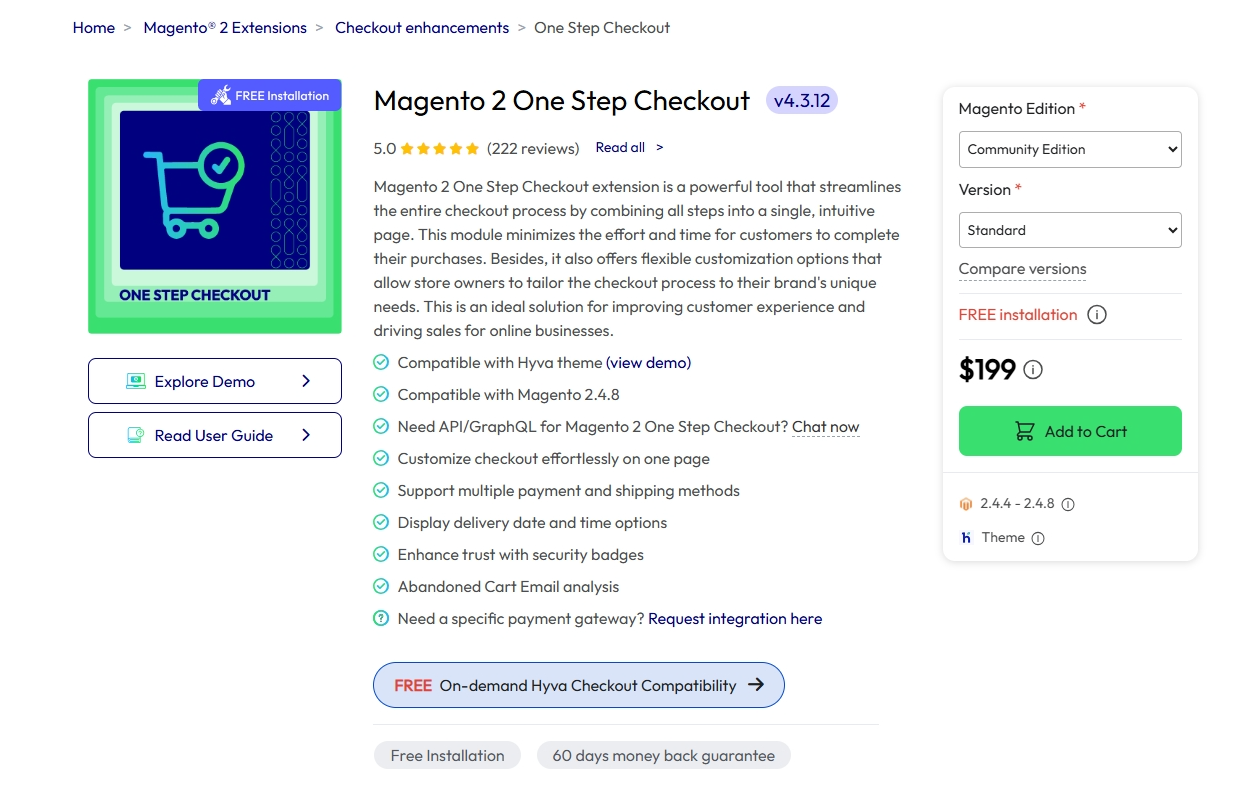
Today, Magento 2 stores often enhance their checkout using solutions such as Hyvä Checkout or Mageplaza One Step Checkout. While both offer unique benefits to improve checkout UX, Mageplaza One Step Checkout stands out as a powerful solution for checkout customization and optimizing the entire process on a single page. With flexible configuration and built-in features, merchants can create a smoother checkout experience while also unlocking opportunities to increase average order value.
Below are 10 practical Magento 2 checkout customization tips to help you retain customers and effectively reduce cart abandonment.
10 checkout customization tips to reduce cart abandonment
How to install and get started with Mageplaza One Step Checkout
Before optimizing your checkout experience, make sure Mageplaza One Step Checkout is properly installed and updated to the latest version. This extension helps turn the default multi-step Magento checkout into a faster, single-page experience that’s easier for customers to complete.
If you haven’t installed the extension yet, follow the step-by-step guide here.
Once everything is set up, you’re ready to start customizing and optimizing your checkout using the tips below.
1. Design a Clean One-Page Checkout Layout
Why it matters?
A multi-step checkout interrupts the buying journey by forcing customers to move across multiple pages. A one-page layout keeps all essential information on a single screen, reducing friction and maintaining purchase momentum.
How to configure:
📍 Stores > Settings > Configuration > Mageplaza Extensions > One Step Checkout > Design Configuration
Navigate to:
In Design Configuration, you can configure:
Checkout Page Layout: Select a 1-column, 2-column, or 3-column layout.Design Style: Choose the interface style (depending on your version).Place Order Button Color / Position: Customize to make the button more prominent.Custom CSS: Add custom CSS if deeper customization is needed.
For desktop users, the 3-column layout is often recommended, as it allows customers to view the form, shipping methods, and order summary simultaneously on a single screen.
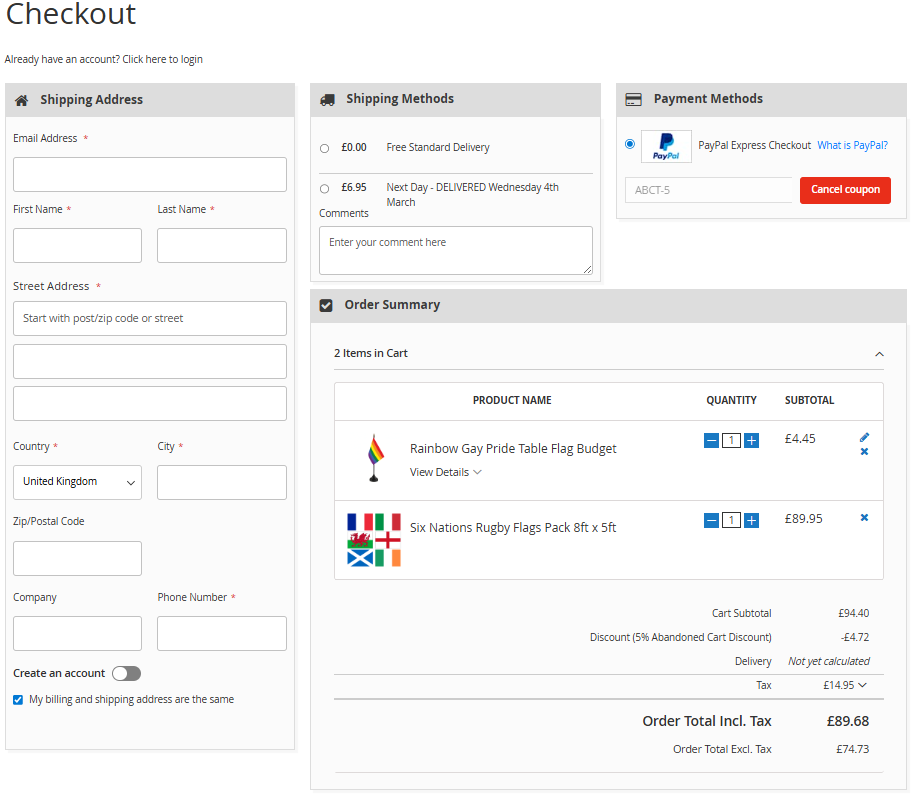
One example is The Flag Shop One Step Checkout to streamline its checkout experience. After adding a product and proceeding to checkout, customers can complete the entire purchase on a single page with clearly organized sections for shipping details, payment methods, and order summary. This layout keeps all essential information visible and helps shoppers finish their orders quickly and confidently.
2. Let Customers Edit Their Cart Without Leaving Checkout
Why it matters?
Requiring customers to return to the cart page to edit items disrupts the checkout flow and increases the likelihood of abandonment. Allowing quantity updates or item removal directly within checkout keeps the experience seamless and minimizes friction at the final step.
According to Baymard Institute, 18% of users abandon their purchase due to a too long or complicated checkout process.
How to configure:
Navigate to:
📍Stores > Configuration > Mageplaza > One Step Checkout > General Configuration

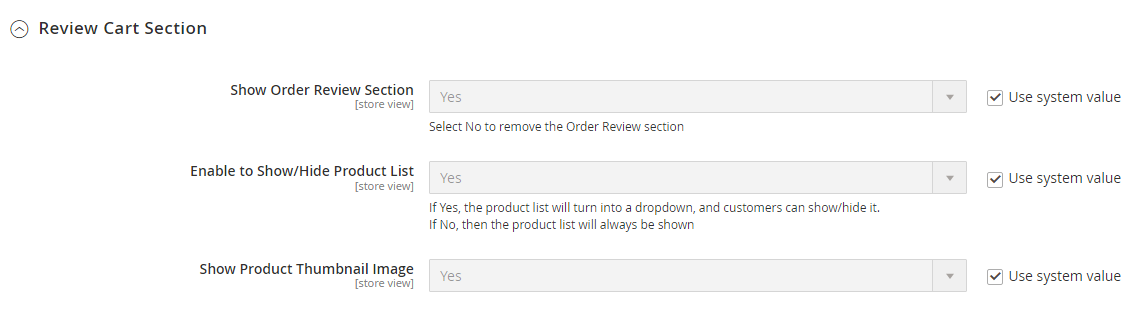
In the Review Cart Section:
- Set
Show Order Review SectiontoYes. - Set
Enable to Show/Hide Product ListtoYes(to allow collapsing the product list). - Set
Show Product Thumbnail ImagetoYes(to display product images).
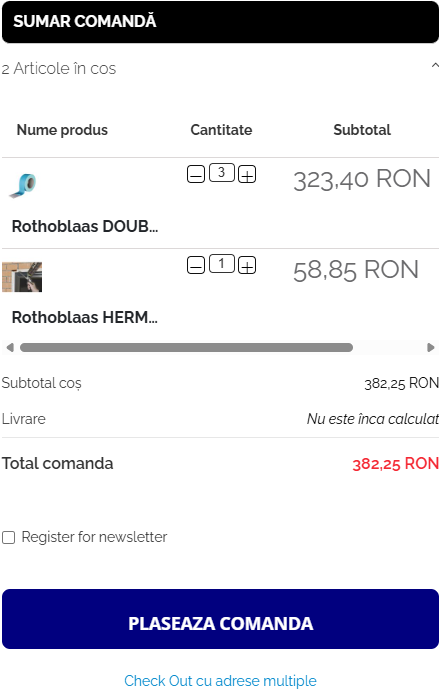
A good example can be seen on the website of Simetric. Even at the checkout stage, customers can quickly adjust quantities or remove items directly within the Order Summary, without returning to the cart page. Small conveniences like this help keep the checkout flow smooth and reduce the chance of customers leaving midway.
3. Remove Unnecessary Checkout Fields
Why it matters?
An overly long form increases “form fatigue” and cognitive load, discouraging customers from completing their purchase. Many default fields in Magento are unnecessary for B2C stores and can be safely removed to streamline checkout.
How to configure:
Navigate to:
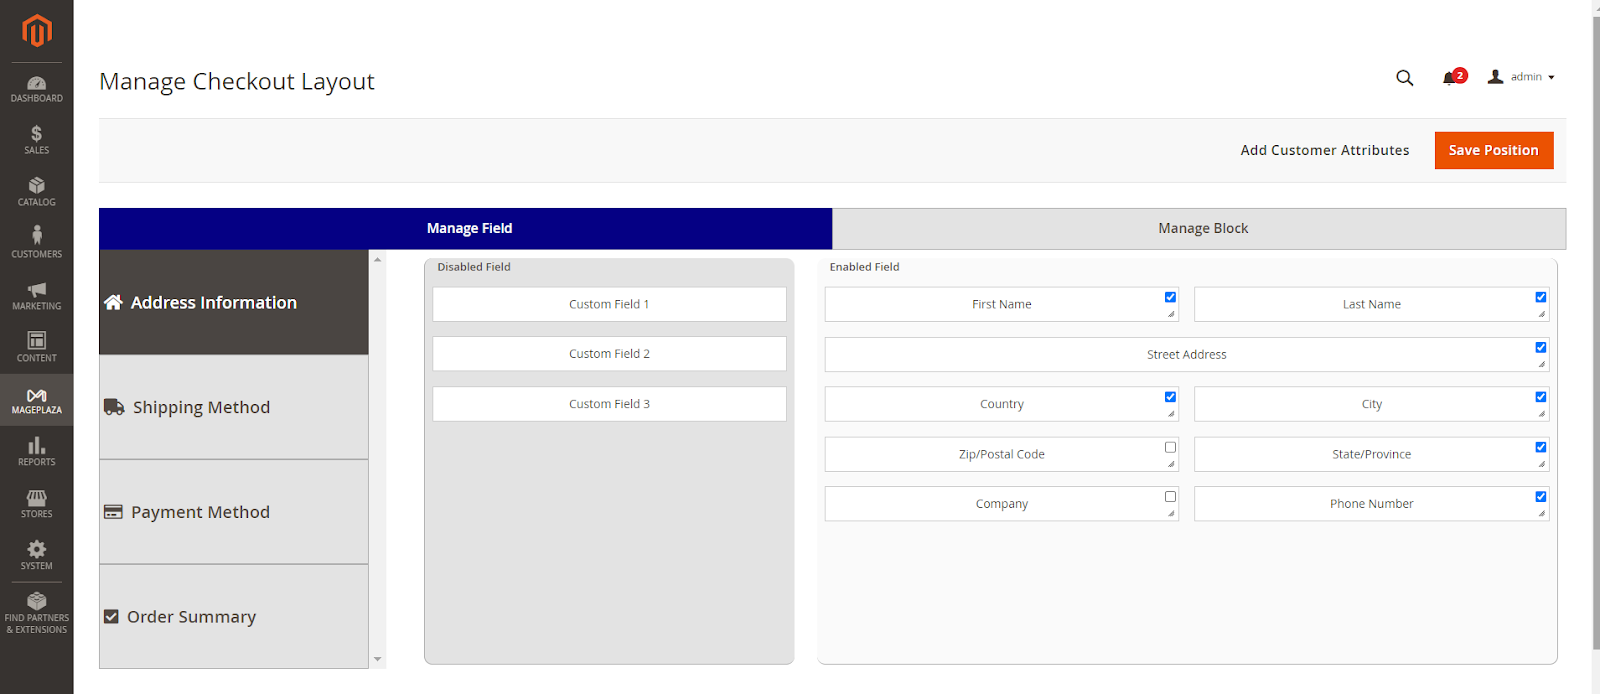
📍 Mageplaza > One Step Checkout > Manage Fields
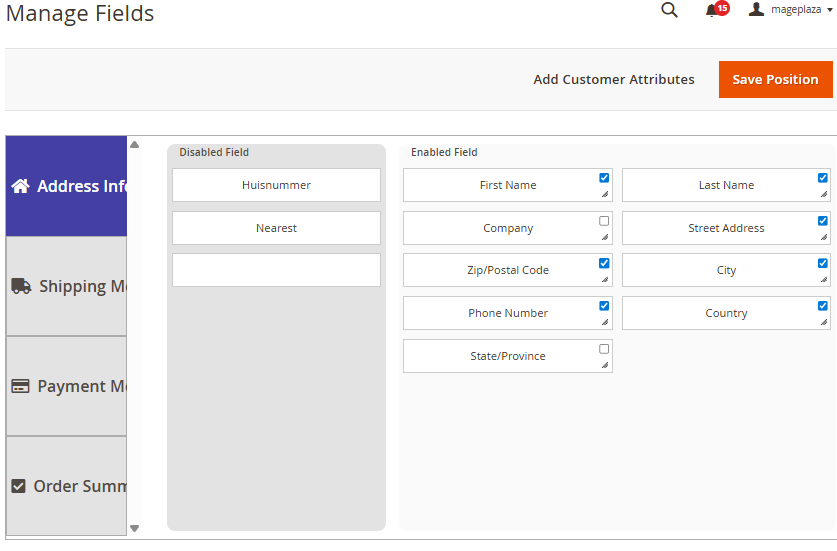
- Drag unnecessary fields from
Enabled FieldstoDisabled Fields. - Enable or disable the
Requiredoption as needed. - Adjust the
Sort Orderto control the display position. - Modify the
Field Widthto optimize the layout.
By removing redundant fields in Manage Fields, the store can shorten the form, reduce friction, and help customers complete their purchase faster.
4. Speed Up Address Entry
Why it matters?
Entering a shipping address is often one of the most time-consuming steps in the checkout process and is also prone to input errors. Automating this step helps customers complete the form faster and reduces abandonment caused by fatigue.
How to configure:
Navigate to:
📍 Stores > Settings > Configuration > Mageplaza Extensions > One Step Checkout > General Configuration
In General Configuration:
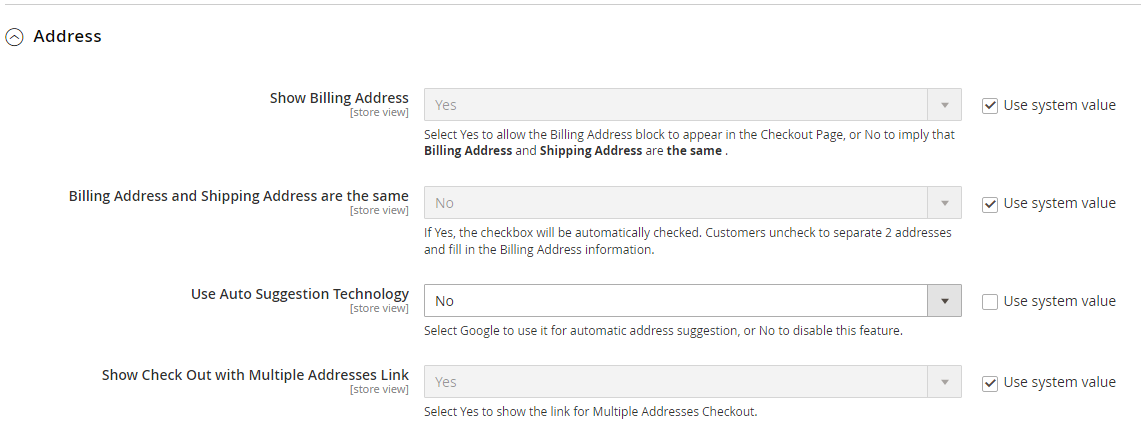
- Set
Use Auto Suggestion Technologyto Google. - Enter your
Google API Key. - Use Restrict the auto suggestion for a specific country to limit suggestions to selected countries.
- Set
Enable GeoIPtoYes(requires the GeoIP extension to be installed).
5. Enable Quick Social Login
Why it matters?
Requiring customers to create an account before checkout can increase cart abandonment. Enabling social login makes the process faster and more convenient, helping improve conversions. Some industry reports estimate that around 43% of users prefer social login for quicker access.
For a deeper look at optimizing the login experience during checkout, you can read the detailed guide here.
How to configure:
Navigate to:
📍Stores > Settings > Configuration > Mageplaza Extensions > One Step Checkout > General Configuration
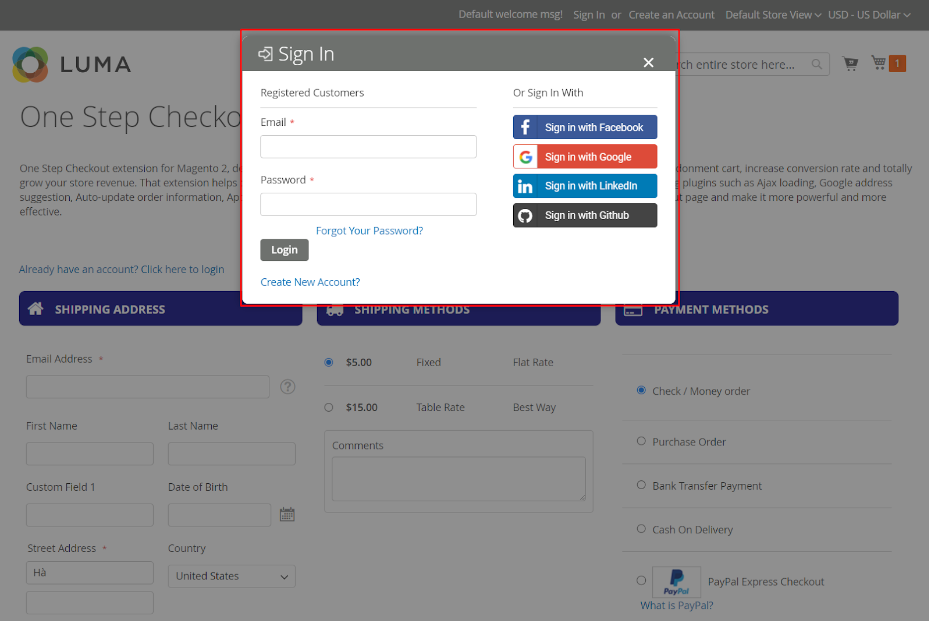
- Set
Show Login LinktoYes. - Set
Social Login on Checkout PagetoYes(this only works if the Social Login extension has been installed).
Social Login on Checkout Page: This function allows customers to sign in via their social networks. However, it is only available if Mageplaza Social Login is installed and enabled.
💡 Note: If you are using the Mageplaza One Step Checkout Ultimate version, Social Login Pro is included with advanced features such as redirect, enhanced security, quick social networks linking.
6. Build Trust During Checkout
Why it matters?
Hidden costs such as shipping fees and taxes reduce trust and increase abandonment rates. Displaying security badges near the payment button also reassures customers at the final step.
Customers need to clearly see:
- Product list
- Shipping fees
- Taxes
- Final grand total
Transparent pricing builds confidence and minimizes last-minute drop-offs.
How to configure:
Navigate to:
📍Stores > Configuration > Mageplaza > One Step Checkout > Design Configuration
Improve Pricing Transparency
- Enable
Show Order Review Section→Yes - Enable
Product List→Yes - Enable
Product Thumbnail Image→Yes - Enable
Discount Code Section→Yes(choose preferred position)
These settings ensure customers clearly see order details before placing the order.
Trust Badges (Seal Block)
Navigate to:
📍One Step Checkout → Display Configuration → Static CMS Block
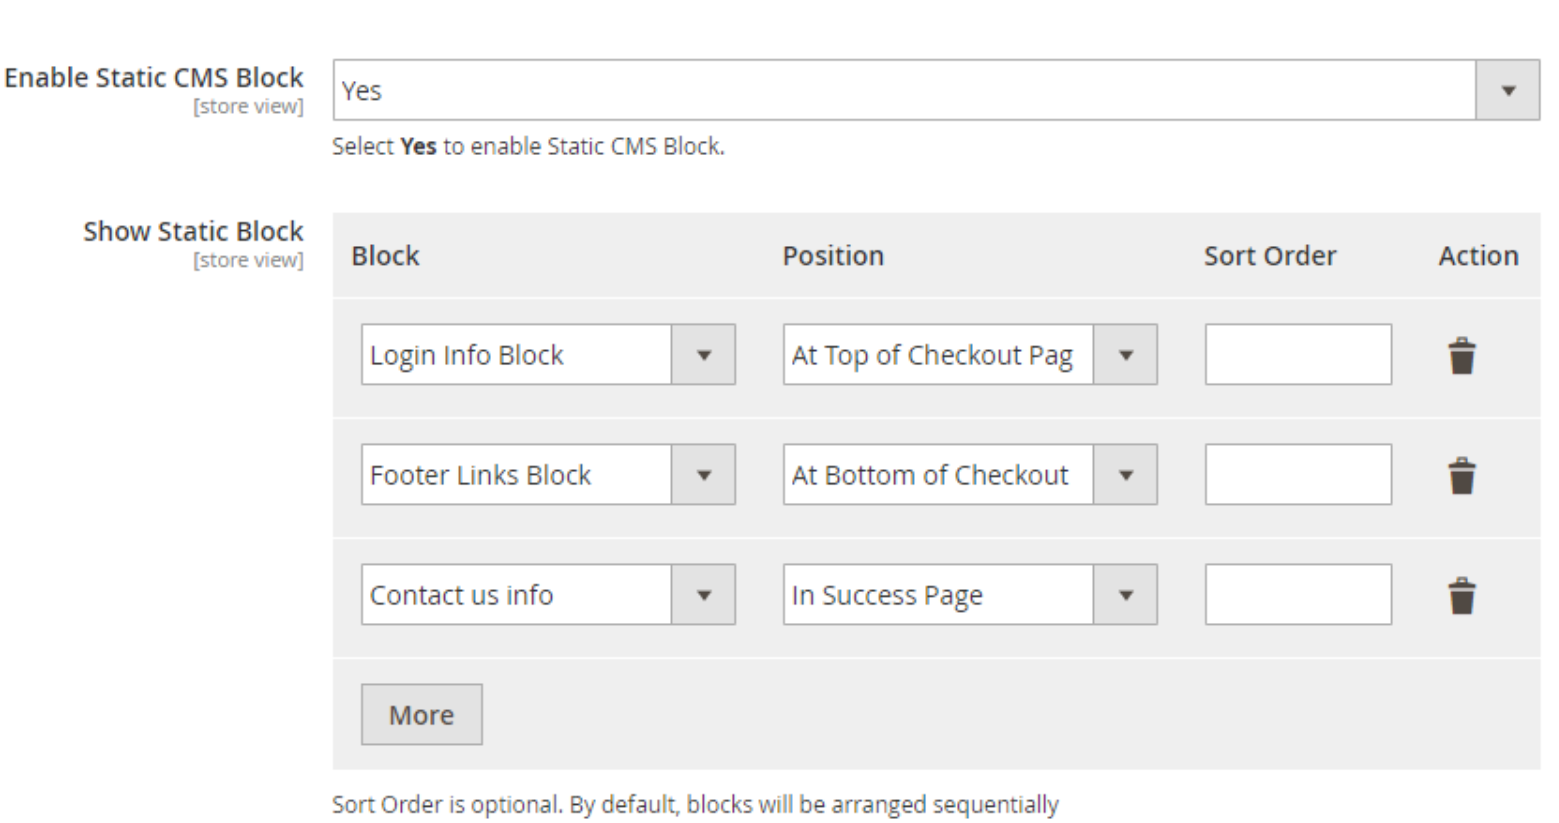
- Enable
Static CMS Block→Yes - Select or create a CMS block containing your security badges (SSL, payment logos, guarantees, etc.)
- Adjust Sort Order to position it near the payment button
Placing trust badges close to the “Place Order” button helps reassure customers right before they complete the purchase.
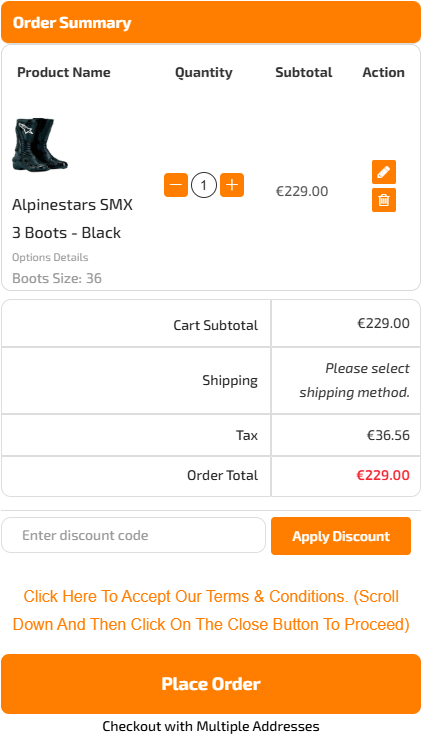
The website of Motorace provides a clear example. Its checkout page shows all costs in the Order Summary, including products, shipping fees, taxes, and the final total, making it easy for customers to review charges before placing the order.
7. Add Flexible Delivery Options
Why it matters?
Some customers want more control over their delivery experience, such as selecting a preferred delivery time, adding delivery notes, or specifying special requests. Providing these options improves convenience, reduces post-purchase confusion, and enhances overall satisfaction.
How to configure:
Navigate to:
📍Stores > One Step Checkout > Manage Fields
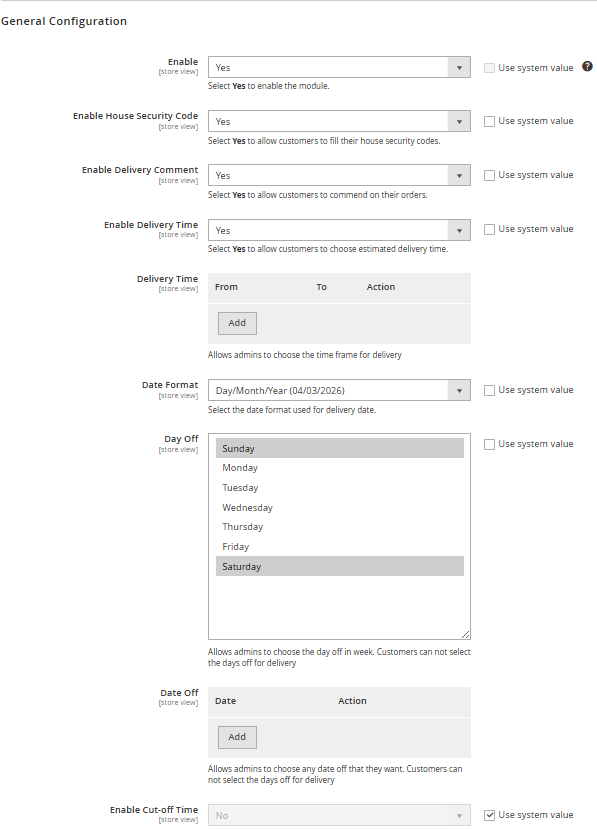
In the Manage Fields tab:
- Drag and drop fields such as
Delivery Time / Date / Notesinto the “Shipping Method” or “Additional Information” section. - Enable or disable the
Requiredoption as needed. - Adjust the
Sort Orderto control the display position.
For more complex custom fields, use Custom Field Configuration within the Manage Fields section (available in the Ultimate version).
8. Offer Helpful Extras at Checkout
Why it matters?
Certain add-on features can enhance the checkout experience without adding unnecessary complexity:
- Discount Code: Displaying the “Apply Discount Code” field directly on the checkout page allows customers to instantly see how much they save.
- Newsletter Subscription: Let customers opt in to promotional emails with a single click.
- Personalized Gift Wrap: Allow customers to request gift wrapping and add a custom message directly to the order.
- Terms & Conditions: Integrating this ensures legal compliance and builds trust by clearly presenting your store’s policies before the final purchase.
If you want to add more features or further customize elements on your checkout page, you can refer to our detailed Magento 2 checkout customization guide to ensure proper technical implementation and system stability.
How to configure:
📍Stores > Settings > Configuration > Mageplaza Extensions > One Step Checkout > Display Configuration
Navigate to:
Discount Code Section
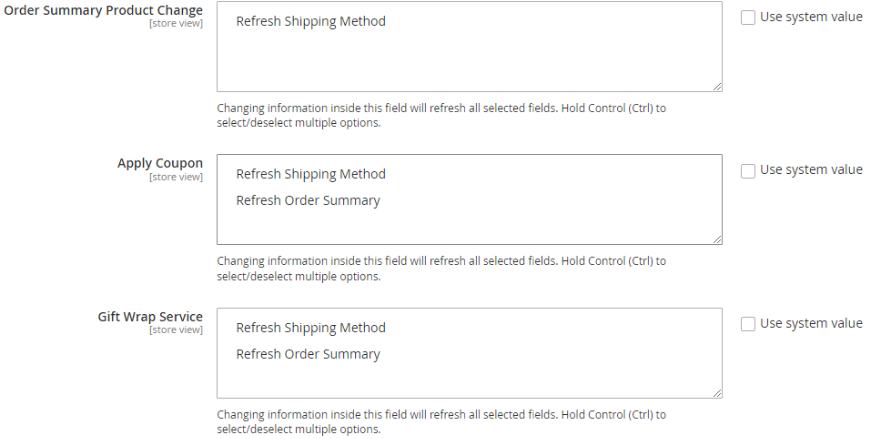
- Select
No→ Hide the discount code field. - Select
In Payment Method Area→ Display it in the payment section. - Select
In Order Summary Area→ Display it in the order summary section. - Set
Show Newsletter CheckboxtoYes. - Terms & Conditions

Set this to Yes to display your policies. Once enabled, the Terms and Conditions will appear in a convenient pop-up dialog, allowing customers to review and accept by clicking “I agree to the terms and conditions” without leaving the page.
📍 Mageplaza > One Step Checkout > Manage Fields
- Set
Show Gift MessagestoYes. - Set
Enable Gift WraptoYes.
You can also configure additional options such as survey responses or order notes if needed.
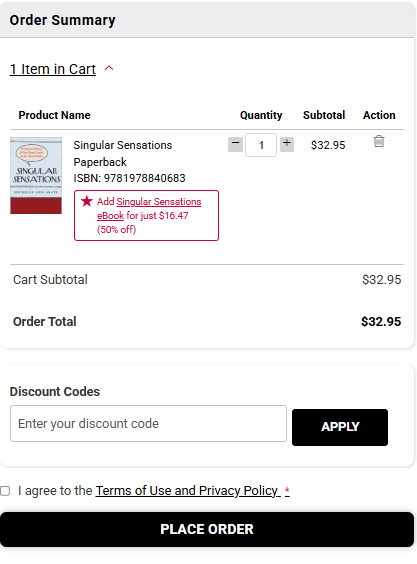
You can see this implementation on the website of Rutgers University Press. The store uses Mageplaza OSC to place the discount code field directly above the order summary, allowing customers to easily apply promotions and instantly see their savings. This feature does not interrupt the purchasing flow but still adds clear value, potentially increasing order value and supporting long-term customer retention.
9. Make Checkout Work Better for Mobile Users
Why it matters?
Mobile checkout requires:
- A simplified layout
- Large, easy-to-tap buttons
- Minimal scrolling
- Clearly separated sections
A mobile-optimized checkout reduces friction, improves usability, and increases conversion rates on smaller screens.
How to configure:
Navigate to:
📍Stores > Configuration > Mageplaza > One Step Checkout > Design Configuration
In Design Configuration:`
- Choose an appropriate
Checkout Page Layout(typically a one-column layout for mobile devices). - Adjust the
Place Order ButtonandDesign Stylesettings to optimize interaction on smaller screens.
Ensure field density is not too tight on small screens to maintain readability and ease of interaction.
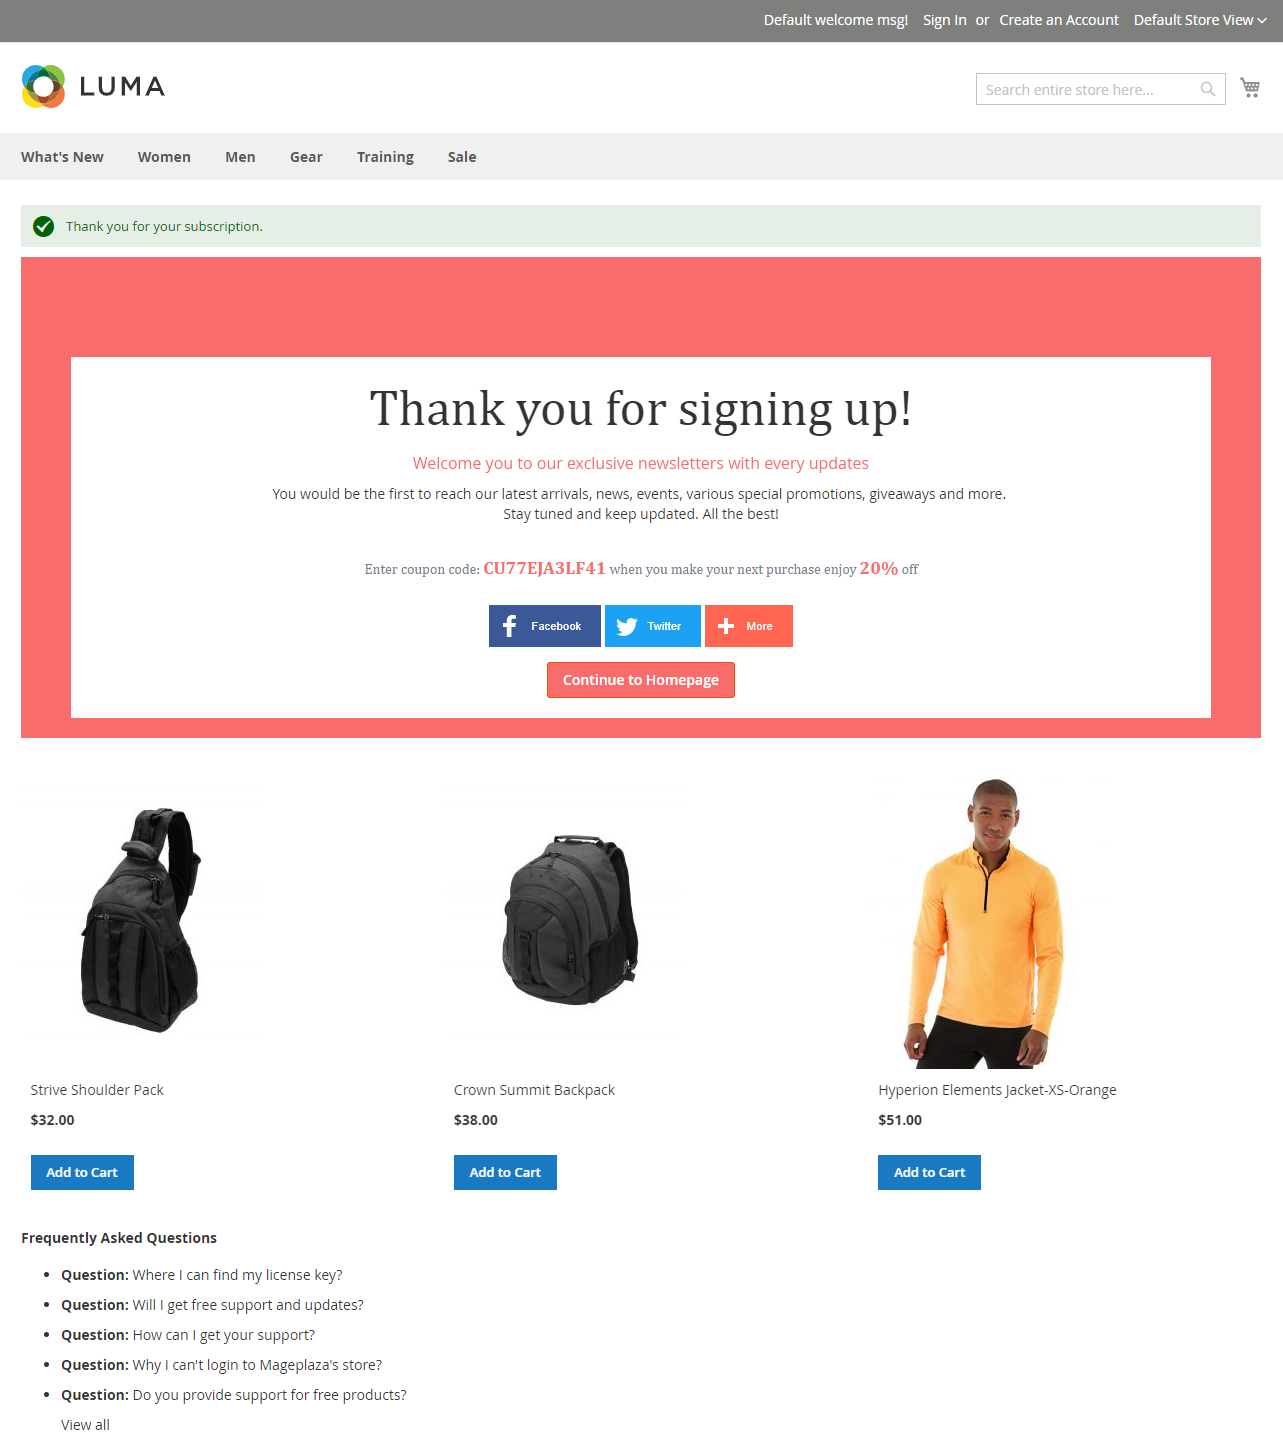
10. Turn the Thank You Page into a Sales Opportunity
Why it matters?
The customer journey doesn’t end after a successful payment. A generic thank-you page is a missed opportunity. Instead, use this moment to upsell, cross-sell, or retain customers with a discount code for their next purchase.
A well-optimized thank-you page can increase repeat purchases and strengthen customer loyalty.
💡 Tip: If you are using the One Step Checkout Ultimate version, this thank-you page optimization feature is already built-in and ready for immediate use.
How to configure:
Navigate to:
📍Stores > Settings > Configuration > Mageplaza Extensions > One Step Checkout > Display Configuration
- Set
Enable Static CMS BlocktoYes. - In
Select/Insert CMS Block, choose the block you want to display at the top or bottom of the checkout page. - Adjust the
Sort Orderto define its position on theSuccess Page.
Advanced customization may require integration with additional extensions.
Conclusion
Mageplaza One Step Checkout for Magento 2 offers a flexible and developer-friendly foundation, making it easy to adapt the checkout experience to your store’s needs. Its customizable structure allows seamless extensions and integrations. Whenever you need additional customization, the Mageplaza team is ready to support you with reliable and professional services.
Table of content

Jacker is the Chief Technology Officer (CTO) at Mageplaza, bringing over 10 years of experience in Magento, Shopify, and other eCommerce platforms. With deep technical expertise, he has led numerous successful projects, optimizing and scaling online stores for global brands. Beyond his work in eCommerce development, he is passionate about running and swimming.
Related Post

7 mins read
|
06-30-2026

How to Enable DebugView in GA4 for your Magento 2 store - Mageplaza
Step-by-step guide to enabling GA4 DebugView for Magento 2 merchants — verify your GA4 events are firing correctly before trusting your data.
8 mins read
|
06-09-2026

Table Rate Shipping in eCommerce: A Practical Guide
Master Magento 2 Table Rate Shipping. Learn how to configure an accurate, automated shipping matrix to optimize your checkout and boost sales.
10 mins read
|
06-02-2026
3 mins read
|
05-30-2026

Google Analytics Ecommerce Reports for Magento Merchants: What to track & Tips
A practical guide to GA4 ecommerce reports for Magento merchants, covering what to track, how to read each report, and specific tips to turn data into revenue decisions.
18 mins read
|
05-20-2026
5 mins read
|
07-30-2026
7 mins read
|
06-30-2026
How to Enable DebugView in GA4 for your Magento 2 store - Mageplaza
Step-by-step guide to enabling GA4 DebugView for Magento 2 merchants — verify your GA4 events are firing correctly before trusting your data.
8 mins read
|
06-09-2026
Table Rate Shipping in eCommerce: A Practical Guide
Master Magento 2 Table Rate Shipping. Learn how to configure an accurate, automated shipping matrix to optimize your checkout and boost sales.
10 mins read
|
06-02-2026
3 mins read
|
05-30-2026
Google Analytics Ecommerce Reports for Magento Merchants: What to track & Tips
A practical guide to GA4 ecommerce reports for Magento merchants, covering what to track, how to read each report, and specific tips to turn data into revenue decisions.
18 mins read
|
05-20-2026