


1 min read
|
04-30-2026
Best Ways to Create Magento 2 Custom Navigation Menu
Vinh Jacker
|
08-23-2024

A well-organized menu enables users to locate what they need swiftly and effectively, resulting in increased engagement and better conversion rates.
This article will examine the most effective techniques for creating a Magento 2 custom navigation menu, including both methods without extensions and with the help of Magento 2 extensions. We’ll also cover how to add custom menu items to ensure your navigation menu is fully tailored to your store’s needs.
Whether you’re a beginner or an experienced developer, this guide will provide you with the insights and steps needed to create a highly effective custom navigation menu for your Magento 2 store.
What is Magento 2 Custom Navigation Menu?
Magento 2 custom navigation menu is a personalized menu that lets store owners design and adjust how their website’s navigation looks and works.
Unlike the default navigation options provided by Magento 2, a custom navigation menu can be designed to meet specific needs, enhance user experience, and improve the overall aesthetics of the website.
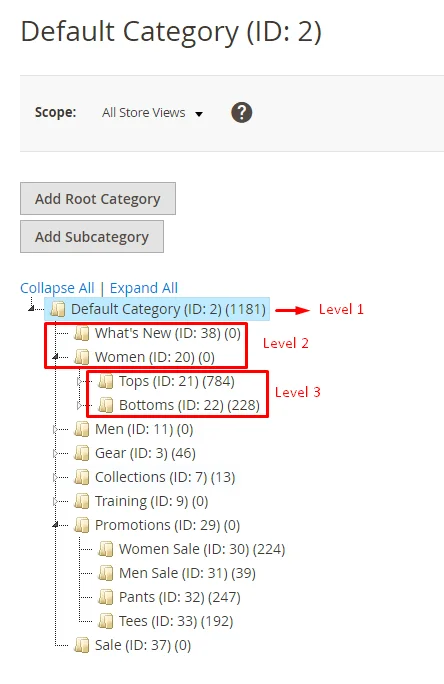
This navigation system includes 4 main levels:
1. Level 1
These are the primary filters displayed on the left side of the product listing page. They include broad categories that help users navigate the main product types. Examples: Product Categories, Price, Brand.
2. Level 2
Secondary filters are located below the main filters and offer more detailed options for users. They help users narrow down their choices by broader subcategories. Examples: Women, Men, Gear.
3. Level 3
These are more detailed filtering options that customers can use to find products better meet their needs, allow users to refine their search based on specific product features. Examples: Tops, Bottoms,…
4. Level 4
These filters are created based on specific requirements of individual stores or particular customer needs. They can include custom attributes and filtering options not available in the default configuration. Examples: Special product features (e.g., waterproof, energy-saving), product ratings.
Key features of Magento 2 Custom Navigation Menu:
-
Tailored User Experience: Custom navigation menus enable store owners to create a unique browsing experience by organizing products and categories based on customer behavior and preferences, leading to higher satisfaction and conversion rates.
-
Improved Usability: A well-structured custom navigation menu enhances the usability of a Magento 2 store, allowing users to quickly navigate through different sections, reducing the time needed to find specific product or information.
-
Enhanced Aesthetics: Custom navigation menus can be styled to match the store’s branding and visual identity, creating a cohesive and professional appearance across the website.
-
Flexibility and Control: Store owners have full control over the menu’s content and structure. They can easily add, remove, rearrange menu items, create dropdown menus, and include custom links to various pages, categories, or external websites.
-
SEO Benefits: A well-organized navigation menu improves SEO by making important pages and categories more accessible, aiding search engines in better crawling and indexing the site, which can boost search rankings.
How to Create Magento 2 Custom Navigation Menu
To design a personalized navigation menu in Magento 2, you can approach it in two ways: with or without a Magento Extension. Based on your needs, choose the method that suits you most. Below is a detailed guide for both methods, including step-by-step illustrations to help you follow along:
Method 1: Without Magento 2 Extension
This approach enables you to design a personalized navigation menu without using an extension, providing complete customization and optimizing performance without relying on third-party tools.
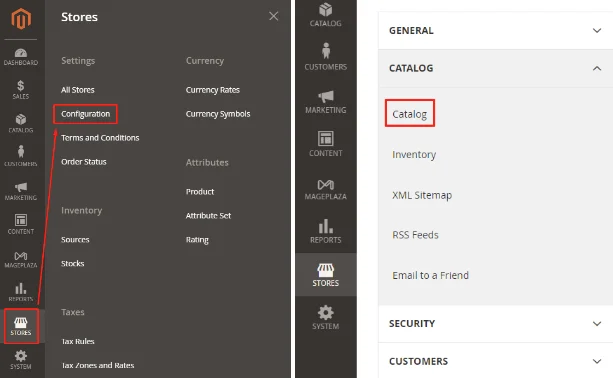
Step 1: Go to Stores > Settings > Configuration > Catalog
Step 2: Expand the Category Top Navigation tab > Specify the number of category levels you want to show in the top navigation menu.
Looking at the category tree below, you will get an idea of how to organize category levels in the backend.
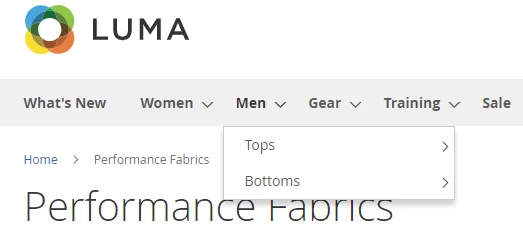
For example, in the backend, if you set the maximal depth to 3, meaning only allow to display level 1, 2, and 3.

Then, the frontend will display the product categories with 3 levels. Level 4 won’t be displayed in the top navigation menu.
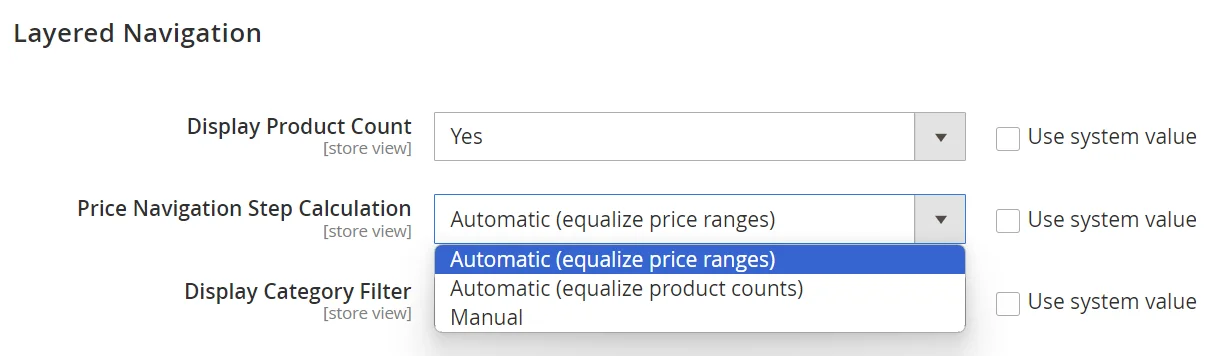
(Optional) If you want to customize the price navigation, scroll up and click on Layered Navigation, uncheck the Use system value boxes, and select the desired option under Price Navigation Calculation.
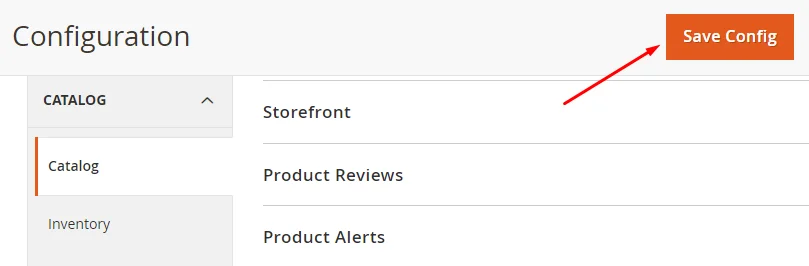
Step 3: After completing, click Save Config to save your settings.
Method 2: With Magento 2 Extension
Using an extension to create a custom navigation menu in Magento 2 helps save time and easily configure advanced features.
To create a custom navigation menu with enhanced features, start by acquiring the Magento 2 Layered Navigation extension.
The Magento 2 Layered Navigation extension enhances the filtering system with AJAX technology, allowing users to find their needed products much faster.
What’s Improved in Layered Navigation Features?
-
Multiple filter selection
-
Smart price slider
-
Diverse filters with trending options
-
Instant search results recommendation
-
Ajax loading
-
Infinite-scrolling
-
Better branding promotion
After purchasing and installing the extension in your Magento 2 store, you can follow the guide to customize Magento 2 Layered Navigation, which will help streamline your customers’ shopping journey.
How to Add Magento 2 Custom Menu Item
Method 1: Using Plugin
Adding a Magento 2 custom menu item with a plugin offers a straightforward, user-friendly approach with minimal coding required. To do this, follow the instructions below:
- Step 1: You need to develop a plugin by creating a di.xml file in the [vendor]/[extension]/etc/frontend/ directory.
<?xml version="1.0"?>
<config xmlns:xsi="http://www.w3.org/2001/XMLSchema-instance"
        xsi:noNamespaceSchemaLocation="urn:magento:framework:ObjectManager/etc/config.xsd">
    <type name="Magento\Theme\Block\Html\Topmenu">
        <plugin name="custom_menu_item" type="[vendor]\[extension]\Plugin\Topmenu" sortOrder="10"
                disabled="false"/>
    </type>
</config>
- Step 2: At [vendor]/[extension]/Plugin/, create Topmenu.php
<?php

namespace [vendor]\[extension]\Plugin;
    use Magento\Framework\Data\Tree\NodeFactory;
    use Magento\Framework\UrlInterface;

    class   Topmenu
    {
        protected $nodeFactory;
        protected $urlBuilder;

        public function __construct(NodeFactory $nodeFactory, UrlInterface $urlBuilder)
        {
            $this->nodeFactory = $nodeFactory;
            $this->urlBuilder = $urlBuilder;
        }

        public function beforeGetHtml(\Magento\Theme\Block\Html\Topmenu $subject, $outermostClass = '', $childrenWrapClass = '', $limit = 0)
        {
            $menuNode = $this->nodeFactory->create(['data' => $this->getNodeAsArray("Profile", "mnuMain"),
                'idField' => 'id',
                'tree' => $subject->getMenu()->getTree(),]);
            $menuNode->addChild($this->nodeFactory->create(['data' => $this->getNodeAsArray("MainMenu", "mnuMyMenu"),
                'idField' => 'id',
                'tree' => $subject->getMenu()->getTree(),]));

            $subject->getMenu()->addChild($menuNode);

        }

        protected function getNodeAsArray($name, $id)
        {
            $url = $this->urlBuilder->getUrl("/" . $id); //here you can add url as per your choice of menu
            return ['name' => __($name),
                'id' => $id,
                'url' => $url,
                'has_active' => false,
                'is_active' => false,];
        }
    }
Method 2: Using Event and Observer
Customizing menu items with events and observers provides a highly flexible solution, allowing for deeper integration and tailored functionality within Magento 2. Follow the instructions to implement it:
- Step 1: At [vendor]/[extension]/etc/frontend, create events.xml file
<?xml version="1.0"?>
<config xmlns:xsi="http://www.w3.org/2001/XMLSchema-instance"
        xsi:noNamespaceSchemaLocation="urn:magento:framework:Event/etc/events.xsd">
    <event name="page_block_html_topmenu_gethtml_before">
        <observer name="Mageplaza_CustomerProfile_observer" instance="[vendor]\[extension]\Observer\Topmenu"/>
    </event>
</config>
- Step 2: At [vendor]/[extension]/Observer, create Topmenu.php file
<?php

namespace [vendor]\[extension]\Observer;
    use Magento\Framework\Event\Observer as EventObserver;
    use Magento\Framework\Data\Tree\Node;
    use Magento\Framework\Event\ObserverInterface;

    class Topmenu implements ObserverInterface
    {
        public function __construct()
        {
        }

        public function execute(EventObserver $observer)
        {
            $menu = $observer->getMenu();
            $tree = $menu->getTree();
            $data = ['name' => __('MyMenu'),
                'id' => 'some-unique-id-here',
                'url' => 'url goes here',
                'is_active' => false];
            $node = new Node($data, 'id', $tree, $menu);
            $menu->addChild($node);
            return $this;
        }
    }
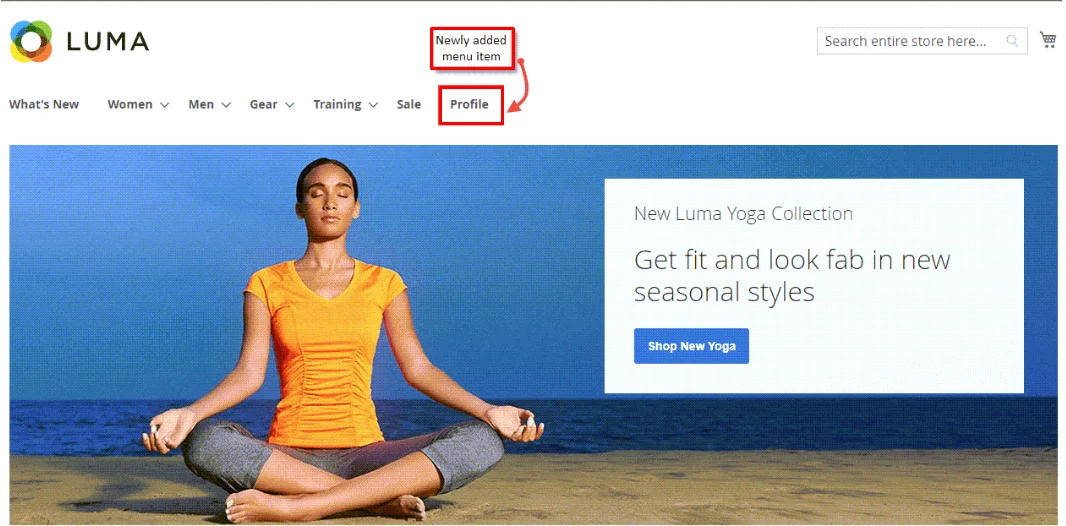
As a result, you will see a new menu item added to your Magento 2 interface.
Conclusion
Creating a custom navigation menu in Magento 2 enhances user experience, boosts customer satisfaction, and improves store performance. Whether you choose a manual setup or use extensions, a well-organized menu helps visitors find what they need quickly.
Implement these strategies to make your Magento 2 store more user-friendly and professional. Start customizing your Magento 2 navigation menu today for better engagement and higher conversion rates.
If you face any challenges, feel free to contact our experts for the most effective assistance.
Table of content

Jacker is the Chief Technology Officer (CTO) at Mageplaza, bringing over 10 years of experience in Magento, Shopify, and other eCommerce platforms. With deep technical expertise, he has led numerous successful projects, optimizing and scaling online stores for global brands. Beyond his work in eCommerce development, he is passionate about running and swimming.
Related Post

1 min read
|
03-30-2026
Magento 2.4.9 Beta Release: What's New?
Magento 2.4.9 beta is here. Stay up to date with every release milestone with this regularly updated guide.
11 mins read
|
03-17-2026

Google Analytics Website Traffic: The A–Z Guide for Magento 2 Store Owners
Learn how to analyze website traffic in Google Analytics 4, identify high-quality traffic sources, and grow your Magento 2 store with data-driven insights.
18 mins read
|
03-17-2026

The Complete Guide to UTM Parameters & Google Analytics for Magento website
Master UTM parameters and Google Analytics for Magento. Track traffic sources, measure campaign performance, and practical tips to use it for better business decisions.
9 mins read
|
10-05-2025

How to implement Cookie Consent for GTM & Google Analytics in Magento Under GDPR?
Implement cookie consent for GTM & GA4 in Magento under GDPR. Step-by-step guide using Google Consent Mode v2 to avoid fines and maintain analytics.
15 mins read
|
02-27-2026
1 min read
|
04-30-2026
1 min read
|
03-30-2026
Magento 2.4.9 Beta Release: What's New?
Magento 2.4.9 beta is here. Stay up to date with every release milestone with this regularly updated guide.
11 mins read
|
03-17-2026
Google Analytics Website Traffic: The A–Z Guide for Magento 2 Store Owners
Learn how to analyze website traffic in Google Analytics 4, identify high-quality traffic sources, and grow your Magento 2 store with data-driven insights.
18 mins read
|
03-17-2026
The Complete Guide to UTM Parameters & Google Analytics for Magento website
Master UTM parameters and Google Analytics for Magento. Track traffic sources, measure campaign performance, and practical tips to use it for better business decisions.
9 mins read
|
10-05-2025
How to implement Cookie Consent for GTM & Google Analytics in Magento Under GDPR?
Implement cookie consent for GTM & GA4 in Magento under GDPR. Step-by-step guide using Google Consent Mode v2 to avoid fines and maintain analytics.
15 mins read
|
02-27-2026