

Magento 2 VAT Number Validation: How to Configure in 5 Steps
VAT (Value Added Tax) number validation in Magento 2 is a feature that enables store owners to validate VAT numbers in real-time during checkout. This functionality is crucial for compliance with tax regulations, as many countries have implemented this measure to prevent fraud and illegal activities.
As a Magento 2 store admin, it’s essential to provide this feature to your customers and ensure the VAT numbers they enter are valid. Configuring VAT ID validation in Magento 2 is straightforward and doesn’t require any coding.
You only need to follow a few simple steps to enable VAT/tax number validation on the front end.
What is Magento 2 VAT ID validation?
VAT ID validation in Magento 2 is crucial for store owners doing business in the European Union (EU). It simplifies tax calculations for B2B transactions by automatically determining the correct tax based on the locations of both the merchant and the customer. Magento 2 validates VAT numbers in real-time using the European Commission’s web services, ensuring accurate tax charges at checkout.
This validation is essential for complying with tax regulations across EU countries and differentiates between types of transactions, including:
1. Transactions where both parties are in the same country.
2. Transactions where parties are in different EU countries.
If both the merchant and the customer are in the same EU country, VAT is charged. However, if they are in different EU countries and are registered EU business entities, VAT is not applied. This ensures accurate tax calculations.
Magento 2 also allows store administrators to configure customer groups, which can be automatically assigned during account creation or address updates. This feature helps differentiate between domestic and intra-EU sales.
Note: For merchants selling virtual or downloadable products, the VAT rate should be based on the customer’s location, whether the sales are intra-union or domestic. This requires setting up individual tax rules for different product classes.
Customer Registration Process for VAT ID Validation in Magento 2
When VAT ID validation is enabled in Magento 2, new customers can enter their VAT ID number during registration. This is particularly useful for business clients who need to be recognized for proper tax handling.
Customers provide their VAT ID along with their address, and Magento 2 sends this information to the European Commission server for validation. This check ensures that the VAT ID is correct and meets the necessary regulations. Based on the server’s response, Magento 2 automatically assigns the customer to one of the default customer groups, which helps manage tax settings and customer privileges.
If a customer or admin updates the VAT ID or associated address, the customer’s group may change. Additionally, Magento 2 might temporarily switch the customer’s group during checkout to ensure accurate tax application for the order.
Store owners also have the option to bypass VAT ID validation for certain customers directly from the Customer Information page, allowing for more personalized management of customer accounts when needed.
Checkout Process for VAT ID Validation in Magento 2
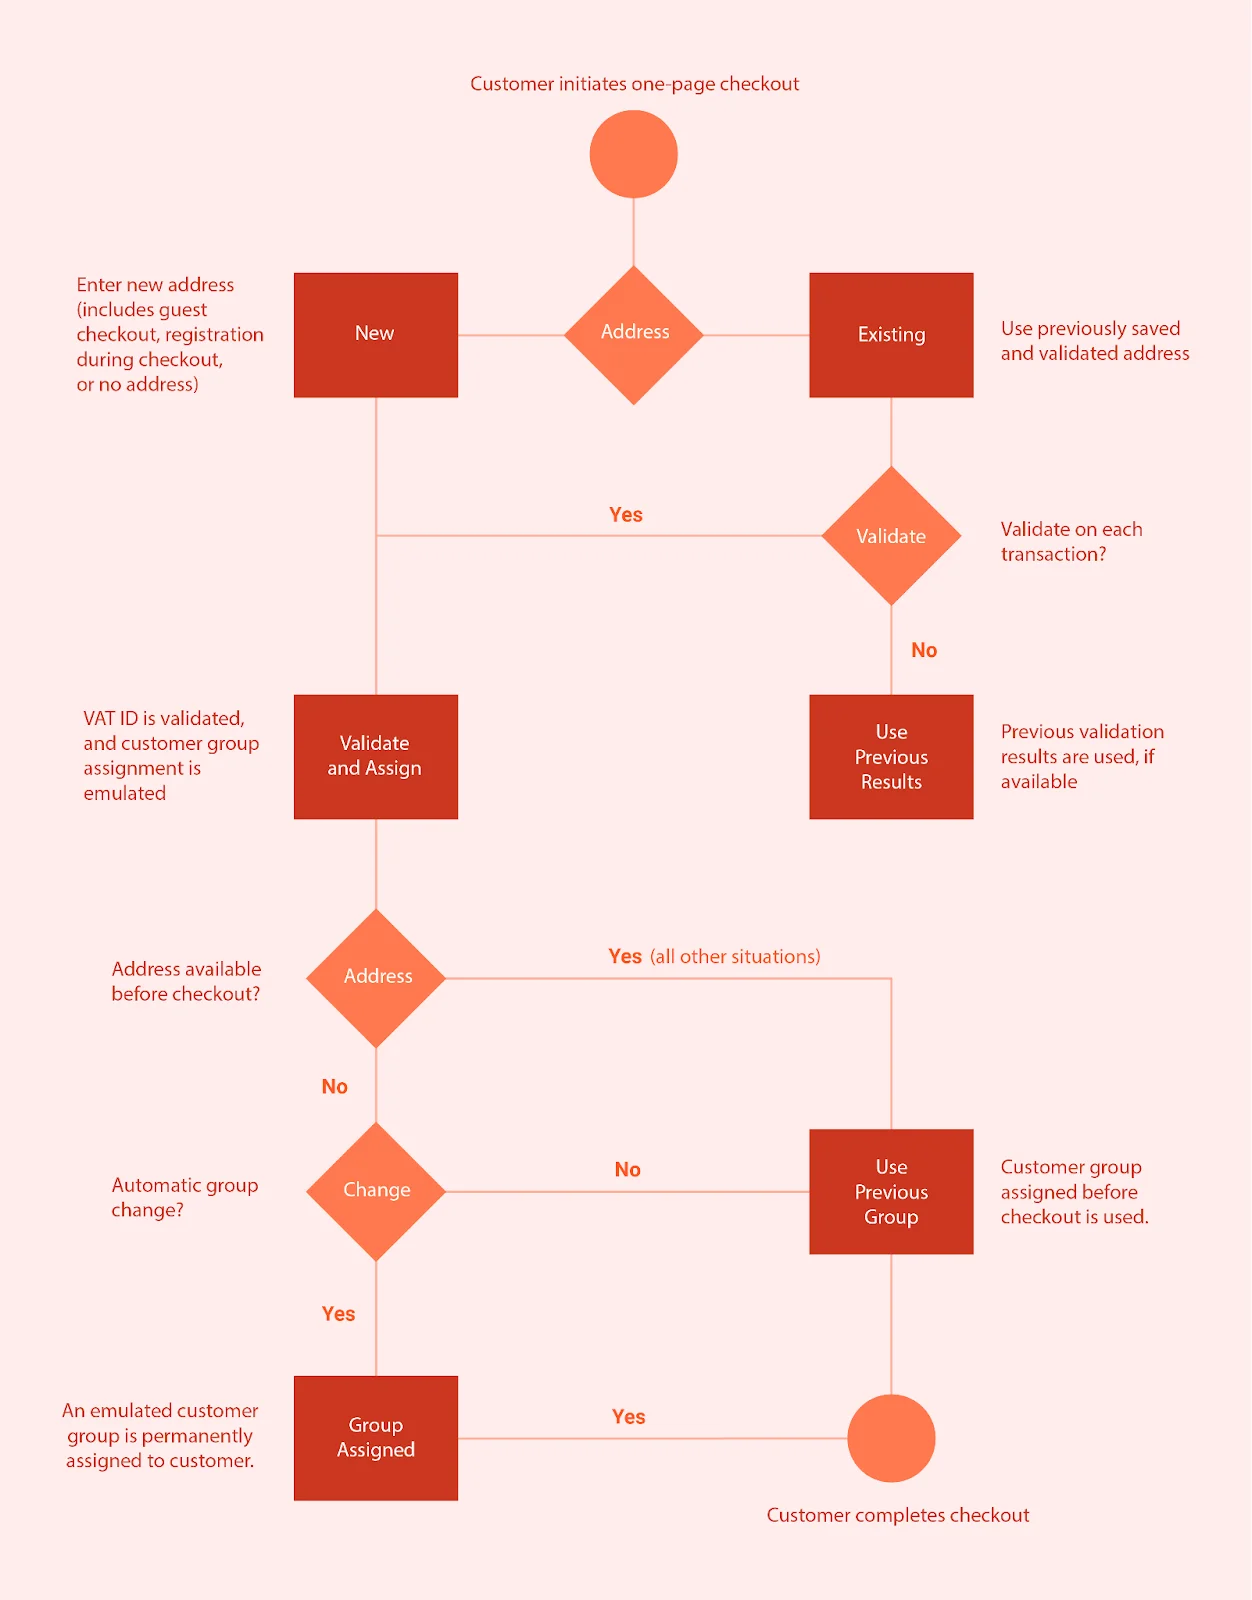
During checkout in Magento 2, when a customer’s VAT number is validated, details like the VAT request identifier and the request date are recorded in the Comments History of the order.
Magento 2’s handling of VAT ID validation and any changes in the customer’s group during checkout is controlled by two settings:
-
Validate on Each Transaction
-
Disable Automatic Group Change
These settings allow store owners to adjust the VAT validation process to fit their business needs.
If a customer uses an external payment method, such as Google Express Checkout or PayPal Express Checkout, the checkout is managed by the external platform. In these cases, the “Validate on Each Transaction” setting does not apply, and the customer’s group remains unchanged during checkout.
Tax Rules for Validating VAT ID
First, create customer groups that reflect the different types of customers you have. Next, set up tax classes, rates, and rules related to these groups. Finally, enable VAT ID validation for your store and complete the setup.
-
Customer Groups: Categorize your customers into groups, such as businesses or individual shoppers. This categorization determines if they should be charged VAT.
-
Tax Classes: Assign tax classes to your products and customers. These classes help determine the appropriate tax for different items or services you sell.
-
Tax Rates: Set specific tax percentages based on the customer’s location and your location. You’ll define different rates for various regions or countries, following their VAT regulations.
-
Tax Rules: Use customer groups, tax classes, and tax rates to determine the correct tax amount. For VAT ID validation, create rules that apply when a business customer provides a valid VAT number.
| Tax Rule #1 | |
|---|---|
| Customer Tax Class | These categories are intended for your clientele. Three kinds are required: One is for clients who are domestic. One is for clients whose VAT ID is entered incorrectly. One for clients who do not check out using their VAT ID. |
| Product Tax Class | All product kinds are included in the product tax class, with the exception of virtual and bundle products. |
| Tax Rate | The VAT rate that applies in your nation should be selected. |
| Tax Rule #2 | |
|---|---|
| Customer Tax Class | These categories are intended for your clientele. Three kinds are required: One is for clients who are domestic. One is for clients whose VAT ID is entered incorrectly. One for clients who do not check out using their VAT ID. |
| Product Tax Class | All product kinds are included in the product tax class, with the exception of virtual and bundle products. |
| Tax Rate | The VAT rate that applies in your nation should be selected. |
| Tax Rule #3 | (Required for virtual and downloadable products) |
|---|---|
| Customer Tax Class | A category for local clients. a category for clients with erroneous VAT IDs. A class that does not pass VAT ID validation. |
| Product Tax Class | A virtual products class. |
| Tax Rate | It needs to be in line with the VAT rate that applies in your nation. |
| Tax Rule #4 | (Required for virtual and downloadable products) |
|---|---|
| Customer Tax Class | A class for clients inside the same union. |
| Product Tax Class | A virtual products class. |
| Tax Rate | Currently, the rate is 0% for sales to other EU nations (apart from the country where your store is based). |
How to Set Up VAT ID Validation in Magento 2
Step 1: Create Customer Groups for VAT
Magento 2 uses four customer groups for VAT ID validation:
-
Local customers
-
EU customers
-
Customers with an invalid VAT ID
-
Customers with a VAT ID verification failure
You can either use the default groups or create new ones for VAT purposes. Assign customers to these groups based on their VAT ID status.
Step 2: Set Up Tax Classes, Rates, and Rules for VAT
To set up VAT correctly, you need to configure:
-
Customer Tax Classes: Define which tax class each customer belongs to.
-
Product Tax Classes: Determine which tax class applies to each product.
-
Tax Rates: Set the tax rates for different regions or countries.
Create tax rules that include these components to use VAT ID validation effectively.
Step 3: Enable VAT ID Validation Settings
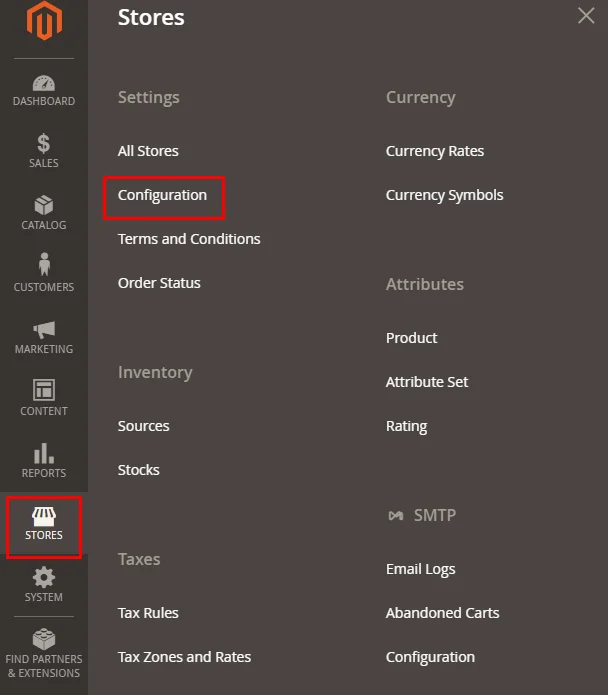
- Go to the Magento Admin sidebar and select Stores > Settings > Configuration.

-
Choose the Store View you want to configure if needed.
-
Under the Customers section, click on Customer Configuration.
-
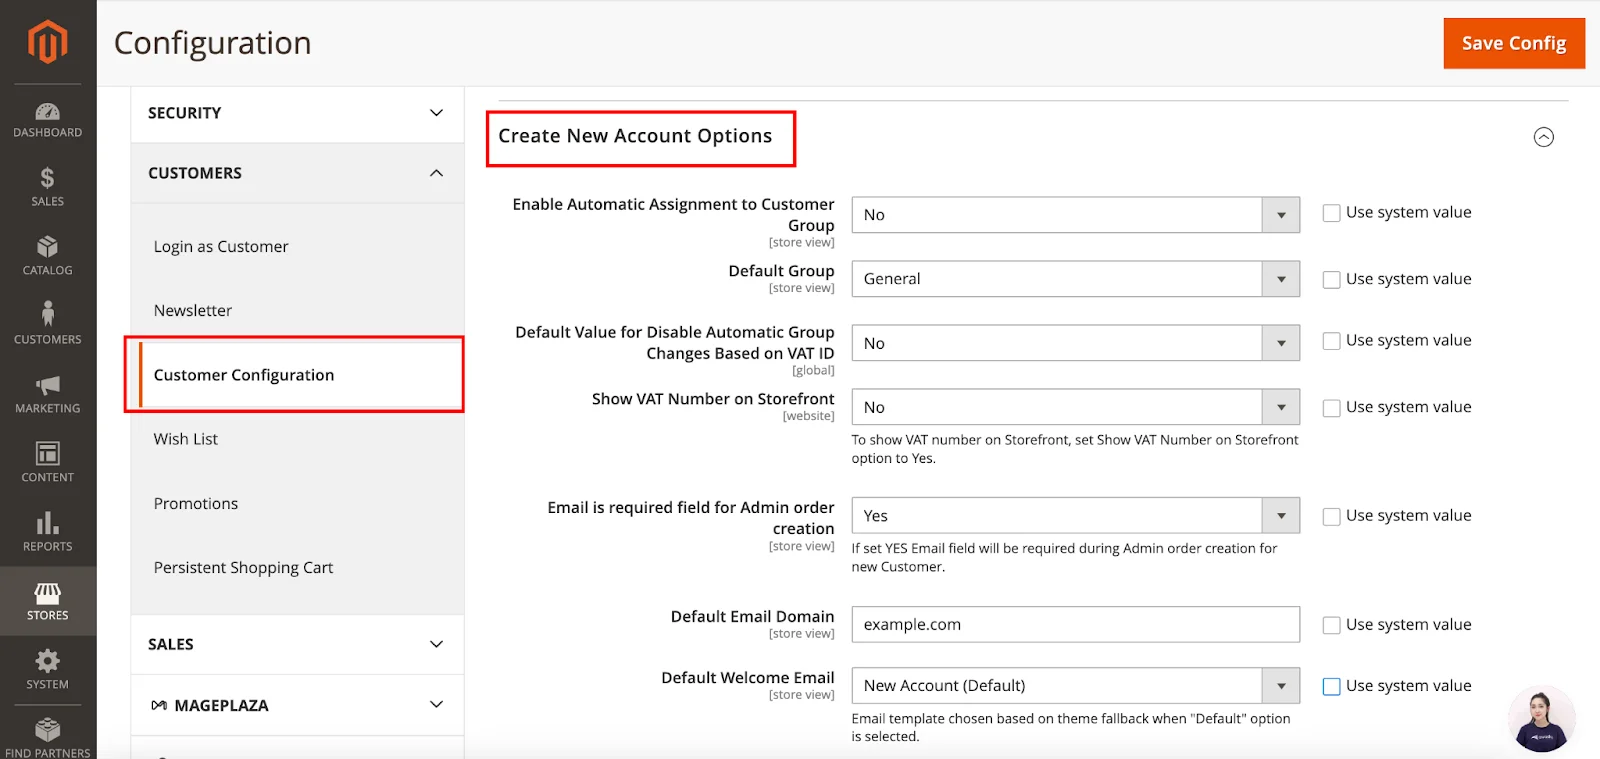
Find the Create New Account Options section and expand it.
-
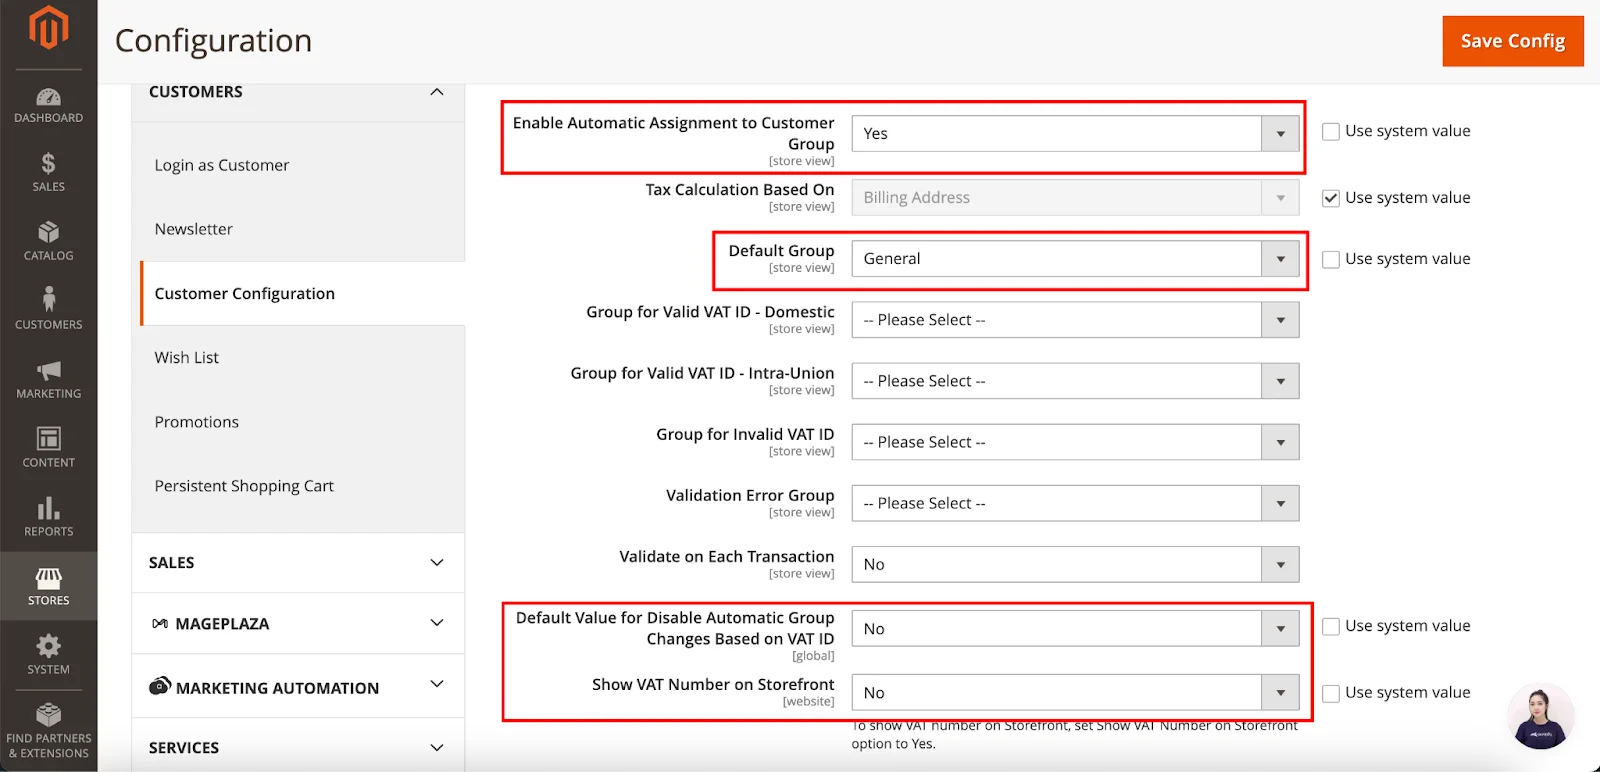
Set Enable Automatic Assignment to Customer Group to Yes.
-
Fill in the required fields:
-
Default Group: Choose the default customer group.
-
Default Value for Disable Automatic Group Changes Based on VAT ID: Set according to your preference.
-
Show VAT Number on Storefront: Decide if you want VAT numbers displayed on your site.
- Click Save Config to apply your changes.
Step 4: Register Your VAT ID and Country
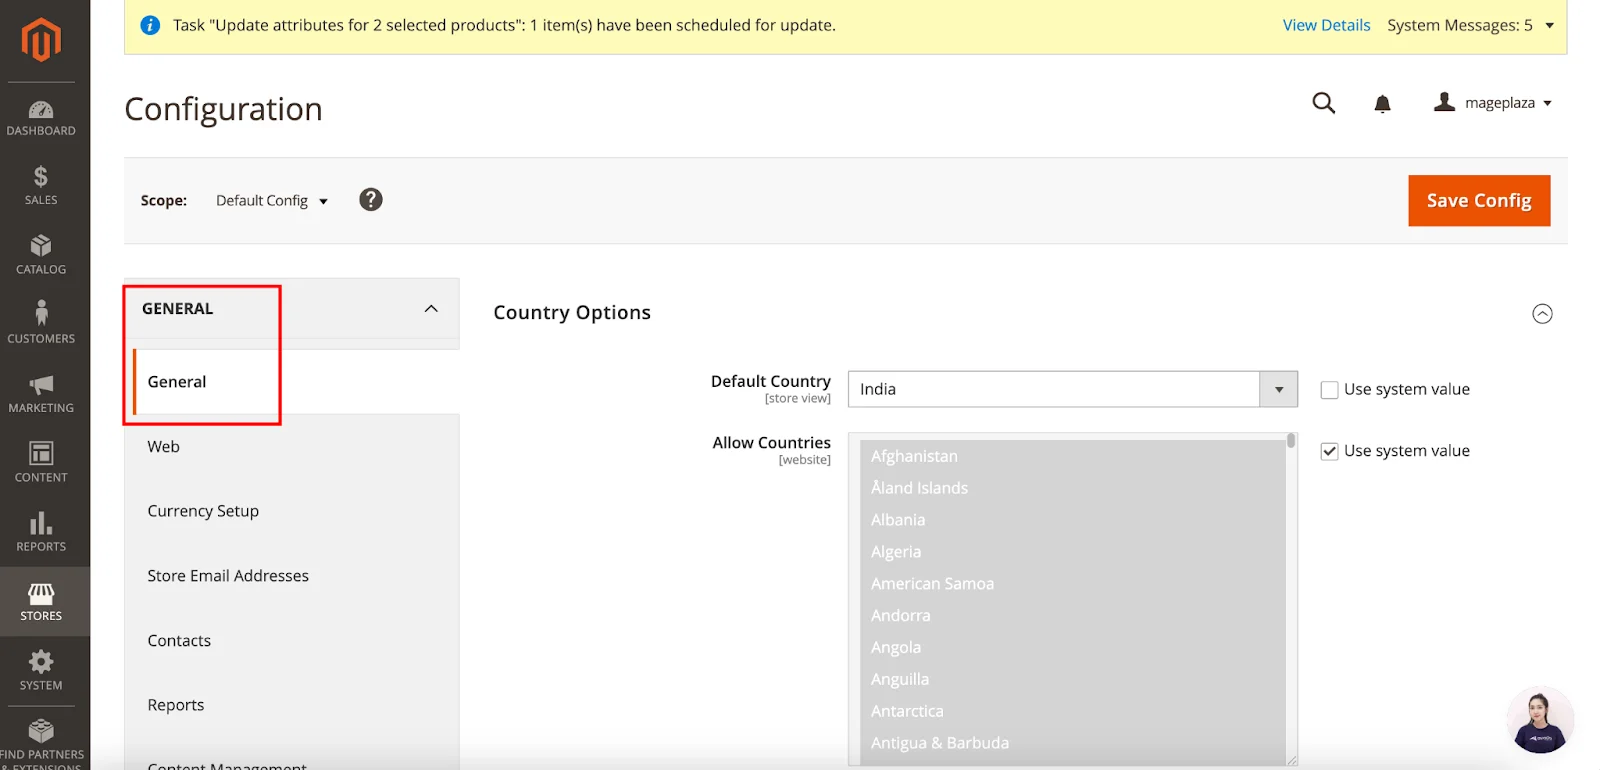
- Go to Stores > Settings > Configuration.
- Under the General section, select General again.
- Scroll to the Store Information section and expand it.
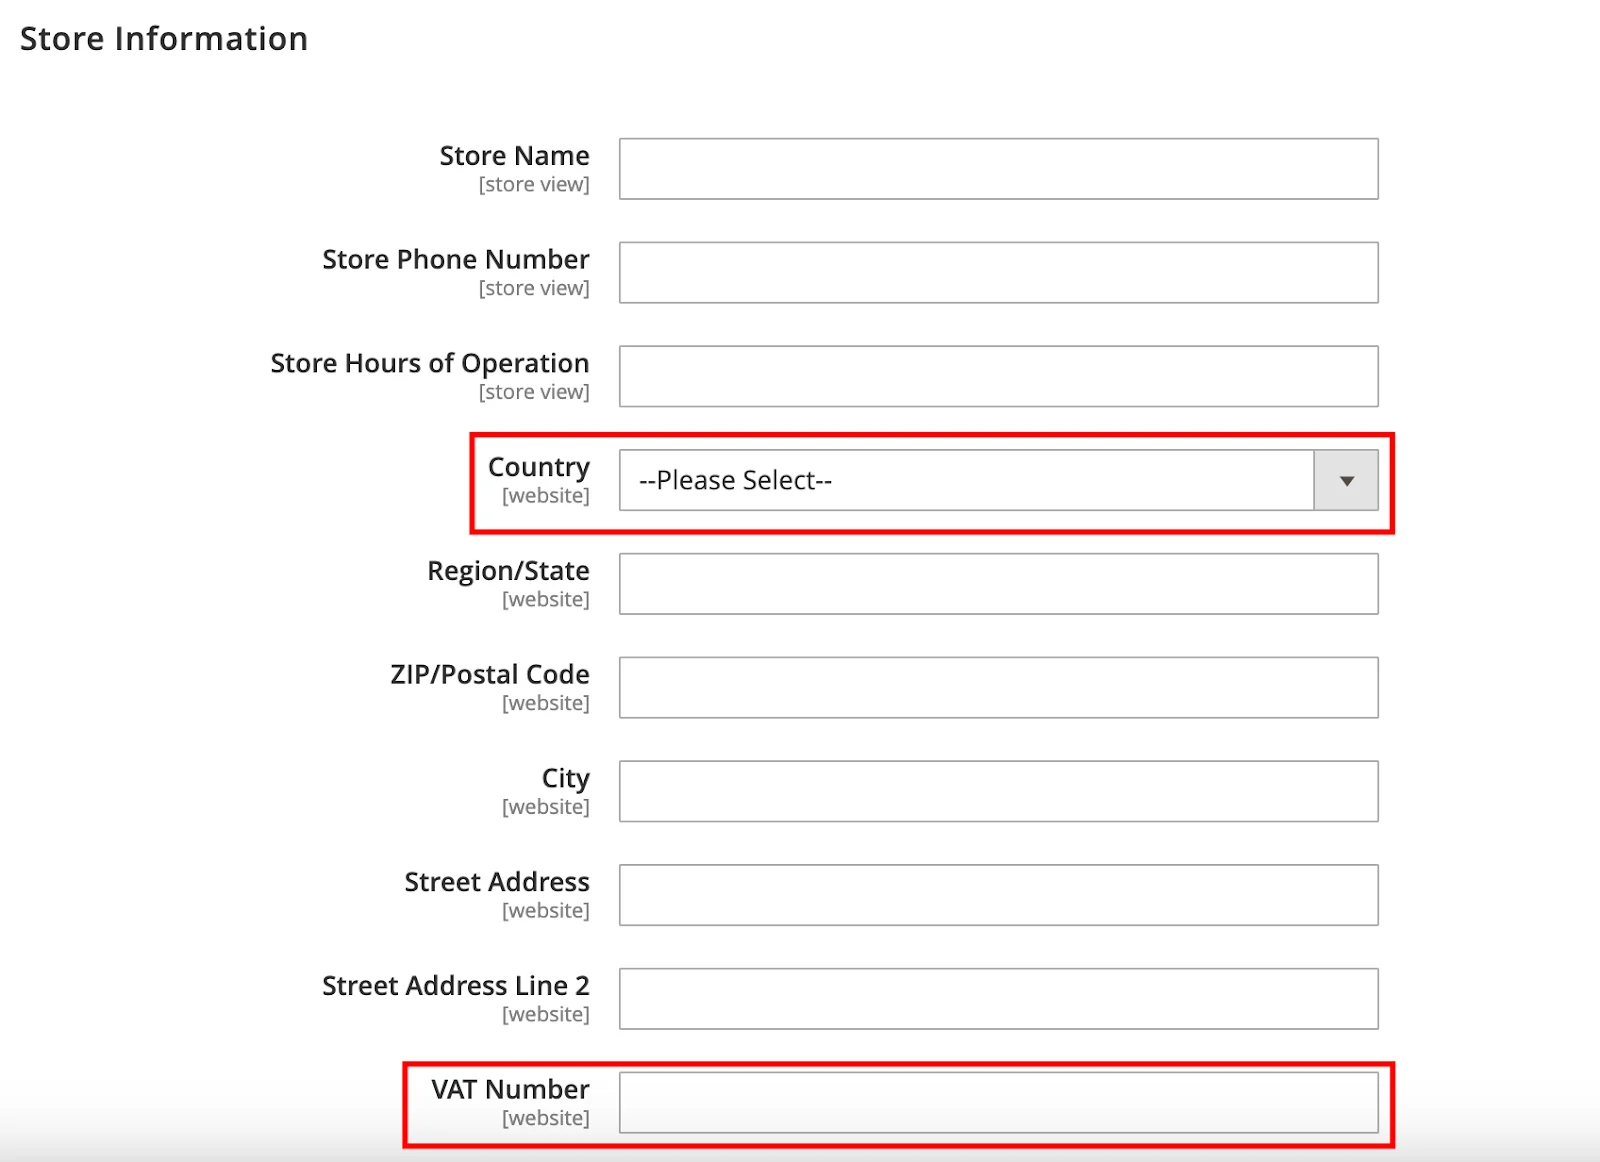
-
Choose your Country from the dropdown menu.
-
Enter your VAT number in the designated field and click Save Config to apply your settings.
Step 5: Check EU Member Countries
- Go to Stores > Settings > Configuration, then under General, find and expand the Countries Options section.
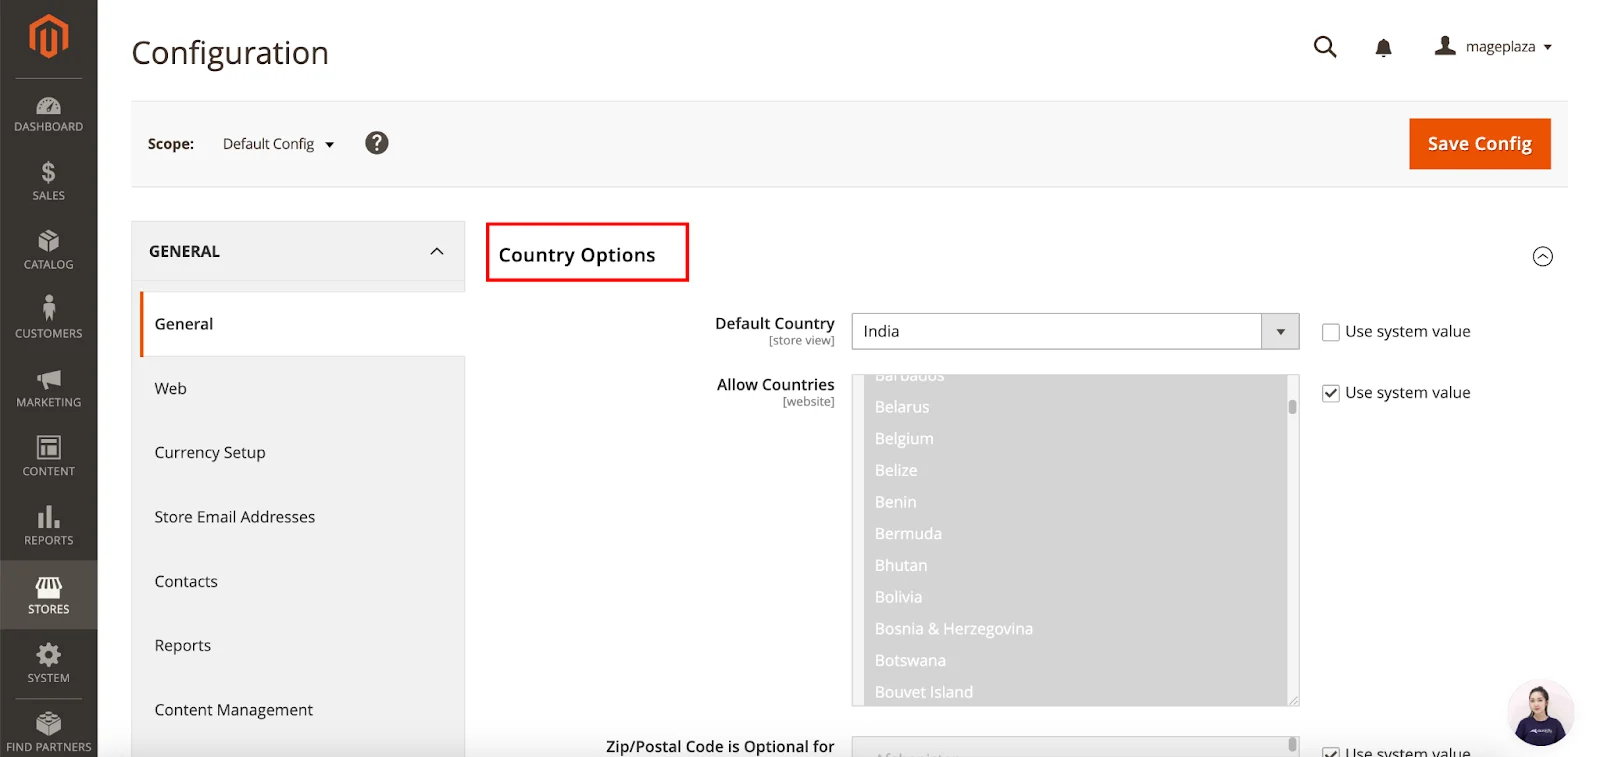
-
Check the list of European Union Countries to ensure all current EU member countries are included.
-
If needed, deselect Use system values. Then, while holding the Ctrl key (PC) or Command key (Mac), select or deselect countries as necessary.
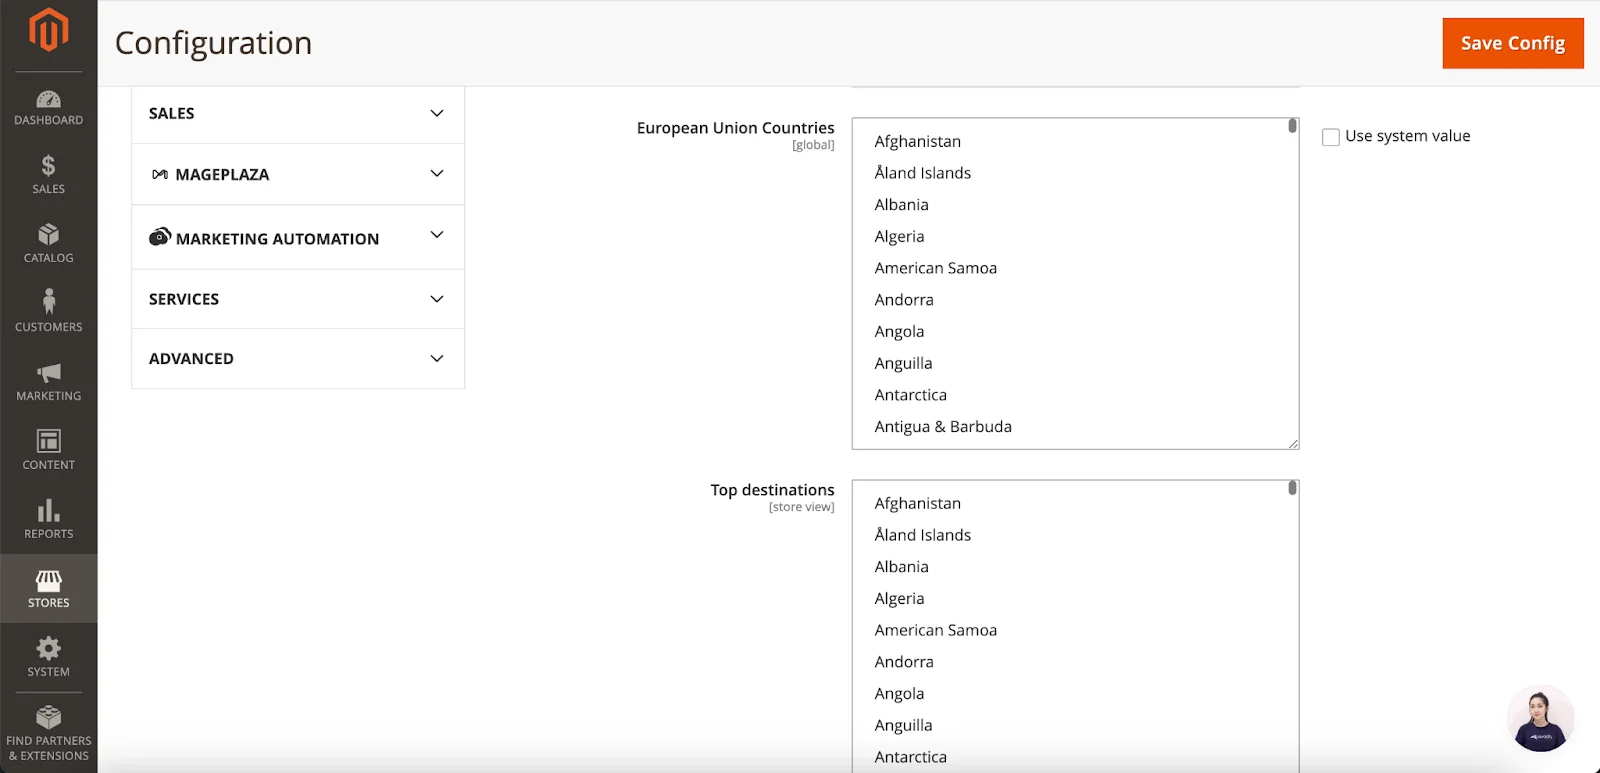
- Click Save Config to finalize your changes.
FAQs
1. What is VAT number validation in Magento 2?
VAT number validation in Magento 2 is a feature that allows store owners to verify VAT numbers during the checkout process. It ensures compliance by checking VAT numbers in real time based on the locations of both the merchant and the customer.
2. How do I enable VAT number validation in Magento 2?
To activate VAT number validation in Magento 2, go to the configuration settings in your Magento 2 store (like we have guided above). From there, you can set up VAT ID validation by configuring customer groups, tax classes, rates, and rules related to VAT.
3. What steps are involved in setting up VAT number validation in Magento 2?
Setting up VAT number validation in Magento 2 involves configuring customer groups, tax classes, rates, and rules. Additionally, you need to enable VAT ID validation in the Magento 2 admin panel to ensure VAT numbers are checked during checkout.
4. Can I display VAT numbers on my Magento 2 store?
Yes, you can display VAT numbers on your Magento 2 store. You can enable this option in the configuration settings, allowing customers to enter their VAT numbers during registration or checkout for validation.
5. How do I implement VAT number validation in Magento 2?
To implement VAT number validation in Magento 2, configure the settings in your Magento 2 store to enable VAT ID validation during checkout. This ensures that the VAT numbers customers enter are checked in real time to maintain tax compliance.
6. Where can I find more information about VAT number validation in Magento 2?
For more information about VAT number validation in Magento 2, refer to the official Magento documentation. You can also get help from Magento experts and explore online resources and forums for additional tips and best practices.
7. How does Magento 2 handle VAT number validation for external payment methods?
When using external payment methods, Magento 2 records details such as the VAT request identifier and the request date in the order’s Comments History. The “Validate on Each Transaction” setting does not apply in these cases, and the customer’s group remains unchanged during checkout.
Conclusion
By following these steps carefully, you’ll successfully complete the VAT Number Validation setup in Magento 2. As noted, the process is straightforward and involves no complex steps.
Give it a try, and see how it works for you. If you encounter any issues along the way, feel free to leave a comment. We’re here to help!

Jacker is the Chief Technology Officer (CTO) at Mageplaza, bringing over 10 years of experience in Magento, Shopify, and other eCommerce platforms. With deep technical expertise, he has led numerous successful projects, optimizing and scaling online stores for global brands. Beyond his work in eCommerce development, he is passionate about running and swimming.
Related Post

Review 74 Mageplaza extension updates from April 2025, highlighting Magento 2.4.8 compatibility, Hyvä theme support, and enhanced functionalities.

Social Media Marketing: Your Ultimate Guide to Skyrocketing Engagement - Mageplaza
Discover a step-by-step framework for effective social media marketing. Learn how to optimize content, run ads, track KPIs, and future-proof your strategy across all major platforms.
The Ultimate Guide to Managing Your E-Commerce Website for Maximum Sales - Mageplaza
Discover simple tips to manage your eCommerce website, boost sales, and grow your online business effortlessly. Learn now!
Review 74 Mageplaza extension updates from April 2025, highlighting Magento 2.4.8 compatibility, Hyvä theme support, and enhanced functionalities.
Social Media Marketing: Your Ultimate Guide to Skyrocketing Engagement - Mageplaza
Discover a step-by-step framework for effective social media marketing. Learn how to optimize content, run ads, track KPIs, and future-proof your strategy across all major platforms.
The Ultimate Guide to Managing Your E-Commerce Website for Maximum Sales - Mageplaza
Discover simple tips to manage your eCommerce website, boost sales, and grow your online business effortlessly. Learn now!