

1 min read
|
03-30-2026
How to Add Custom Tab in Product Page Magento 2
Vinh Jacker | 03-17-2025
Product details play an important role in customer experience, so it’s critical to let customers understand what they are going to buy. But a product page shouldn’t be flooded with too much information.
Adding tabs is a great way to help you reduce information overloading as it can organize large content into easily digestible data chunks. Using this method, all the information which is related to a specific subject will be provided without overwhelming users.
As a result, users can quickly navigate through all the content at the same time from just one tab, which would simply facilitate access to information without negatively impacting your SEO and site ranking. Therefore, in this post, I will show you the way to create a custom tab in Magento 2 Product Page.
8 steps to add a Custom Tab to the Product Page in Magento 2:
- Step 1: Create a Magento 2 new attribute for the custom tab
- Step 2: Choose or make an attribute set for Magento product tabs
- Step 3: Configure the custom product tab
- Step 4: Define the templates and layout files
- Step 5: Rename the product tabs
- Step 6: Remove product tabs
- Step 7: Add custom tab
- Step 8: Add related products in tabbed navigation
Step 1: Create a Magento 2 new attribute for the custom tab
-
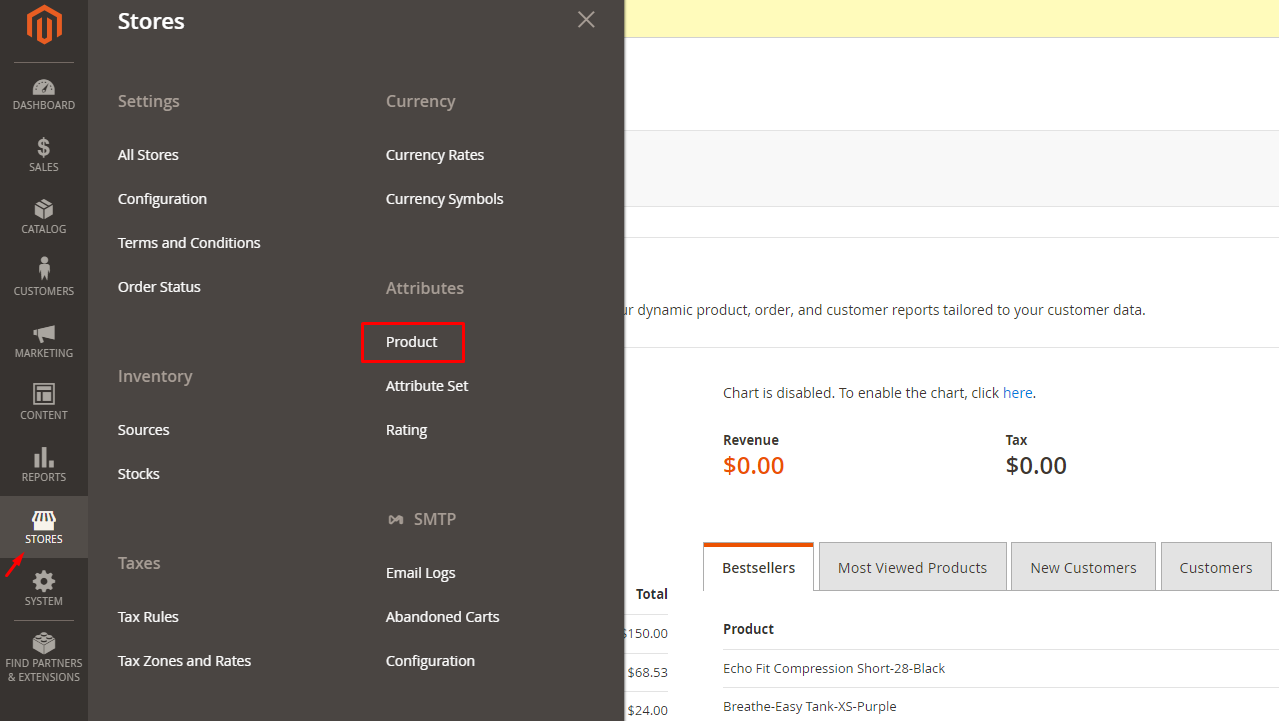
Log in to your Magento Admin Panel.
-
Navigate to
Stores > Attributes > Product.
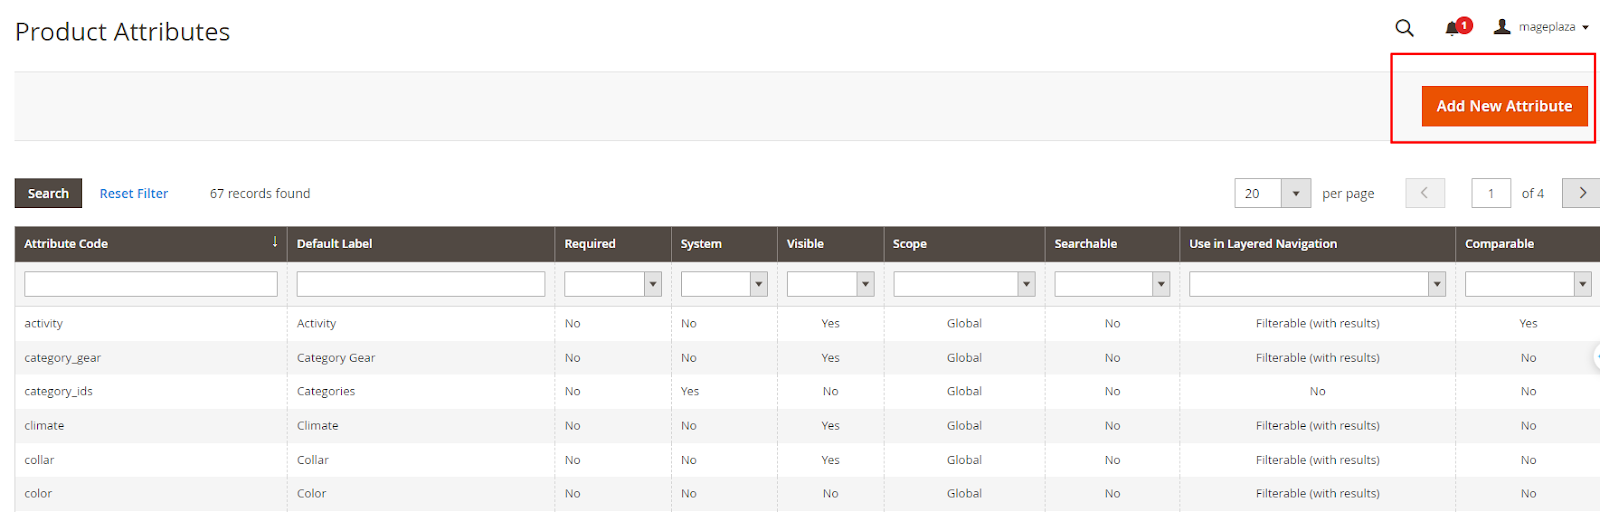
- Click on
Add New Attribute.
- Set the
Default Labelas Test and theAttribute Codeas “test”.
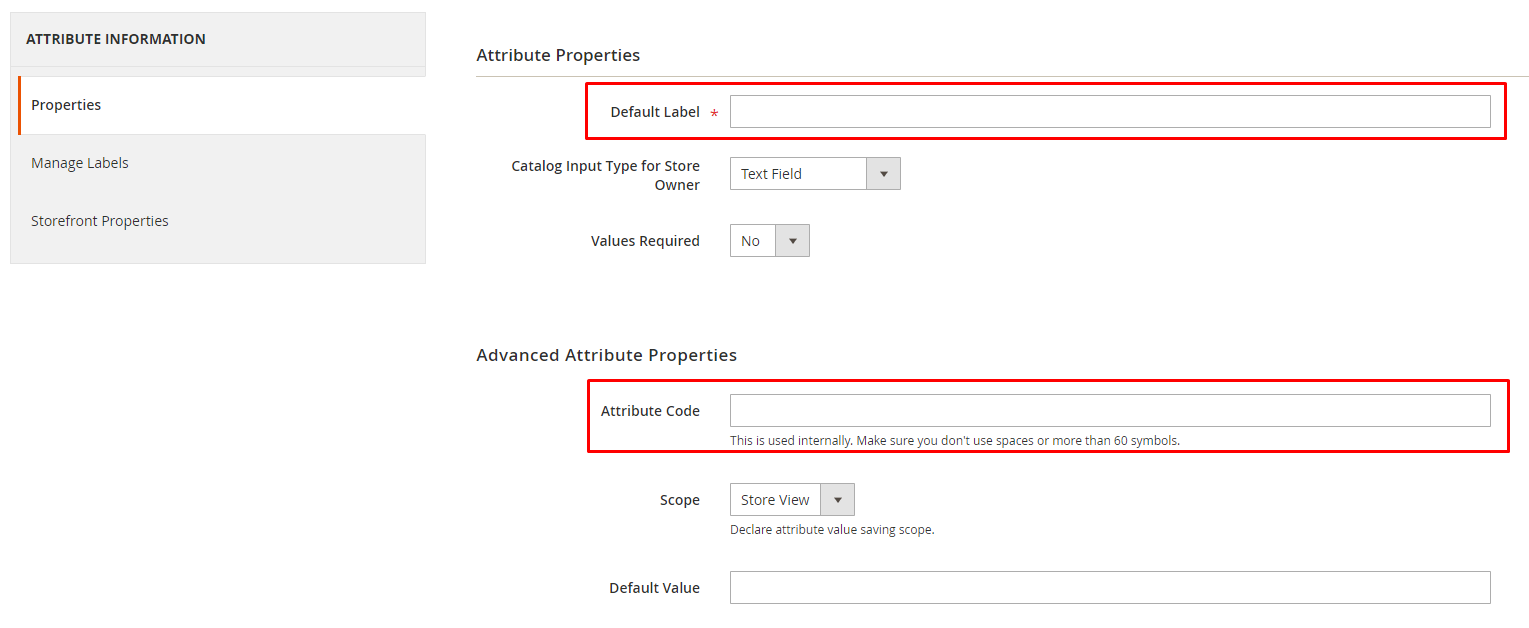
- Click
Save Attribute.
Then, you can see the test attribute in the list below:

Step 2: Choose or make an attribute set for Magento product tabs
- Go to
Stores > Attribute Set.
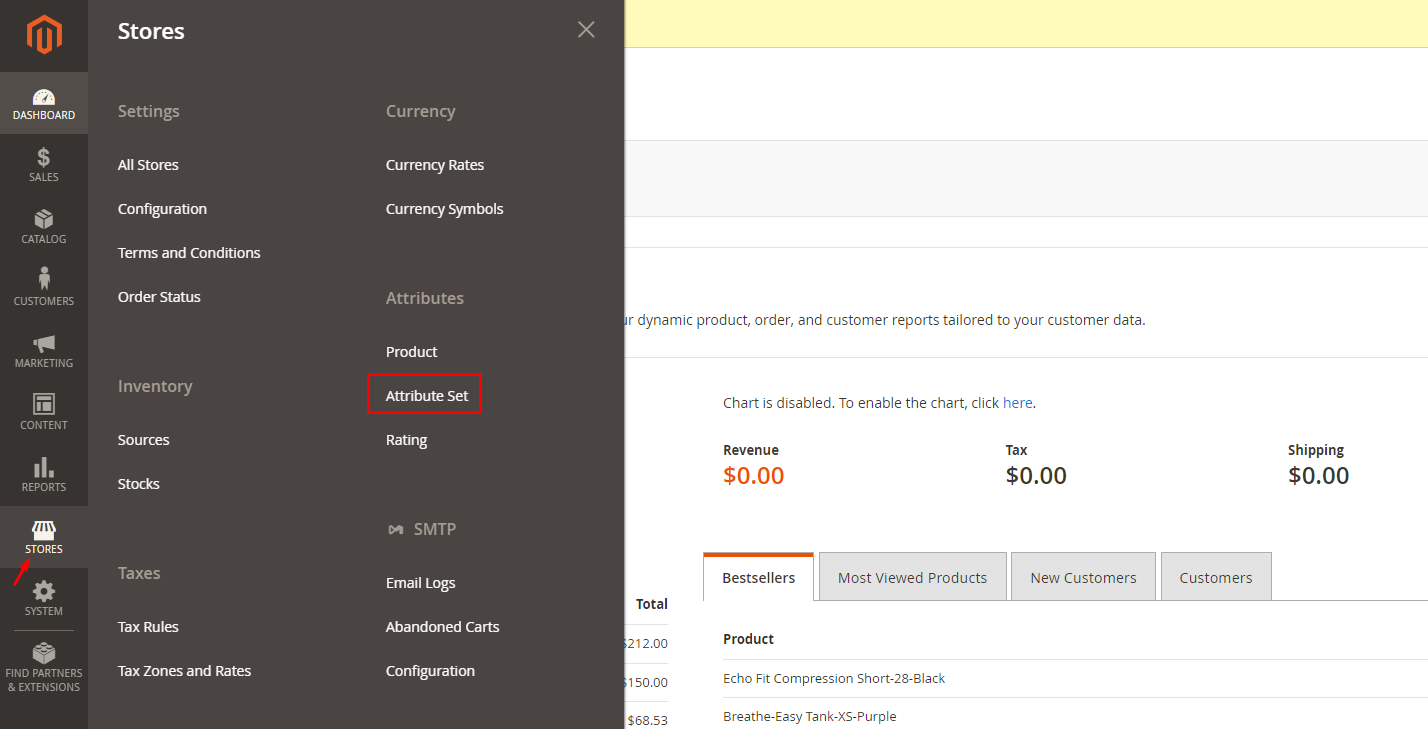
- If you haven’t created an Attribute Set yet, click on
Add Attribute Set.

- Enter “shirt” as the Attribute Set Name.
-
Click on the newly created “shirt” Attribute Set.
-
Move “test” from unassigned to Product Details by drag and drop
testattribute -
Drag and drop the “test” attribute from the unassigned section to the
Product Detailssection
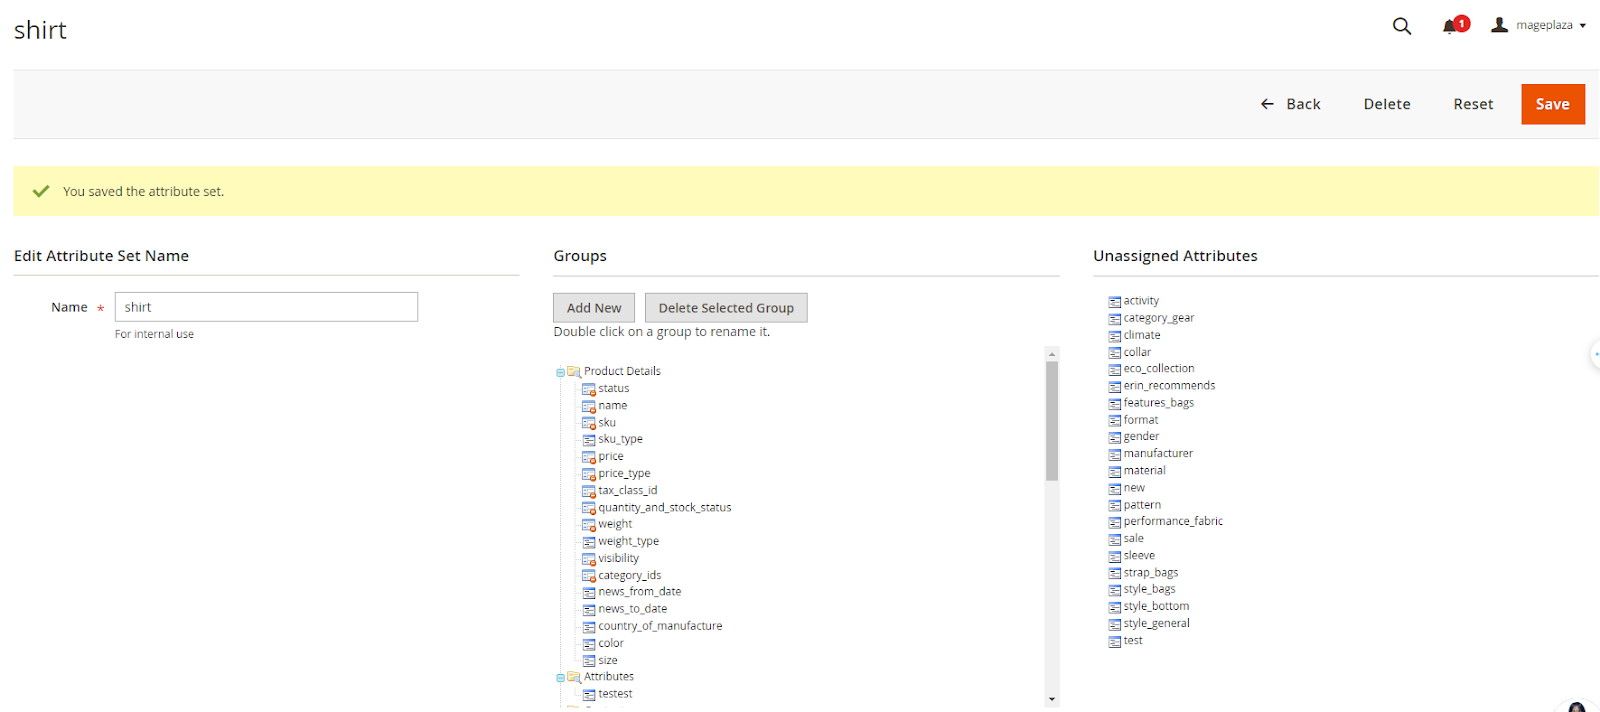
- Click
Save.
Step 3: Configure the custom product tab
-
Open the product edit page in the Admin Panel.
-
Set the template name as “shirt”.
-
Add the
testattribute. -
Click
Save.
Now you’ll see the new “test” attribute set on the product edit page. Remember to update the attribute set and save your changes.
Step 4: Define the templates and layout files
Firstly, you need to define which templates and layout files that you are going to customize. An effective method which can help you to do this is enabling Template Path Hints and adding Block Names to Hints via Magento admin. Please follow this: Stores > Configuration > Advanced > Developer > Debug. Now, you will see that the Magento module which is responsible for product info tabs is module-catalog. You can start your customization now.
Step 5: Rename the product tabs
Before setting another title for the product tab, you need to override base layout file catalog_product_view.xml which can be found inside the vendor/module_catalog folder.
The standard way to override this file is to create a new layout file inside your theme scope and then name it just like the base file.
Following is how your file path will look like:
app/design/frontend/<Mageplaza>/<Theme>/Magento_Catalog/layout/catalog_product_view.xml
And this is the code which is inside the file:
<?xml version="1.0"?>
<page layout="1column" xmlns:xsi="http://www.w3.org/2001/XMLSchema-instance";; xsi:noNamespaceSchemaLocation="urn:magento:framework:View/Layout/etc/page_configuration.xsd">
  <body>
    <referenceBlock name="product.info.details">
      <referenceBlock name="product.info.description">
        <arguments>
          <argument name="title" translate="true" xsi:type="string">Description</argument>
        </arguments>
      </referenceBlock>
    </referenceBlock>
  </body>
</page>
In the above code, the first layout handler <referenceBlock name="product.info.details"> is used to reference your product tabbed navigation as a whole. Meanwhile, the child handler <referenceBlock name="product.info.description"> reference individual tab, in this example is your case details tab.
By using <argument name="title" translate="true" xsi:type="string"> you can set new title for your tab. Note that the handler <arguments> is just a container for <argument> and it does not have it’s own attributes.
Step 6: Remove product tabs
Removing product tabs is quite a simple task. You just need to reference your target block and set the remove attribute to true.
Bellow is the catalog_product_view.xml:
<?xml version="1.0"?>
<page layout="1column" xmlns:xsi="http://www.w3.org/2001/XMLSchema-instance";; xsi:noNamespaceSchemaLocation="urn:magento:framework:View/Layout/etc/page_configuration.xsd">
  <body>
    <referenceBlock name="product.info.review" remove="true" />
  </body>
</page>
Step 7: Add custom tab
Bellow is the way you can add a custom tab to your product page:
Firstly, go to Magento admin and create a new attribute. Then, name it Packaging and add it to default attribute set.
After finishing the above step, you need to create a new template file. The file can be named as packaging-content.phtml and be saved in app/design/frontend/<Magplaza>/<Theme>/Magento_Catalog/templates/product/view/.
Next, paste this code to the file:
<?php
$_helper = $this->helper('Magento\Catalog\Helper\Output');
$_product = $block->getProduct();
$_code = $block->getAtCode();
$_className = $block->getCssClass();
$_attributeLabel = $block->getAtLabel();
$_attributeType = $block->getAtType();
$_attributeAddAttribute = $block->getAddAttribute();
if ($_attributeLabel && $_attributeLabel == 'default') {
    $_attributeLabel = $_product->getResource()->getAttribute($_code)->getFrontendLabel();
}
  $_attributeValue = $_product->getResource()->getAttribute($_code)->getFrontend()->getValue($_product);
?>

<?php if ($_attributeValue): ?>
    <div class="packaging-content" <?php  echo $_attributeAddAttribute;?>>
        <?php echo $_attributeValue; ?>
    </div>
<?php endif; ?>
Make sure that the N.B. attribute set match with the string value in your if statement which is in line number 9.
Finally, place the below code in your layout file catalog_product_view.xml:
<?xml version="1.0"?>
<page layout="1column" xmlns:xsi="http://www.w3.org/2001/XMLSchema-instance";; xsi:noNamespaceSchemaLocation="urn:magento:framework:View/Layout/etc/page_configuration.xsd">
  <body>
    <referenceBlock name="product.info.details">
      <block class="Magento\Catalog\Block\Product\View\Description" name="packaging-content" template="Magento_Catalog::product/view/packaging-content.phtml" group="detailed_info">
        <arguments>
          <argument name="at_call" xsi:type="string">getPackaging</argument>
          <argument name="at_code" xsi:type="string">packaging</argument>
          <argument name="css_class" xsi:type="string">packaging</argument>
          <argument name="at_label" xsi:type="string”>packaging</argument>
          <argument name="add_attribute" xsi:type="string">itemprop="packaging"</argument>
          <argument name="title" translate="true" xsi:type="string">Packaging content</argument>
        </arguments>
      </block>
    </referenceBlock>
  </body>
</page>
Step 8: Add related products in tabbed navigation
In order to add related products in tabbed navigation, there will be two files which you will need to edit, which are template and layout.
With the template file, name it as related-products.phtml and save in app/design/frontend/<Mageplaza>/<Theme>/Magento_Catalog/templates/product/. The file will only have one code line:
<?php echo $this->getBlockHtml('catalog.product.related'); ?>
The layout file which named catalog_product_view.xml will look like this:
<?xml version="1.0"?>
<page layout="1column" xmlns:xsi="http://www.w3.org/2001/XMLSchema-instance";; xsi:noNamespaceSchemaLocation="urn:magento:framework:View/Layout/etc/page_configuration.xsd">
  <body>
    <!— 1st Code Block: Get Related Products as new tab -->
    <referenceBlock name="product.info.details">
      <block class="Magento\Catalog\Block\Product\View" name="deliveryinfo.tab" as="deliveryinfo" template="Magento_Catalog::product/related-products.phtml" group="detailed_info" >
        <arguments>
          <argument translate="true" name="title" xsi:type="string">Related Products</argument>
        </arguments>
      </block>
    </referenceBlock>

    <!— 2nd Code Block: Move original block to product info tabs -->
    <move element="catalog.product.related" destination="product.info.details" />
  </body>
</page>
The first code is for setting up a new tab with related products. The second code is used to change your upsell-products.phtml template file to this:
<?php echo $this->getBlockHtml('product.info.upsell'); ?>
Here are some customizations you need to make in your layout file:
- Line 6: change template file’s name to
upsell-products.phtml. - Line 8: title your tab to
You might be interested. - Line 14: element the attribute to
product.info.upsell.
Add Custom Tab in Product Page Using an Extension
Adding custom tabs to your Magento 2 product page can be much simpler with the help of a third-party extension. There are many options available in the market, and to give you a clear idea of how these tools work, we’ll use one as an example. While most extensions share a similar setup process, they differ in the features they offer. Let’s take the Meetanshi Magento 2 Product Tabs extension as an example to explore how these solutions can streamline your product page customization.
Step 1: Install & configure the module
Step 2: Set up general configuration
Go to Stores > > Configuration > Custom Tabs to visit the general setups for this plugin.
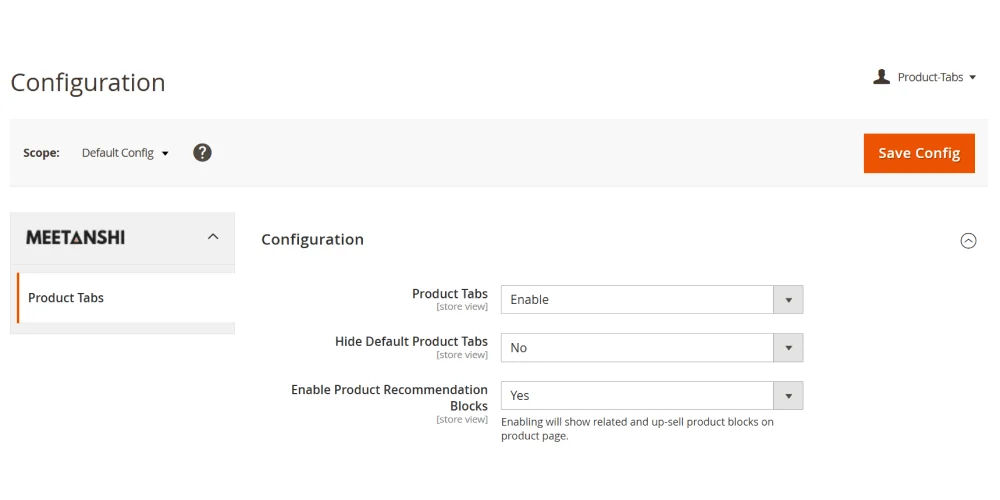
- Product Tabs: Choose Enable to activate the extension
- Hide Default Product Tabs: Select Yes/No to approve/disapprove hiding Magento’s default product tabs
- Enable Product Recommendation Blocks: Select Yes to show related, cross-sell, and up-sell product blocks on the product page
Step 3: Add new product tabs
Next, navigate to Catalog > Product Tabs > Manage Product Tabs. This is where you add a new product tab.
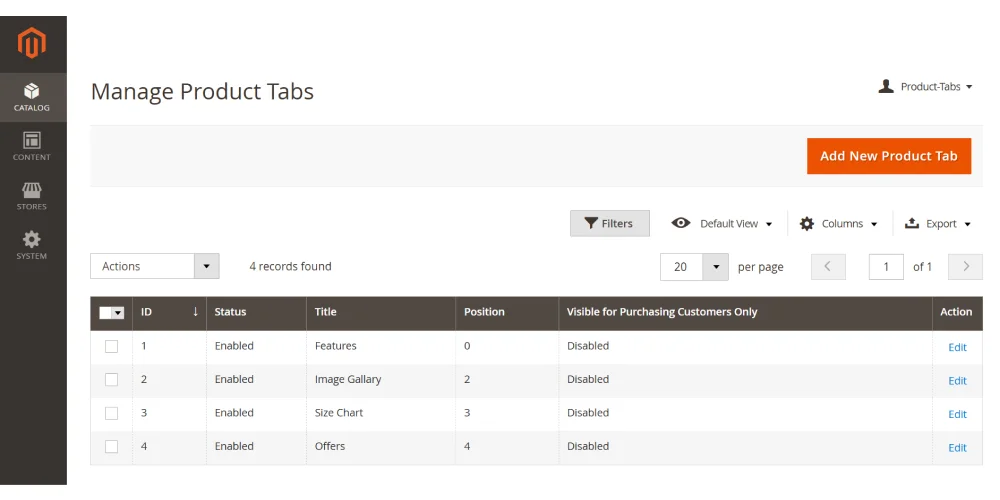 Press the Add New Product Tab button on the top-right corner and start creating a new product tab button.
Then, you will see a page allowing you to customize the product tab. Follow our instructions below.
General Settings:
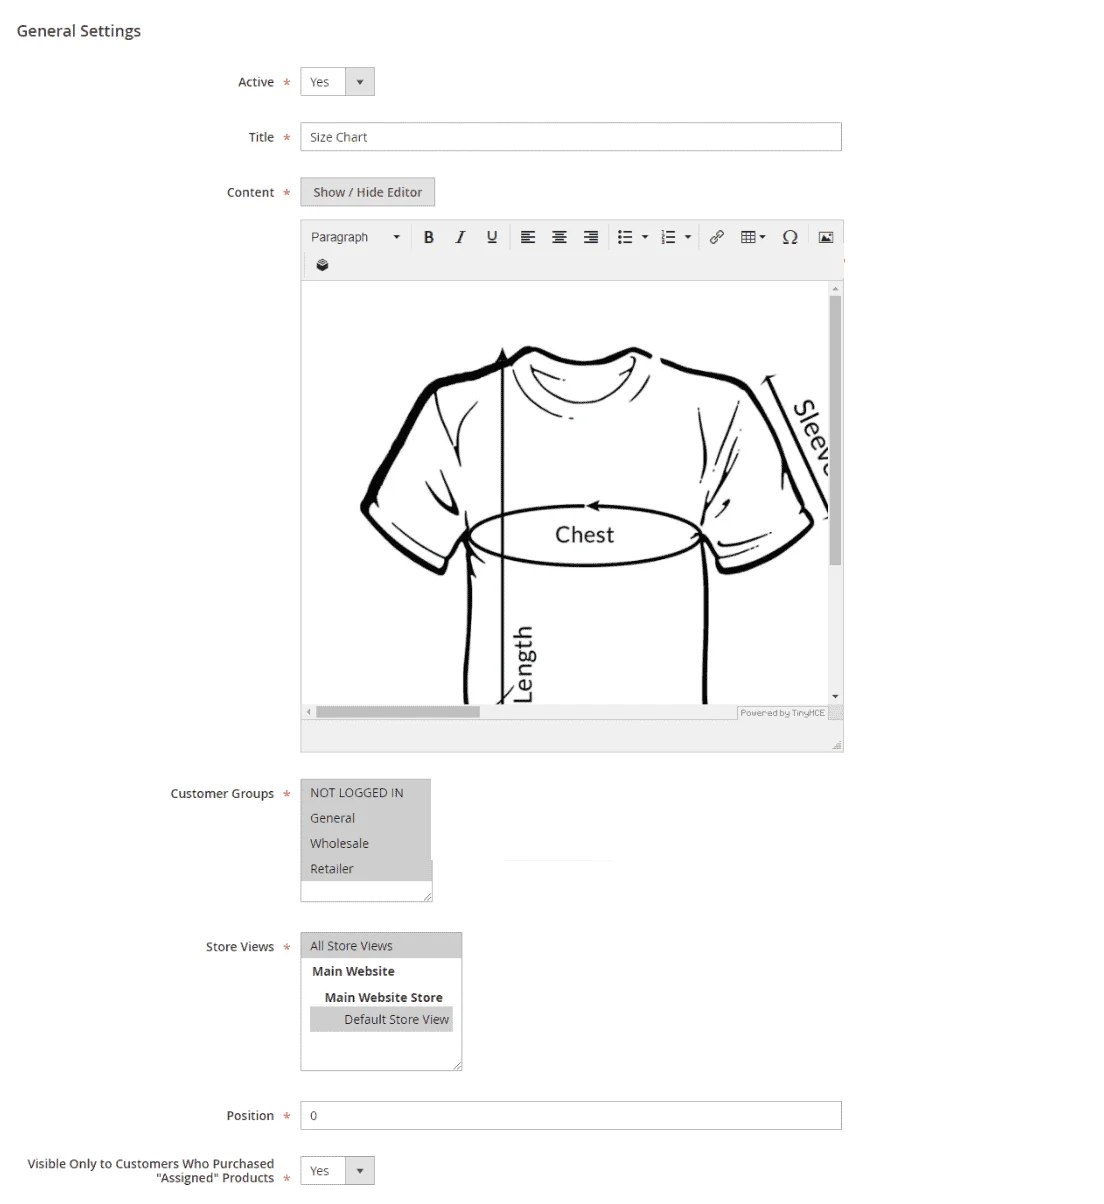
- Active: Enable the product tab
- Title: Enter the tab title, such as “Size Chart” or “Offers”
- Content: Add the description you want to display in this tab section (images are supported)
- Customer Groups: Choose which customer groups can view the product tab
- Store Views: Select the store views where the product tab will be visible
- Position: Define the position of the tab on the product page (0 is the first to show up)
- Visible Only to Customers Who Purchased “Assigned Products”: Choose Yes if you want the tab to be visible only to customers who have purchased assigned products
Related, Up-Sell, Cross-Sell Display Settings:
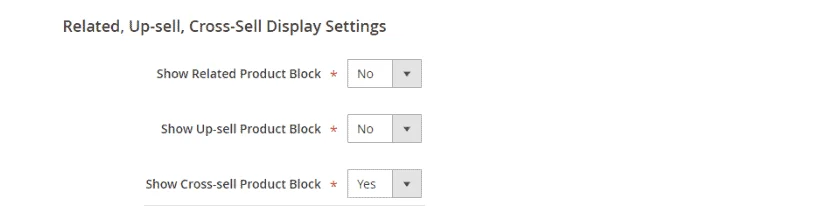
- Choose Yes to display product recommendation blocks, including related, up-sell, and cross-sell items.
- Choose No to hide those blocks.
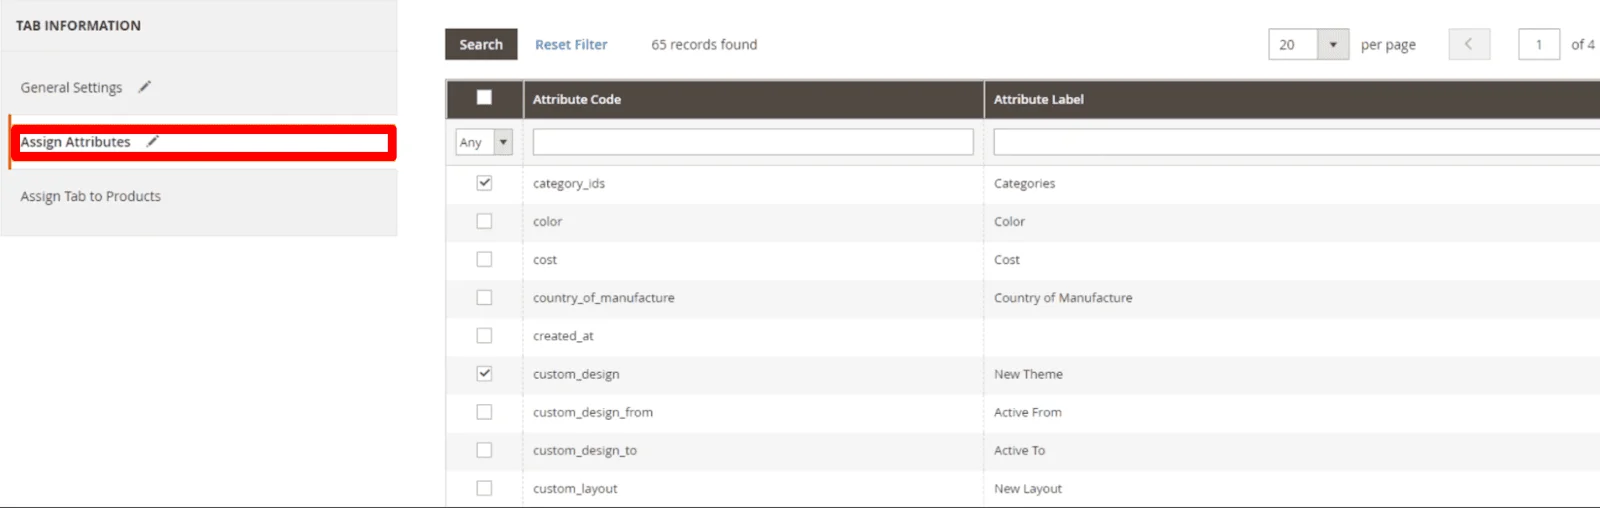
After that, select the items you want this tab to appear on. Users can pick any products, all items, or specific categories. This flexibility lets you customize the information based on the product type. To do this, go to the “Assign Attributes” tab.
Finally, click “Save” to create your custom tab. Once saved, it will be applied to the selected products and ready to use.
Step 4: Check your new tabs in frontend
Go to your store frontend and move to the product page you assigned new product tabs to check the result. You should verify that it displays the correct content and appears as intended. If any issues arise, review the configuration settings to make necessary adjustments.
If everything goes right, your frontend should look like this:
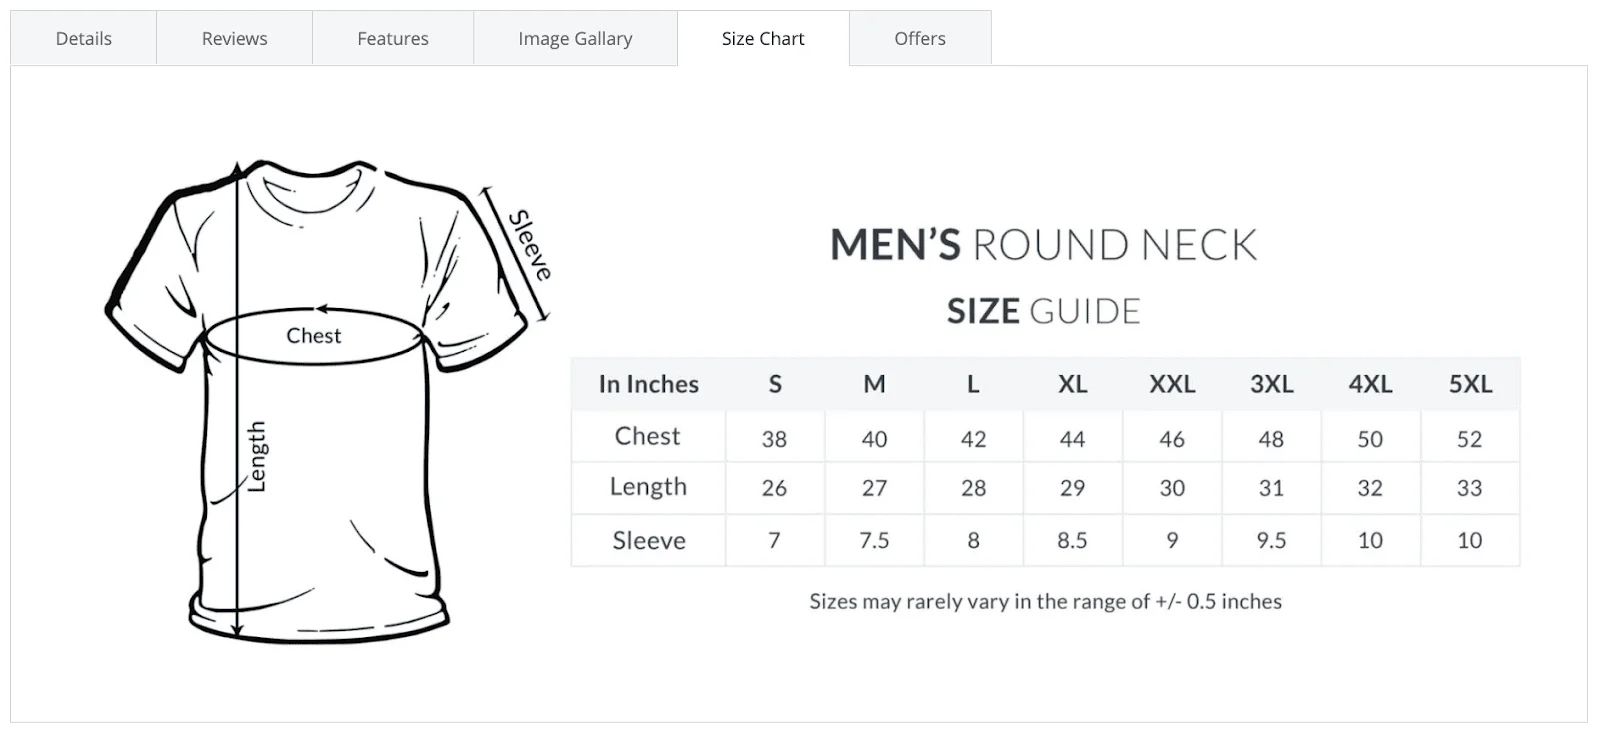
Note: If it doesn’t work, try flushing the cache in your backend and then check the frontend again.
Here are some useful tips to help you make the most of your custom tabs in Magento 2:
- Incorporate Rich Media: Add images, videos, or links to make tabs more engaging and visually appealing.
- Focus on Content Relevance: Ensure the information in each tab is directly related to the product and valuable for visitors, enhancing customer satisfaction.
- Optimize for SEO: Strategically place keywords throughout the tab content to boost your search engine rankings.
- Try Different Formats: Test various types of content in tabs to discover what resonates best with different audience segments.
- Add More Custom Tabs: Try to personalize as much as possible to win your customers’ hearts. You can add custom tabs in customer account too, to create unique experiences for them and improve their loyalty.
Product Tab Extensions for Magento 2
Besides Meetanshi’s Product Tab extension, there are plenty of alternatives available in the market. When selecting the right module, consider your priorities—whether it’s specific features, budget, or other requirements. In this blog, we’ll explore some of the top options, including a free plugin worth considering.
Magefan
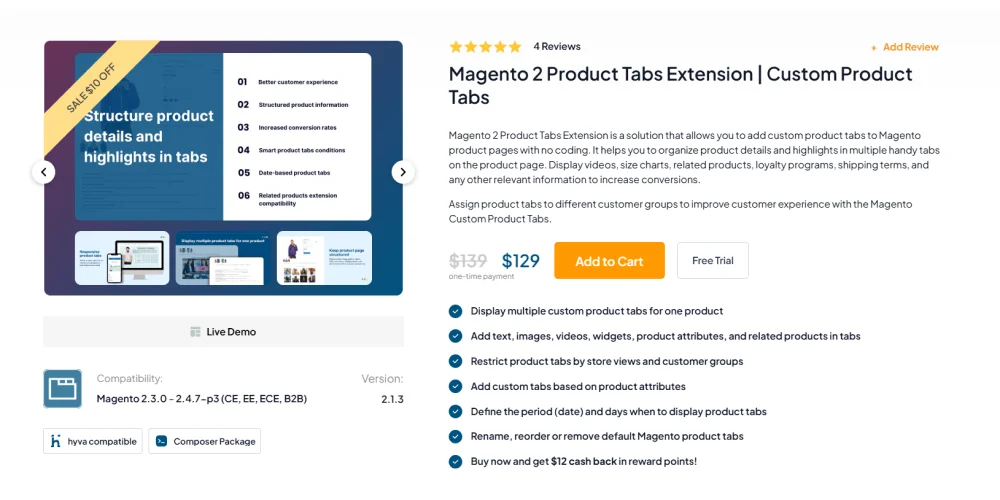
Highlight feature:
- Show multiple custom tabs for a single product
- Include text, images, videos, widgets, product attributes, or related products in tabs
- Limit product tabs to specific store views or customer groups
- Create custom tabs based on product attributes
- Set specific dates or days for when tabs should appear
- Rename, rearrange, or remove default Magento product tabs
Price: $139
Weltpixel
![]()
Highlight feature:
- Create custom product tabs with tailored content using Magento Conditions directly in the admin panel
- Easily modify default Magento tabs by changing their title, position, or choosing whether they appear on the frontend
- Add labels to custom tabs to highlight valuable information and attract users, with options for custom text or product attribute-based labels
- Improve the customer experience with content tailored to product type and attributes
- Use detailed, relevant descriptions to build trust and encourage purchases
- Provide specific information to help buyers choose the right product
- Offer clear, detailed descriptions to keep customers engaged on the product detail page
- Add rich, dynamic descriptions using smart static blocks
- Keep product pages clean and organized with smart tabs
Price: $199 - $599
Magezon
Highlight feature:
- Create tab profiles based on 9 conditions and categories
- Add unlimited tab items
- Customize tab content with ease
- Support for color swatches
- Display multiple product rows
- Compatible with multiple store views
- Save time with Ajax loading
- Fully responsive design
- Use the widget function to place tabs anywhere on the storefront
Price: Free
Conclusion
In conclusion, it is not too difficult to customize and add a custom tab to your product page’s tabbed navigation. I hope that after reading this post, you will be able to have new tabs with new customized content with ease by adding some CSS for styling.
x

Jacker is the Chief Technology Officer (CTO) at Mageplaza, bringing over 10 years of experience in Magento, Shopify, and other eCommerce platforms. With deep technical expertise, he has led numerous successful projects, optimizing and scaling online stores for global brands. Beyond his work in eCommerce development, he is passionate about running and swimming.
Related Post


The Complete Guide to UTM Parameters & Google Analytics for Magento website
Master UTM parameters and Google Analytics for Magento. Track traffic sources, measure campaign performance, and practical tips to use it for better business decisions.
10 mins read
|
10-05-2025
How to implement Cookie Consent for GTM & Google Analytics in Magento Under GDPR?
Implement cookie consent for GTM & GA4 in Magento under GDPR. Step-by-step guide using Google Consent Mode v2 to avoid fines and maintain analytics.
15 mins read
|
02-27-2026

Speed vs. Sales: Comparing Hyvä Checkout and Mageplaza One Step Checkout
Learn how Hyvä Checkout and Mageplaza One Step Checkout impact order completion rates and revenue growth.
8 mins read
|
02-25-2026

Hyvä Theme is Now Open Source: What This Means for Magento Community - Mageplaza
Hyvä is now Open Source and free. Discover what changed, what remains commercial, how it impacts the Magento ecosystem, and how to maximize its full potential.
8 mins read
|
02-12-2026
2 mins read
|
01-30-2026
1 min read
|
03-30-2026
The Complete Guide to UTM Parameters & Google Analytics for Magento website
Master UTM parameters and Google Analytics for Magento. Track traffic sources, measure campaign performance, and practical tips to use it for better business decisions.
10 mins read
|
10-05-2025
How to implement Cookie Consent for GTM & Google Analytics in Magento Under GDPR?
Implement cookie consent for GTM & GA4 in Magento under GDPR. Step-by-step guide using Google Consent Mode v2 to avoid fines and maintain analytics.
15 mins read
|
02-27-2026
Speed vs. Sales: Comparing Hyvä Checkout and Mageplaza One Step Checkout
Learn how Hyvä Checkout and Mageplaza One Step Checkout impact order completion rates and revenue growth.
8 mins read
|
02-25-2026
Hyvä Theme is Now Open Source: What This Means for Magento Community - Mageplaza
Hyvä is now Open Source and free. Discover what changed, what remains commercial, how it impacts the Magento ecosystem, and how to maximize its full potential.
8 mins read
|
02-12-2026
2 mins read
|
01-30-2026