

A Complete Guide on Configure & Use RabbitMQ in Magento 2
Efficient message queuing is crucial for eCommerce platforms like Magento 2. RabbitMQ stands out as a strong solution because it provides a scalable and dependable messaging system. This system enables the platform to handle complex tasks and high volumes of traffic effectively, ensuring seamless communication between services.
If you don’t know how to configure and use RabbitMQ message queues in Magento 2, this article will guide you through the specific process.
Step 1: Install RabbitMQ Server
Firstly, you need to install RabbitMQ on your server. Here’s how you can do it on Ubuntu:
1, Update your package list:
sudo apt-get update
2, Install RabbitMQ:
sudo apt-get install rabbitmq-server
3, Start and enable RabbitMQ service:
sudo systemctl start rabbitmq-server
sudo systemctl enable rabbitmq-server
4, Create a RabbitMQ user and virtual host:
sudo rabbitmqctl add_user magento_user magento_password
sudo rabbitmqctl add_vhost magento_vhost
sudo rabbitmqctl set_permissions -p magento_vhost magento_user ".*" ".*" ".*"
Step 2: Configure RabbitMQ in Magento 2
The next step is to open the app/etc/env.php file and add the RabbitMQ configuration:
'queue' => [
         	'amqp' => [
                	 'host' => 'yourhost.yourdomain.com',
 'port' => '5672',
 'user' => 'magento_user',
 'password' => 'magento_password',
 'virtualhost' => '/'
 	 ]
 ],
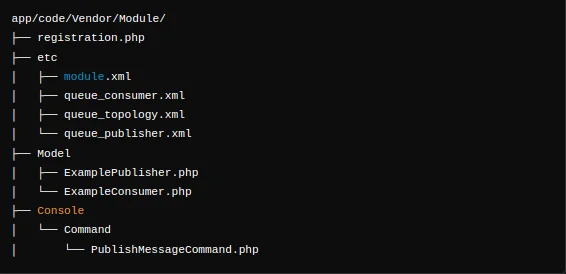
Step 3: Create the Module Structure
You need to create the following directory structure for your module:
Step 4: Define the Module
1, Create Registration.php
Path: app/code/Vendor/Module/registration.php
<?php
\Magento\Framework\Component\ComponentRegistrar::register(
    \Magento\Framework\Component\ComponentRegistrar::MODULE,
    'Vendor_Module',
    __DIR__
);
2, Create Module.xml
Path: app/code/Vendor/Module/etc/module.xml
<?xml version="1.0"?>
<config xmlns:xsi="http://www.w3.org/2001/XMLSchema-instance" xsi:noNamespaceSchemaLocation="urn:magento:framework:Module/etc/module.xsd">
    <module name="Vendor_Module" setup_version="1.0.0">
        <sequence>
            <module name="Magento_Amqp"/>
        </sequence>
    </module>
</config>
Step 5: Define the Queue and Consumer
According to Magento 2 documentation, if you use amqp RabbitMQ connection, you must set up the message queue by customizing files in the app/code/Vendor/Module/etc directory. These files define the message routing rules, the connection between queues and consumers, and the exchanges where topics are published.
1, Define the topology in queue_topology.xml:
This file sets the message routing rules and defines the queues and exchanges.
Path: app/code/Vendor/Module/etc/queue_topology.xml
<?xml version="1.0"?>
<config xmlns:xsi="http://www.w3.org/2001/XMLSchema-instance" xsi:noNamespaceSchemaLocation="urn:magento:framework-message-queue:etc/queue_topology.xsd">
    <topology name="example.queue.topology">
        <exchange name="example.exchange" type="topic" connection="amqp">
            <binding id="example.binding" topic="example.topic"/>
        </exchange>
        <queue name="example.queue" connection="amqp">
            <binding id="example.queue.binding" exchange="example.exchange" topic="example.topic"/>
        </queue>
    </topology>
</config>
Here, you define an exchange named example.exchange of type topic. Then, you bind this exchange to a topic example.topic. Next, you need to create a queue named example.queue and bind it to the example.exchange using the same topic.
2, Define the consumer in queue_consumer.xml:
This file describes the connection between a queue and its consumer.
Path: app/code/Vendor/Module/etc/queue_consumer.xml
<?xml version="1.0"?>
<config xmlns:xsi="http://www.w3.org/2001/XMLSchema-instance" xsi:noNamespaceSchemaLocation="urn:magento:framework-message-queue:etc/queue_consumer.xsd">
    <consumer name="example.consumer" queue="example.queue" connection="amqp" consumerInstance="Vendor\Module\Model\ExampleConsumer">
        <cron expression="* * * * *"/>
    </consumer>
</config>
Here, you will define a consumer named example.consumer that listens to the example.queue. The consumer instance is specifies the class Vendor\Module\Model\ExampleConsumer, and it is configured to run every minute using a cron expression.
3, Define the publisher in queue_publisher.xml:
In this file, you will define the exchange where a topic is published.
Path: app/code/Vendor/Module/etc/queue_publisher.xml
<?xml version="1.0"?>
<config xmlns:xsi="http://www.w3.org/2001/XMLSchema-instance" xsi:noNamespaceSchemaLocation="urn:magento:framework-message-queue:etc/queue_publisher.xsd">
    <publisher name="example.publisher" topic="example.topic" connection="amqp"/>
</config>
Here, we define a publisher named example.publisher that publishes messages to the topic example.topic on the amqp connection.
By configuring these files, you establish the basic framework for message queues using RabbitMQ in your Magento 2 module. This setup enables you to send and receive messages asynchronously, improving the efficiency and performance of your Magento application.
Step 6: Implement the Publisher And Consumer
1, Create ExamplePublisher.php
This class processes the messages from the queue.
Path: app/code/Vendor/Module/Model/ExamplePublisher.php
<?php
namespace Vendor\Module\Model;

use Magento\Framework\MessageQueue\PublisherInterface;

class ExamplePublisher
{
    protected $publisher;

    public function __construct(PublisherInterface $publisher)
    {
        $this->publisher = $publisher;
    }

    public function publish($message)
    {
        $this->publisher->publish('example.topic', $message);
    }
}
2, Create ExampleConsumer.php
The class publishes messages to the queue.
Path: app/code/Vendor/Module/Model/ExampleConsumer.php
<?php
namespace Vendor\Module\Model;

class ExampleConsumer
{
    public function process($message)
    {
        // Process the message
        echo "Received message: " . $message . PHP_EOL;
    }
}
Step 7: Use the Publisher
In this step, you need to create a console command to publish messages to the queue.
Path: app/code/Vendor/Module/Console/Command/PublishMessageCommand.php
<?php
namespace Vendor\Module\Console\Command;

use Magento\Framework\Console\Cli;
use Symfony\Component\Console\Command\Command;
use Symfony\Component\Console\Input\InputInterface;
use Symfony\Component\Console\Output\OutputInterface;
use Vendor\Module\Model\ExamplePublisher;

class PublishMessageCommand extends Command
{
    protected $publisher;

    public function __construct(ExamplePublisher $publisher)
    {
        $this->publisher = $publisher;
        parent::__construct();
    }

    protected function configure()
    {
        $this->setName('vendor:module:publish')
            ->setDescription('Publish a message to the RabbitMQ queue');
        parent::configure();
    }

    protected function execute(InputInterface $input, OutputInterface $output)
    {
        $this->publisher->publish('Hello, RabbitMQ!');
        $output->writeln('<info>Message published successfully</info>');
        return Cli::RETURN_SUCCESS;
    }
}
Step 8: Register the Console Command
It is necessary to create di.xml to register the console command
Path: app/code/Vendor/Module/etc/di.xml
<?xml version="1.0"?>
<config xmlns:xsi="http://www.w3.org/2001/XMLSchema-instance" xsi:noNamespaceSchemaLocation="urn:magento:framework:ObjectManager/etc/config.xsd">
    <type name="Magento\Framework\Console\CommandList">
        <arguments>
            <argument name="commands" xsi:type="array">
                <item name="vendor_module_publish" xsi:type="object">Vendor\Module\Console\Command\PublishMessageCommand</item>
            </argument>
        </arguments>
    </type>
</config>
Step 9: Enable the Module and Run Setup Commands
1, Enable the module:
bin/magento module:enable Vendor_Module
2, Run the setup upgrade command:
bin/magento setup:upgrade
3, Run the dependency injection compile command (optional but recommended):
bin/magento setup:di:compile
4, Clear the cache:
bin/magento cache:clean
Step 10: Test the Setup
1, Publish a message to the queue using the console command:
bin/magento vendor:module:publish
2, Check the consumer output:
You need to pick up the message and process it, printing “Received message: Hello, RabbitMQ!” to the console or logs.
Conclusion
By following this complete guide, you can configure and use RabbitMQ in Magento 2 successfully. RabbitMQ will allow your Magento application to perform tasks asynchronously, enhancing the system’s responsiveness. Whether handling order processing, inventory updates, or customer notifications, RabbitMQ ensures that users will have a more efficient and seamless interaction with your Magento store.
If you have any problems while following this tutorial, feel free to let us know.

Jacker is the Chief Technology Officer (CTO) at Mageplaza, bringing over 10 years of experience in Magento, Shopify, and other eCommerce platforms. With deep technical expertise, he has led numerous successful projects, optimizing and scaling online stores for global brands. Beyond his work in eCommerce development, he is passionate about running and swimming.
Related Post

Review 74 Mageplaza extension updates from April 2025, highlighting Magento 2.4.8 compatibility, Hyvä theme support, and enhanced functionalities.

Social Media Marketing: Your Ultimate Guide to Skyrocketing Engagement - Mageplaza
Discover a step-by-step framework for effective social media marketing. Learn how to optimize content, run ads, track KPIs, and future-proof your strategy across all major platforms.
The Ultimate Guide to Managing Your E-Commerce Website for Maximum Sales - Mageplaza
Discover simple tips to manage your eCommerce website, boost sales, and grow your online business effortlessly. Learn now!
SWOT Analysis: The Ultimate Tool for Business Growth - Mageplaza
Learn how to use SWOT analysis to identify strengths, weaknesses, opportunities, and threats. Build smarter strategies and drive business growth effectively.
Review 74 Mageplaza extension updates from April 2025, highlighting Magento 2.4.8 compatibility, Hyvä theme support, and enhanced functionalities.
Social Media Marketing: Your Ultimate Guide to Skyrocketing Engagement - Mageplaza
Discover a step-by-step framework for effective social media marketing. Learn how to optimize content, run ads, track KPIs, and future-proof your strategy across all major platforms.
The Ultimate Guide to Managing Your E-Commerce Website for Maximum Sales - Mageplaza
Discover simple tips to manage your eCommerce website, boost sales, and grow your online business effortlessly. Learn now!
SWOT Analysis: The Ultimate Tool for Business Growth - Mageplaza
Learn how to use SWOT analysis to identify strengths, weaknesses, opportunities, and threats. Build smarter strategies and drive business growth effectively.