Shopify Returns: A-Z Guide to Create and Manage
Summer Nguyen | 04-12-2024
A clear return policy not only builds trust but also helps prevent disputes and revenue loss. Shopify offers built-in tools to simplify the return process, from setting up policies to processing refunds and exchanges. In this guide, we’ll walk you through the key aspects of managing Shopify Return, ensuring a hassle-free experience for both merchants and customers.
Shopify Return at Glance
What is Shopify Return?
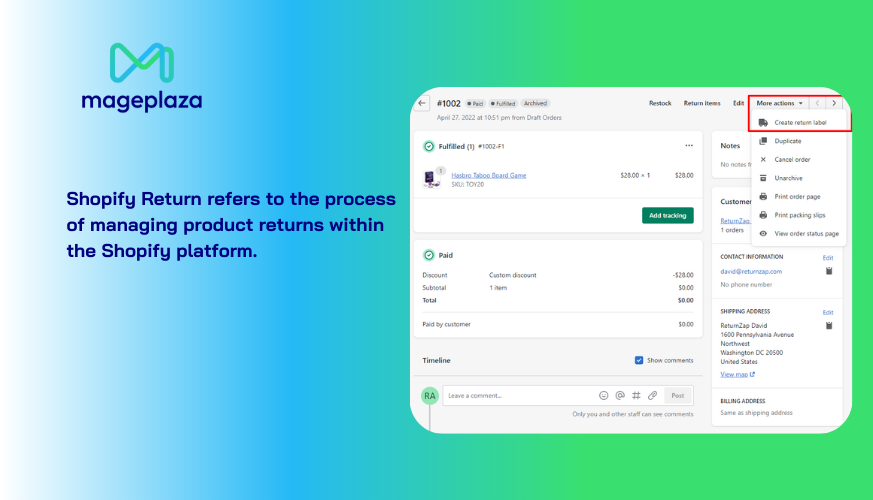
Return refers to the process through which customers return purchased products to a online store. This typically happens when a customer is not satisfied with a product due to reasons like defects, the product not matching the description, or a change of mind.
In Shopify, the return process is managed through the platform, allowing merchants to handle these transactions efficiently and maintain records.
Why do you need to manage Shopify Return?
Managing returns is a crucial aspect of running any successful Shopify business. Here are some of the key reasons you need an active return management process:
- Keep customers happy – A clear, easy return or exchange process is proven to encourage more customer purchases and build long-term loyalty. It provides a safety net.
- Comply with regulations – In many regions, you’re legally obligated to offer returns and refunds within defined timeframes and conditions. Failing compliance risks penalties.
- Maintain profit margins – Issuing prompt refunds allows you to quickly relist and resell returned merchandise rather than writing it off as a total loss from disposal.
- Identify product issues – Analyzing return volumes and reasons often surfaces underlying problems with product quality, sizing, descriptions or other factors you can improve on.
- Prevent fraud – An explicitly stated return policy leaves less room for abuse and fraudulent activity compared to loosely handled returns.
How to Create Your Shopify Return Policy
This guide will show you how to prepare your return policy and set it up on Shopify:
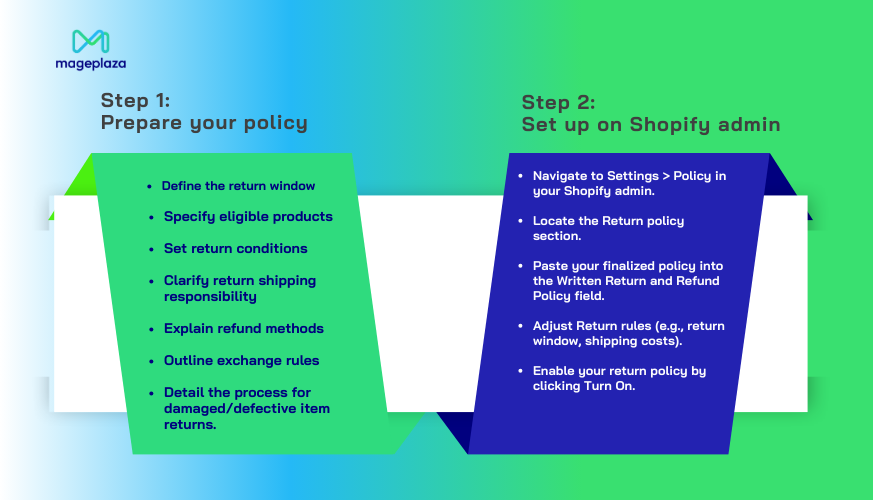
1. Prepare your policy (with example)
A well-crafted return policy is crucial for establishing trust with your customers and minimizing returns. It outlines the terms and conditions under which customers can return products, ensuring a smooth and fair process for both parties.
Start by considering the following elements:
- Return window: Specify the timeframe within which customers can initiate a return. This is typically 30 to 60 days from the purchase date.
- Eligible products: Clearly state which products are eligible for return. This might exclude certain items like personalized products or perishable goods.
- Return conditions: Outline the conditions under which a return is accepted. This could include requirements for the product’s condition, original packaging, and proof of purchase.
- Return shipping: Determine who is responsible for return shipping costs. This can be the customer, the seller, or a shared responsibility.
- Refunds: Explain the refund process, including the methods available (e.g., store credit, original payment method) and any associated fees.
- Exchanges: If you offer exchanges, specify the terms and conditions, such as whether there’s a fee or if the exchange is limited to the same product.
- Damaged or defective items: Outline the procedure for returning damaged or defective items. This should include information on replacement or repair options.
Here’s an example of a return policy:
“Returns are accepted within 30 days of the purchase date. Items must be in their original condition with all tags and packaging intact. Return shipping costs are the customer’s responsibility. Refunds will be issued to the original payment method. Damaged or defective items will be replaced or repaired at no cost to the customer.”
Sample Shopify Return Policy:
“At [Your Store Name], we strive to provide our customers with the best possible shopping experience. We understand that sometimes things don’t work out as planned, so we offer a hassle-free return policy.
Eligible Returns:
- All items purchased from our online store are eligible for return within 30 days of the purchase date, except for the following items:
- Personalized or custom-made items
- Perishable goods
- Gift cards
- Sale items (unless otherwise stated)
Return Conditions:
- Items must be in their original condition, unused, and unwashed.
- All original tags and labels must be attached.
- The original packaging must be included.
- Proof of purchase (order confirmation or receipt) is required.
Return Shipping:
- Return shipping costs are the customer’s responsibility, unless the item is damaged or defective.
- We recommend using a trackable shipping method to ensure safe delivery of your return.
Refunds:
- Refunds will be processed within 5 business days of receiving the returned item.
- Refunds will be issued to the original payment method used for the purchase.
- Shipping charges are non-refundable, unless the item was damaged or defective.
Exchanges:
- We do not offer exchanges. If you would like a different size or color, please return the item for a refund and place a new order.
Damaged or Defective Items:
- If you receive a damaged or defective item, please contact our customer support team within 7 days of receiving the item.
- We will provide you with instructions on how to return the item and arrange for a replacement or repair.
Additional Notes:
- Please note that we reserve the right to refuse returns or exchanges for items that do not meet our return policy requirements.
- If you have any questions about our return policy, please do not hesitate to contact our customer support team.”
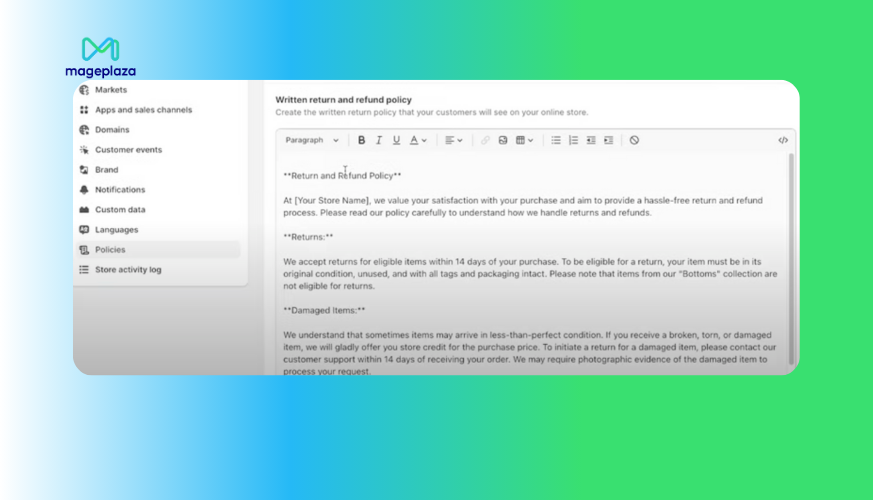
2. Set up return policy on Shopify admin
Once you’ve finalized your return policy, it’s time to set it up in your Shopify admin. Follow these steps:
- Click on “Settings” in your Shopify admin.
- Choose the “Policy” option from the menu.
- Find the “Return policy” section
- Scoll down to Written Return and Refund Policy field
- Copy and paste your return policy into the provided text box.
6. Scroll up to the Return rules field, click on Manage
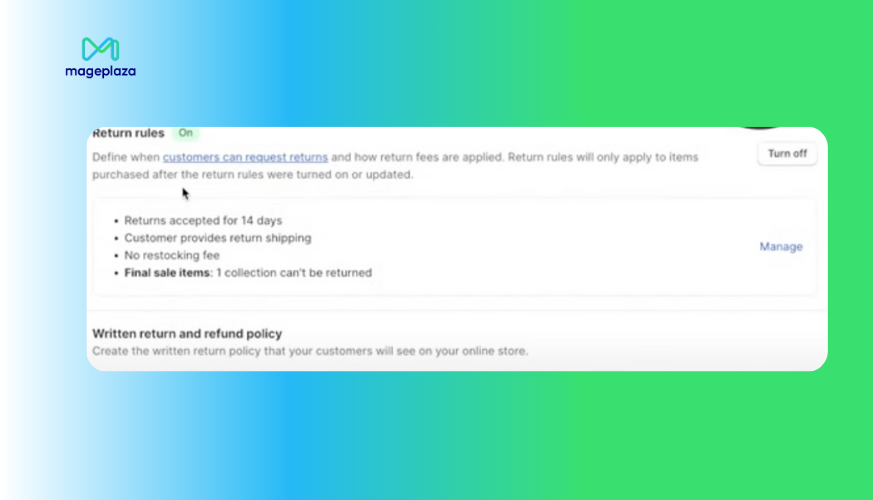
7. Now you see the Default Return Rules screen
8. Change policies about days, return shipping cost,…
9. Go back to the Return policy screen and click Turn On to enable your Shopify Return policy
How to Handle Returns for an Order on Shopify
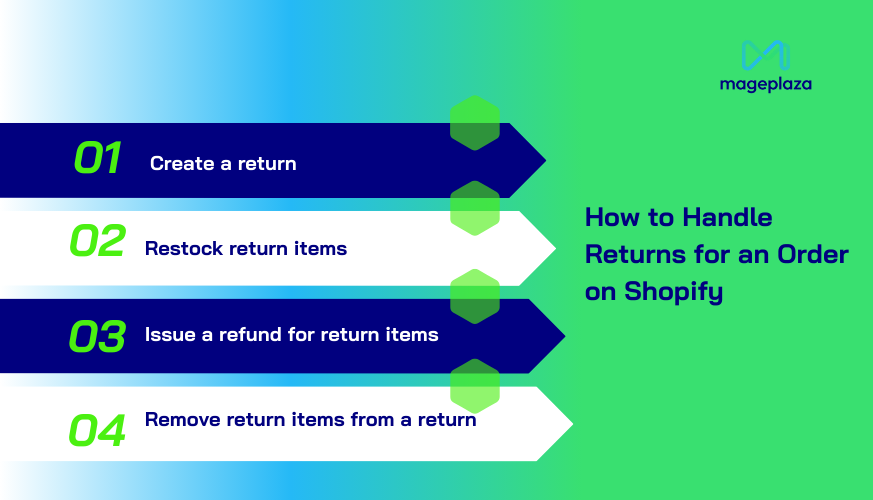
1. Create a Return
- Go to Orders in your Shopify admin and select the order.
- Click Return.
- Under Select return items, enter the quantity and select a reason for return.
- (Optional) Adjust Restocking Fee or Return Shipping Fee in the Summary section and click Save.
- (Optional) To add exchange items, click Add products in the Exchange items section.
- (Optional) To apply a discount to exchange items, click Apply discount, enter details, and click Apply.
- Under Return shipping options, choose from:
- Create a return label in Shopify (US-only).
- Upload a return label (PDF/JPEG or URL) with optional Tracking details.
- No shipping required for returns without shipping.
- Click Create return.
2. Restock Return Items
- After receiving items, go to Orders in Shopify admin.
- Click the relevant order and select Restock in the Return in progress section.
- Choose the items and select a Restock location.
- Click Restock items.
3. Issue a Refund for Return Items
- After inspecting returned items, go to Orders in Shopify admin.
- Select the order and click Refund in the Return in progress section.
- Enter the item quantity to refund.
- (Optional) Uncheck Send a notification to the customer if you don’t want an email sent.
- Click Refund.
4. Remove Return Items from a Return
- Go to Orders in Shopify admin and select the order.
- In Return in progress, click the … and choose Remove return items.
- Select the items to remove and confirm by clicking Remove item twice.
Do You Know Shopify Self-Service Returns?
Shopify Self-Service Returns is a new feature designed to streamline the return process for your customers. It allows customers to initiate and track returns directly from their order page, without needing to contact your customer support team. This can significantly reduce the workload on your team and improve the overall customer experience.
1. How Does It Work?
- Customer Initiates Return: The customer goes to their order page and selects the item they want to return. They then follow the on-screen instructions to initiate the return.
- Return Label Generation: The system generates a return shipping label that the customer can print and attach to the package.
- Return Tracking: The customer can track the status of their return on their order page.
- Refund Processing: Once the returned item is received and inspected, the refund will be processed according to your store’s return policy.
2. How to Enable Shopify Self-Service Returns
- Go to your Shopify admin.
- Click on “Settings” > “Shipping and delivery.”
- Scroll down to the “Return labels” section.
- Enable the “Allow customers to print return labels” option.
- Configure the return label settings as needed.
Conclusion
Setting up and managing Shopify Return effectively can enhance customer trust and improve your store’s operations. As you apply this guide, do you encounter any challenges in implementing your return policy or optimizing the process? If you need further assistance or want to customize your Shopify store for a seamless return experience, our Shopify development services are here to help. Contact us today to ensure your store runs smoothly and keeps customers coming back!

Summer is the CMO and Digital Commerce Solution Expert with 10+ years of experience. She specializes in Magento, Shopify, ERP, CRM, AI, and Blockchain, delivering strategic solutions that transform businesses. With a deep understanding of digital commerce, she helps brands scale and stay ahead in a competitive market.
Related Post

Magento 2.4.8 Official Release: What's Updated?
In this article, we’ll explore the standout new features and enhancements that make the Magento 2.4.8 official version truly special.

Mageplaza Announces Official Separation from Avada Group
Mageplaza is pleased to announce a significant milestone in our journey as we officially separate from the Avada Group to operate as an independent company.
Explore the latest from Mageplaza in January 2025, with new modules and updates designed to enhance your Magento e-commerce experience.
Magento 2.4.8 Official Release: What's Updated?
In this article, we’ll explore the standout new features and enhancements that make the Magento 2.4.8 official version truly special.
Mageplaza Announces Official Separation from Avada Group
Mageplaza is pleased to announce a significant milestone in our journey as we officially separate from the Avada Group to operate as an independent company.
Explore the latest from Mageplaza in January 2025, with new modules and updates designed to enhance your Magento e-commerce experience.
& Maintenance Services
Make sure your store is not only in good shape but also thriving with a professional team yet at an affordable price.
Get Started