How to Configure Price Filter - Price Navigation in Magento 2
Vinh Jacker | 06-16-2016

Layered Navigation in Magento 2 default is designed as a convenient sitemap on your Magento 2 store. The navigation is usually placed on the left of the category page with a list of categories and price range to filter the options.
One of the biggest concerns of customers when purchasing a product is the price - whether they can afford it. With the default Layered Navigation in Magento 2, it is possible for the customers to filter items by price. Thus, instead of going around your store, they only need to describe their demands through the price filterto get the item lists with the desired price range very quickly.
In today’s post, we will show you 3 methods to configure price filter/price navigation, step by step. However, if you want to give more criterias for the searching as well as enhance customer’s experience on your site, you can refer to Magento 2 Layered Navigation extension, an advanced filter from Mageplaza.

What is Price Filter/ Price Navigation?
Configuring price filter/price navigation successfully means classifying the product by price in the navigation. There are 3 methods supported to calculate price navigation: Automatic (Equalize Price Ranges), Automatic (Equalize Product Counts), and Manual. While the first two methods allow auto-calculating, the manual needs to set the price interval. For example, the interval is 10 and the price step by 10 includes:
- $20.00 - $29.99 (1)
- $30.00 - $39.99 (2)
- $70.00 - $79.99 (1)
- $100.00 - $109.99 (1)
- $120.00 - $129.99 (2)
- $150.00 - $159.99 (1)
- $180.00 - $189.99 (1)
- $420.00 - $429.99 (1)
- $440.00 - $449.99 (1)
- $710.00 and above (1)
Keep your eyes on the following guides to configure the price filter/price navigation in the layered navigation.
Related topics
- How to customize Email Template, Transactional Email
- How to Create Product Attribute
- How to Enable Customer Login / Register Captcha
- How to Configure PayPal Express Checkout Payment Method
3 Methods to Set Price Filter/ Price Navigation in Magento 2
- Method 1: Automatic (equalize price ranges)
- Method 2: Automatic (equalize product counts)
- Method 3: Manual
General Settings Step
- On the Admin Panel,
Stores > Settings > Configuration. - In the left panel, under
Catalog, selectCatalog. - Open the
Layered Navigationsection. - In the
Display Product Countfield, enable the user to enter the number of products that is included in parentheses after each filtered item. - In the
Price Navigation Steps Calculationsection, please navigate according to the method you choose:
Method 1: Automatic (equalize price ranges)
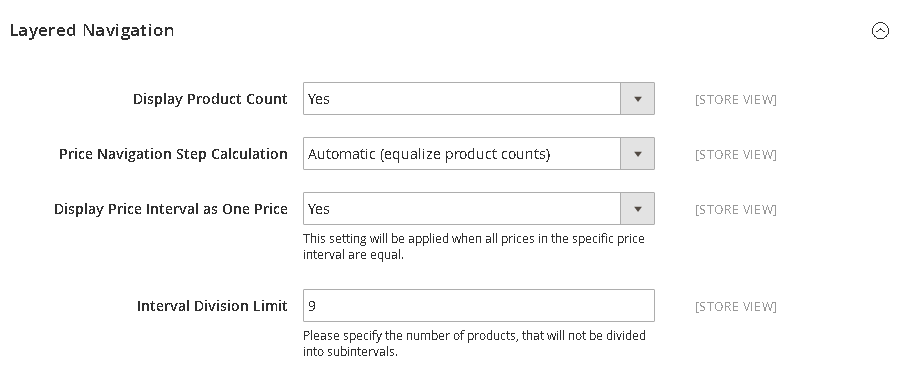
This method is to use the standard algorithm for the price navigation. In the Price Navigation Steps Calculation, select the Automatic (Equalize Price Ranges).

Method 2: Automatic (equalize product counts)
- In the
Price Navigation Steps Calculationfield, select Automatic (equalize product counts) option. - In the
Display Price Interval as One Pricefield, allow showing a single price for many products that are both at the same price if you choose Yes. - In the
Interval Division Limitfield, offer the threshold for a number of products within a price range. The range cannot be further split beyond this limit. If it is ignored, the default value (9) will be applied.

Method 3: Manual
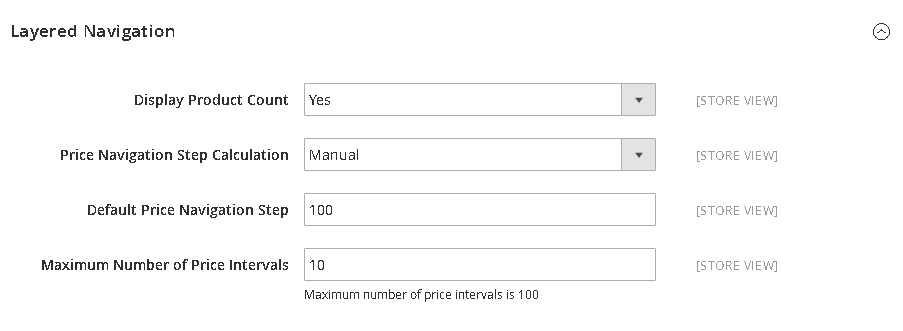
- In the
Price Navigation Steps Calculation, select Manual option. - Set the
Default Price Navigation Step. - Set the
Maximum Number of Price Intervalsand the maximum number is 100.

Save Configto complete.
Recommended solution for a better Magento 2 Price Filter
Your filtering system can be upgraded thanks to Layered Navigation’s exclusive features:
- Multiple filter options: filter by Ratings, In Stock, New products, Sale products, etc.
- Price Slider to enhance customers’ experience
- Shop by brand offer brand preference suggestions
- AJAX technology displays instant results to create better site performance
- Infinite scrolling loads all results on one page only and many more…
You can take a look at these successful businesses with their creative Layered Navigation usage.
The bottom line
Price Filter shows how you optimize your customers’ product search journey. With a great experience, they can feel motivated to take further steps. That is why these 3 methods to configure Price Filter/Navigation in Magento 2 are essential for any store, and you can even have better results when using our Layered Navigation extension. Check this out and we are sure you will not regret it!


