How to setup store information: phone number, address, VAT number in Magento 2
04-08-2016

Setup store information is necessary to online stores in order to provide the basic information that will be used on sale documents and in other communications. The Store Information you need to add includes phone number, country, region/state, Zip code, VAT number, etc. All of this information is flexible to edit whenever you need.
However, because Magento 2 support multiple settings to customize, sometimes it can be quite complex for store admins to find exactly where to edit it. The following guides hopefully will be helpful for you.

3 Steps to setup store information in Magento 2
Step 1: Login to your Magento 2 backend
- On the Admin sidebar, click on
Stores. Then underSettings, chooseConfiguration. - In the panel on the left under
General, chooseGeneral.
Step 2: Setup your store information
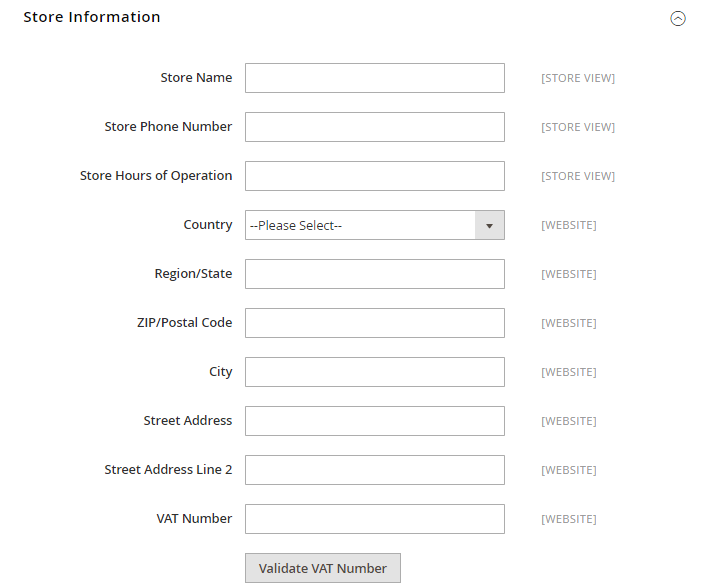
- Expand the Store Information section, and do the following:
- Enter the
Store Namethat you want to use in all communications. - Enter the
Store Phone Number, formatted as you want it to appear. - In the
Store Hours of Operationfield, enter the hours your store is open for business. For example: Mon - Fri, 9-5, Sat 9-noon PST - Select the
Countrywhere your business is located. - Select the
Region/Statewith the country. - Enter the
Store Address. If the address is long, continue the address onStore AddressLine 2. - If applicable, enter the VAT Number of your store. To verify the number, click the
Validate VAT Numberbutton.
- Enter the
- When complete, click on
Save Config.
Step 3: Check result
You can check the result in any order tests now.
Providing customers with essential store information such as phone number, address, VAT number in Magento 2 can speed up the customer support process, reduce repetitive store-related questions, and also create a professional image. You can also check the topic of How to get Store ID, Code, and Name in Magento 2 or other posts below. Your ideas matter to us, so please express your thoughts in the comment box.
Related Topics:


