Change Store Email Addresses - Mageplaza
How to change Email Logo in Magento 2
Vinh Jacker | 05-16-2016

Email Logo is inserted into the header and footer of a transactional email message. Similarly to the Store Logo, the Email Logo is also one of the best ways for the audience to identify your brand easily and at same time, your store becomes more reliable to the visitors. Therefore, right after installing Magento 2 successfully, the very first thing to do is replacing the Magento 2 Default Logo with your own one. If you send emails to spam boxes, you should enable SMTP. In this tutorial, you can find detailed tips and guides on how to set an email logo for your Magento 2 store.
How to select the email logo?
The logo accepts many image types such as JPG/JPEG, GIF, PNG, or SVG, and it is flexible to customize the size of the logo from Magento 2 Admin. However, I have a tip for you to make it easier. To ensure that your logo is displayed clearly on high-resolution devices, you should upload an image that is three times as large as the required size in the header. If you don’t know the size of the logo, or of any image used in your theme, just right-click on the image on your site, and inspect the element to get its size.

3 Steps to Change Email Logo in Magento 2
Approach 1
The following steps will help you know what you can do to change Email Logo in Magento 2:
- Step 1: Upload your logo
- Step 2: Select the Header and Footer Templates
- Step 3: Save Config and design
Step 1: Upload your logo
First, you have to select your logo and upload it on the Magento platform. I will show you how to do it for MAgento version 2.0 and 2.1 or above:
Change Email Logo in Magento 2.0
- On the Admin sidebar,
Stores > Settings > Configuration.
Change Email Logo in Magento 2.1 or above
-
On the Admin sidebar,
Content > Design > Configuration > Select your current theme >. - You can see the existing design configuration on the management table, then click on
EditunderAction. - On the workplace, please scroll down to Other Settings, open
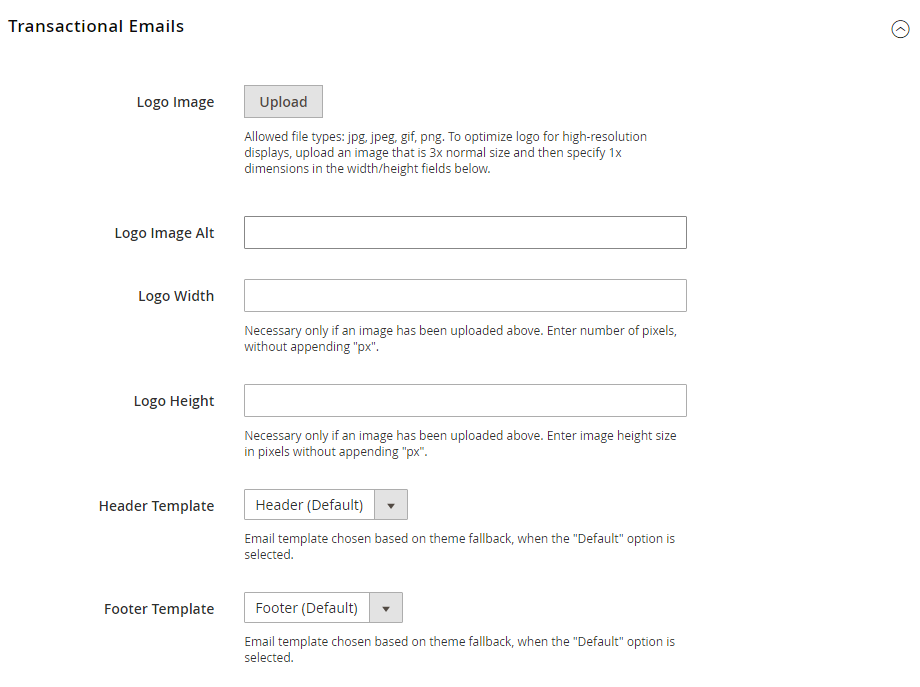
Transactional Emailsetion,- To change your Logo Email, click on
Uploadto choose one of the image files you want to aplly for your logo. - Enter the alternate text identify the
Logo Image Alt. - Require
Logo WidthandLogo Heightin pixels. Just enter the number that doesn’t include “px” symbol. The appearance of the email logo in the header depends on the offered value size instead of the real size of the logo.
- To change your Logo Email, click on
Step 2: Select the Header and Footer Templates
If you want to modify Header and Footer templates or if you run multiple stores, you can assign a specific template to each, that will appear on the transactional email message.
- Select the
Header TemplateandFooter Templatefrom the available list as needed.
Step 3: Save Config and design
Save Config to finish and the design of the email is active.
Have you done changing your Magento 2 email logo following the above guide? If yes, start to set up other things for your email, or check out our Magento Abandoned Cart Email extension for a better email marketing strategy. Comments and questions are appreciated, so please leave them below!
Approach 2
For individuals with advanced programming and frontend development expertise, the recommended approach is as follows:
Within the path app/design/frontend/<Vendor>/<theme>/Magento_Email/web, include a file named logo_email.png.
Explanation:
In vendor/magento/module_email/Model/AbstractTemplate.php, a constant is defined as const DEFAULT_LOGO_FILE_ID = 'Magento_Email::logo_email.png', representing the correct filename for the logo file.
Related posts:


