How to Create Custom Order Status in Magento 2
Vinh Jacker | 06-24-2016

Order Status indicates the state of an order during the handling process. It notifies both customers and store owners about the order progress, for instance, where the order is, whether it has been packed, shipped, or paid, etc. Magento 2 stores need to create order status to manage orders effectively, as well as build a professional image to customers. This post will refer to how to create custom order status in magento 2.
In the configuration, you can create a new one, assign it to the order state, set it as the default status for that state, or remove it. Let’s check the overview below.
Read more about Order Status Workflow
Differences between Order Status and Order State in Magento 2
In Magento, orders move through different stages, which are grouped into “states” and further detailed by “statuses.” Think of states as big buckets and statuses as specific items within those buckets.
-
Order states (e.g., new, processing, complete) define the overall progress of an order. They give you a high-level picture of where the order stands in its lifespan.
-
Order statuses (e.g., order received, packed, shipped) provide more granular information about what’s happening within a state. They tell you the exact step the order is currently at.
For instance, an order might be in the “processing” state, but its status could be “payment review” or “awaiting fulfillment.” This tells you exactly what’s holding up the completion of the order.
Magento 2 Predefined Order Statuses
Magento 2 tracks your orders like a map, with each stop marked by a status. These pre-built checkpoints let you and your customers know exactly where an order stands. Let’s explore the key landmarks:
- Pending: The order’s waiting room, no packing or billing has started yet.
- Processing: Payment’s confirmed, gears are turning, invoicing or shipping might be happening.
- Complete: The orders reached their destination, packed, billed, and delivered to the happy customer.
- Pending Payment: The order is waiting for its ticket (payment) before boarding the processing train.
- Canceled: The order’s journey stopped short, either by the customer or you. Don’t worry, PayPal hiccups might trigger this, but completing the payment gets it back on track.
- Closed: The order’s file is closed, filed away securely after a refund.
- Payment Review: A PayPal perk, gives you extra assurance before things move forward.
- On Hold: A pause button for orders, handy when you need to take a breather before deciding.
- Fraud: An alert flag, is raised if something seems fishy (no invoice, no email), prompting you to investigate.
Remember, these are just the main signposts. Magento offers even more statuses to fine-tune your order tracking. With this map in hand, navigating your online store’s orders becomes a breeze!
4 Steps to Custom Order Status in Magento 2
- Step 1: Create Custom Order Status
- Step 2: Assign an order status to a state
- Step 3: Custom an existing order status
- Step 4: Remove an order status from the current state
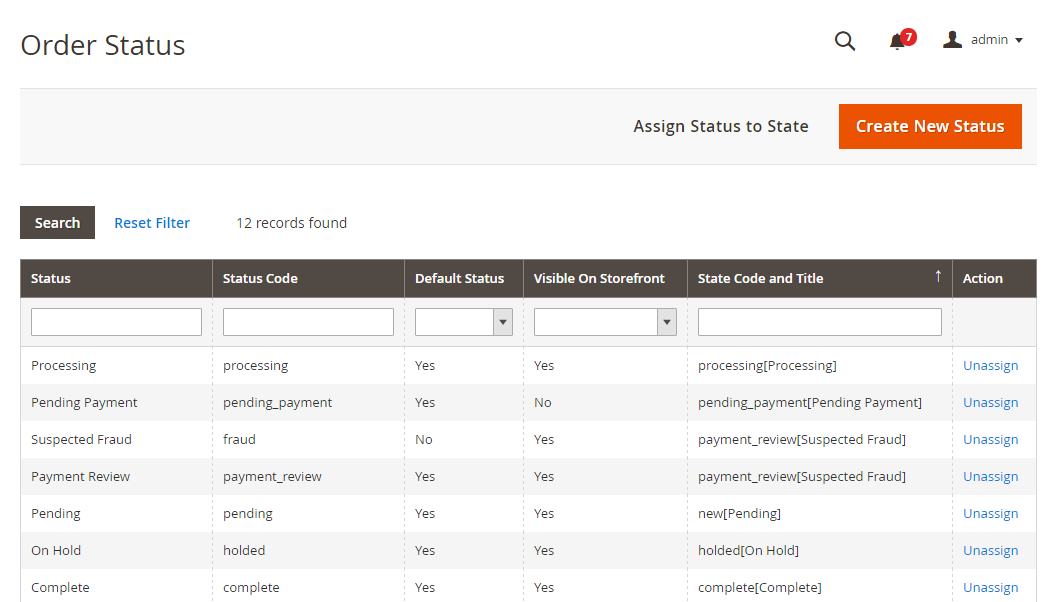
Step 1: Create Custom Order Status
First, you can add a new order status:
- On the Admin Panel,
Stores > Settings > Order Status. - In the upper-right corner, click on
Create New Status.
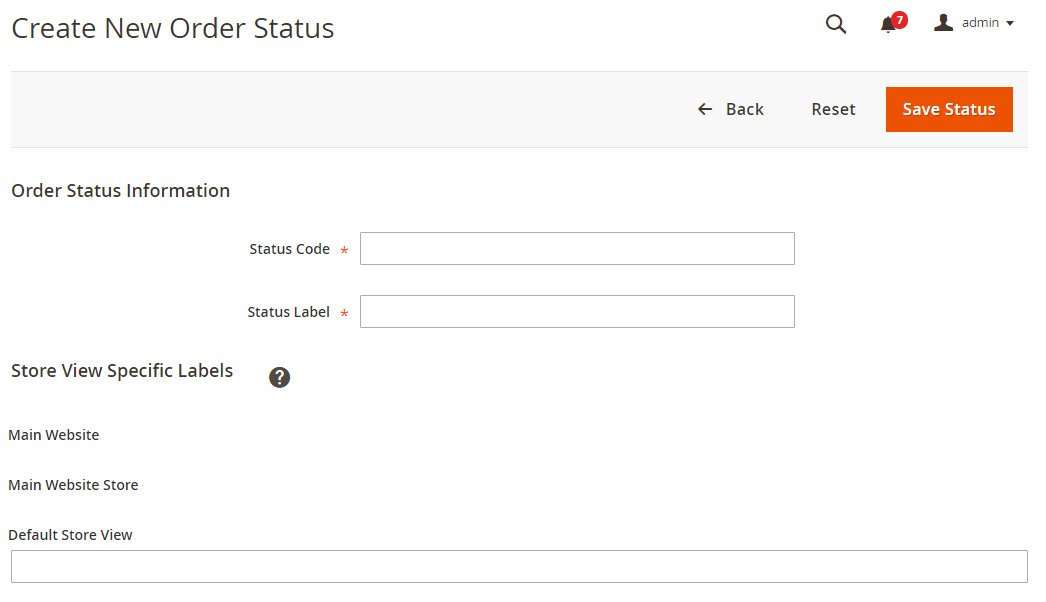
- Under
Order Status Informationsection,- Insert a
Status Codefor the internal reference.
The field needs to contain the letters (a-z), the number (0-9) and the underscore instead of a space while it is required to use the letters for the first character and the rest can be a combination of letters and numbers.
- Set the
Status Labelfor Admin and storefront.
- Insert a
- Set the
Store View Specific Labelsfor each store view on your store. Save Statusto complete.
Step 2: Assign an order status to a state
Next, you will assign that status to an existing state:
- Go to the
Order Statuspage, click onAssign Status to Statebutton.
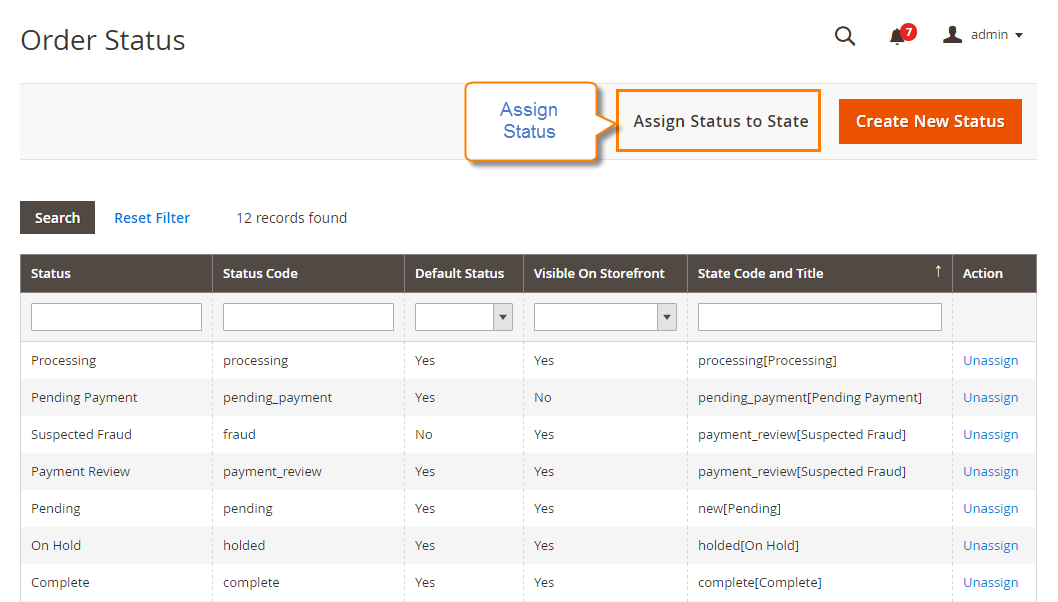
- In the Assign Order Status to State section,
- From the existing list of the order status, select the
Order Statusto assign. - Choose the
Order Stateto include the order status you’ve just assigned. - Accept the order status as a default status, tick the
Use Order Status as Defaultcheckbox. - Enable the order status on the storefront, please tick the
Visible On Storefrontcheckbox.
- From the existing list of the order status, select the
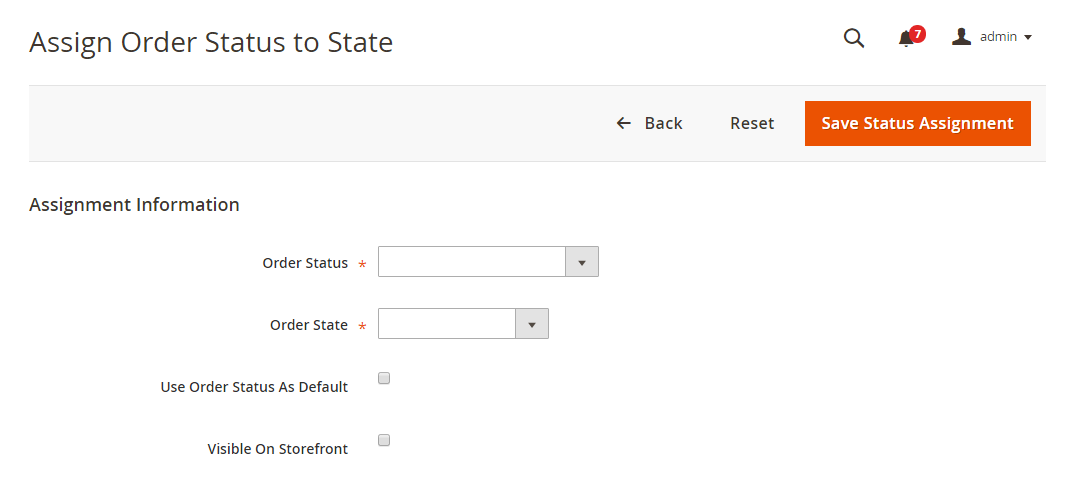
- Click on ` Save Status Assignment` to complete.
Step 3: Custom an existing order status
You can edit information of any existing order status
- Find the order status in the status list, and open the edit page.
- Customize any order status information as you need.
- Click on
Save Statusto save the changes.
Step 4: Remove an order status from the current state
It is possible to remove order status, but for the currently used one, you have to disable it first.
You cannot remove the order status that is being used.
- Find the order status that you want to unassign in the status list.
- Under the
Actioncolumn, on the corresponding row, click on theUnassignlink.
Right after that, a notification of the assignment will appear at the top of the workplace. Although the order status is unassigned, it is still included in the gird and never deleted.
Order Status Workflow in Magento 2
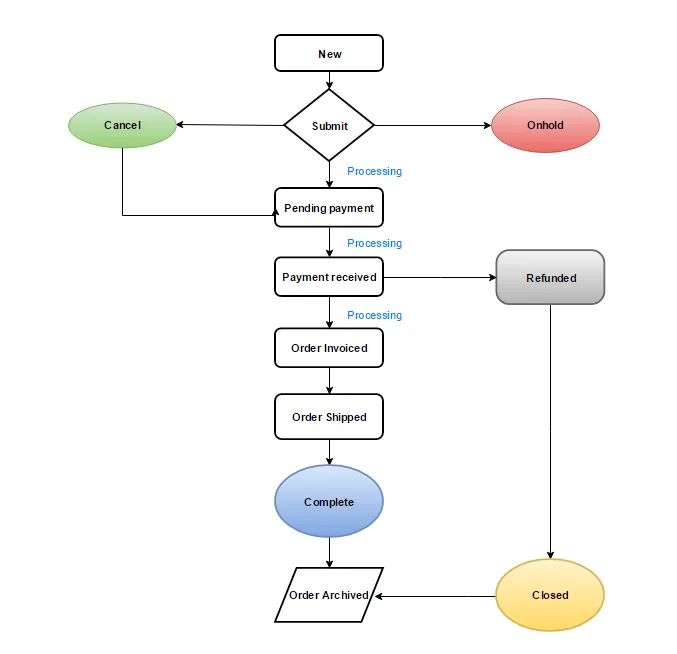
- New: The customer has created an order but has not made any payment.
- Pending: The order has not been invoiced or shipped.
- Processing: The order has been either invoiced or shipped.
- Complete: The order has been both invoiced and shipped.
- On hold: The order status has been manually set to On hold by an admin.
- Canceled: The order has not been paid for and has been canceled by the store admin or payment gateway.
- Closed: A credit memo has been issued and the refund has been completed.
Read more: Order Status Workflow in Magento 2
Order Status Changes Notifications
In Magento 2, you can enable notifications for the entire order status workflow. These notifications are useful for both customers and store owners. Keeping customers informed is crucial. Magento allows you to set up automatic notifications that are sent to customers whenever their order status changes. Configuring these email notifications helps maintain transparency and keeps customers updated throughout the order fulfillment process.
FAQs
Can I change the order status and state anytime?
Yes, adjust Magento’s backend settings to modify order status and state during processing.
What’s the difference between order status and order state in Magento 2?
Order status is a label for the current state, while order state is a broader category grouping multiple statuses.
Can I create custom order statuses for better order management?
Absolutely! Craft custom statuses to fit your unique workflow. This lets you categorize new orders efficiently and keep them separate from the default options.
Can I set a custom status for new orders in Magento 2?
Yes. Create a unique status and make it the default for all incoming orders. This way, your workflow starts with the information you need from day one.
Final words
Thanks to the custom order status, customers can track their detailed order progress by themselves, and admins can manage orders with ease. With the above 4 quick steps, creating Custom Order Status becomes easy for any store. Comment down below or chat with us if you have any difficulties in configuration.
Related topics
- Order Status Workflow
- Add Order ID, Customer IP Address in Invoice
- Enable or disable reorders
- RSS Feed: Order Status Notification
- Orders and Returns Widget
- Order Status and Order State
- Change Invoice, Order PDF template
- Free magento Delete Orders extension
- Magento Delete test orders
- Magento 2 Custom Order Number


