How to create Virtual Products in Magento 2
04-15-2016

While physical products indicate what might be touched or tasted, virtual products are non-tangible products such as memberships, services, warranties, or subscriptions. They actually are like simple products, but cannot be shipped, and with no weight. Magento 2 platform Virtual Products settings will help you create a new non-tangible item without any difficulty.
For example, you want to put Fitness Membership for sale, just configure the virtual products settings to create and sell it easily. The virtual products can be purchased separately or together with some product types like Grouped Product and Bundle Product.

Discover 6 types of products in Magento 2
6 Steps to create Virtual Product in Magento 2
To create Virtual Product, please follow these steps:
- Step 1: Select the Product Type
- Step 2: Select the Product Template
- Step 3: Fill out the Required Fields
- Step 4: Fill out the Remaining Product Details
- Step 5: Generate the Product
- Step 6: View the Product in Your Store
Step 1: Select the Product Type
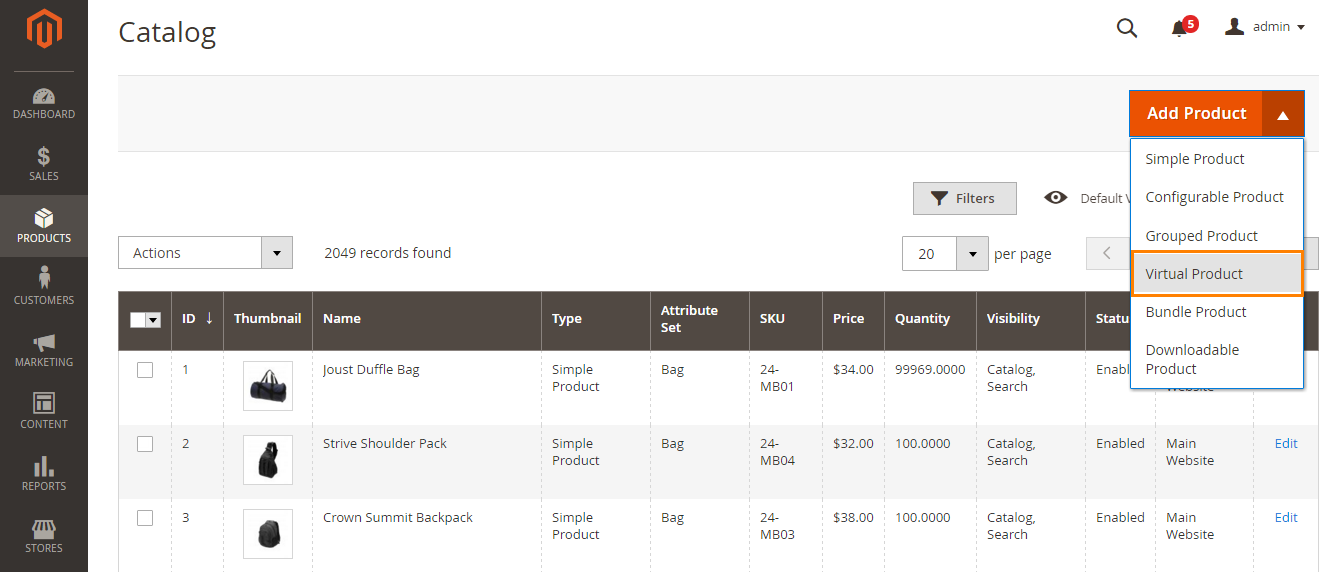
- On the Admin sidebar, click on
Product > Inventory > Catalog. - In the upper-right corner on the
Add Productmenu, chooseVirtual Product.

Step 2: Select the Product Template
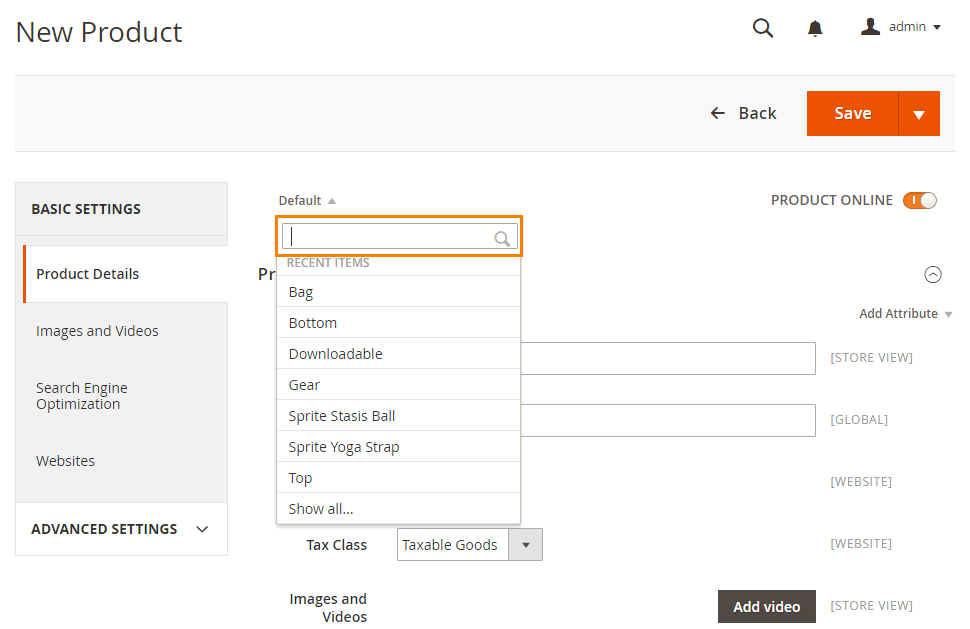
Follow one of two ways to select the product template:
- In the
Searchbox, enter the needed name of the template. - In the list, select one of the templates you want to use
The corresponding form will be shown to configure.

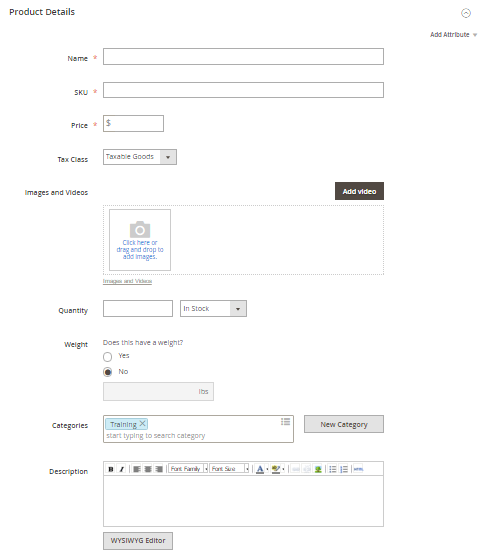
Step 3: Fill out the Required Fields
- In the
Product Detailsection, need to do:- Enter the
Name. - Use the default SKU for the product, or offer another value.
- Enter the
Price
- Enter the
- By now the product has not yet been ready to publish, let switch to the Off for
Product Online. - Click on
Saveto finish this step.
Step 4: Fill out the Remaining Product Details
- To set
Tax Class, follow one of the options:- None
- Taxable Goods
To learn about requirements for the taxation of digital goods and services, see the white paper, Identification & Taxability of Digital Products on the Avalara site.
- To add Images for a virtual product, follow one of the options:
- Drag and drop an image from your desktop on the
Cameratile in the Images and Videos box. -
In the Images and Video box, click on Camera title and feel free to choose the desired image from the file in your computer.
A placeholder appears until a product image is uploaded.
- Drag and drop an image from your desktop on the
- Enter the
Quantityof the product. - To assign the product to a Category, follow one of the options:
- Type in the
Searchbox to find and select a match. - Click on the
Show Listicon to see the category tree, then click on any available category you want to assign to the product. - Create a new category by entering the
Category Nameand assign to theParent Category, then click onCreate Category.
- Type in the

- Write some product description if you need. Then, click on
Submit. You can also use theWYSIWYG Editorfor additional control.

Step 5: Generate the Product
- Set the Product Online switch to the On position whenever you are ready to publish the product in the catalog.
- Then
Save & Closeon theSavemenu.

Step 6: View the Product in Your Store
On the Admin menu, choose Customer View.

THINGS TO REMEMBER
- Virtual products are as non-tangible products as memberships, services, warranties, or subscriptions.
- Virtual products are much like simple products, but without the Weight.
- Shipping Options are not supported if the virtual product is added to cart.
The bottom line
If your store requires the addition of a virtual product in Magento 2, kindly follow the above steps to create one. We also have other guides for 5 more Magento 2 product types as below, so you can check them out. In case you want to make your product look outstanding on the frontend, try Mageplaza Product Labels.
You are free to share this post or mention any concerns in the comment box.
Creating Products Series in Manage Store:
- How to create Simple Products
- How to create Configurable Products
- How to create Grouped Products
- How to create Bundle Products
- How to create Downloadable Products
Reference: Magento 2 user guide


