How to Customize Email Template in Magento 2
Vinh Jacker | 05-19-2016

In Magento 2, the email template contains your logo and store information, so there is nothing more for you to edit or design. It is easy to customize by inserting variables and saving them in the backend, and then your email template will be available to use, or you can create a new transactional email or follow-up email.
As a result, you won’t need to worry about wasting too much time every time you send an email while still ensuring effective personalization of the emails sent to your customers. This will prompt them to pay attention to your sales or promotional content and then take action.
Discover Follow Up Email extension for Magento 2
Main Components of A Magento 2 Email Template
Discover Follow Up Email extension for Magento 2
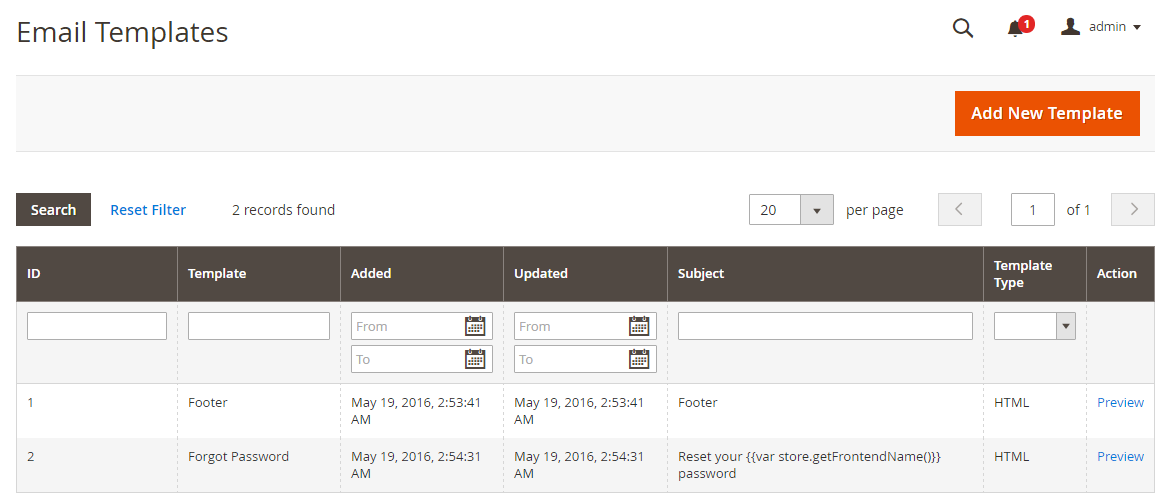
The email template in Magento 2 is divided into three main parts: Header, Body, and Footer.
-
Header: The header is at the top of the email that is sent to customers. Simultaneously, it attracts the viewer’s attention very well, so your logo is placed there and linked directly to your store. This is a great idea to drive more traffic to your site.
-
Footer: The footer template includes the sender’s conclusion and signature. You can freely edit the content of the footer and add more information, such as company email, number, or address.
-
Message: The message template is referred to as the body of the email, and the customization is similar to what you do with the header and footer templates. However, with the message template, it is different when you apply different activities or events. Magento provides you with the corresponding templates to use or modify to be suitable for your brand. For example, you can start with the main information related to the recipients.
Magento 2 Email Template Layout Rules
When creating or editing Magento 2 email templates, consider these rules for proper email display:
- Use responsive design principles for adaptability
- Optimize image sizes for faster loading
- Keep email width around 650px
- Simplicity is key; avoid complex layouts
- Replace <div> with <table> for table-layout
- Inline code is preferable over CSS styling
- Avoid HTML5 and use HTML4, and switch to CSS2 features instead of CSS3 ones
- Prefer ‘background-color’ to ‘background,’ and also explore the use of extended properties like ‘padding-top,’ ‘padding-left,’ and more
- If possible, employ the HTML characteristics rather than CSS
- Simple color backgrounds are better than images
- Avoid JavaScript in email templates
- Use common fonts or standard system fonts for readability
- Ensure mobile-friendly layouts for broader accessibility
4 Steps to Customize Email Template in Magento 2
Step 1: Load the Default Template
First, you have to select and load the templates:
- On the Admin Panel,
Marketing > Communications > Email Templates. - Click on
Add New Template,- Choose the types of the Template: Header, Footer, or Message Templates.
- Click on
Load Template, the corresponding format will appear.
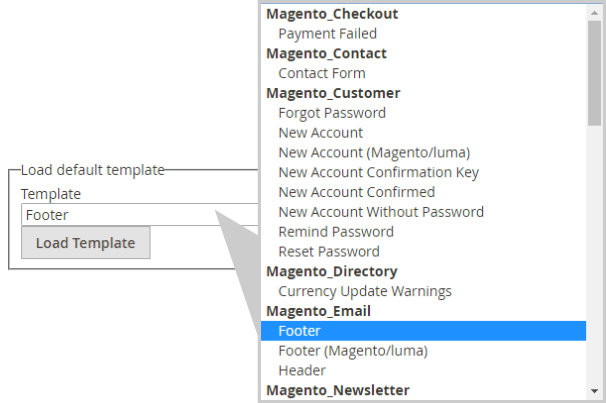
Step 2: Fill out the Template Information
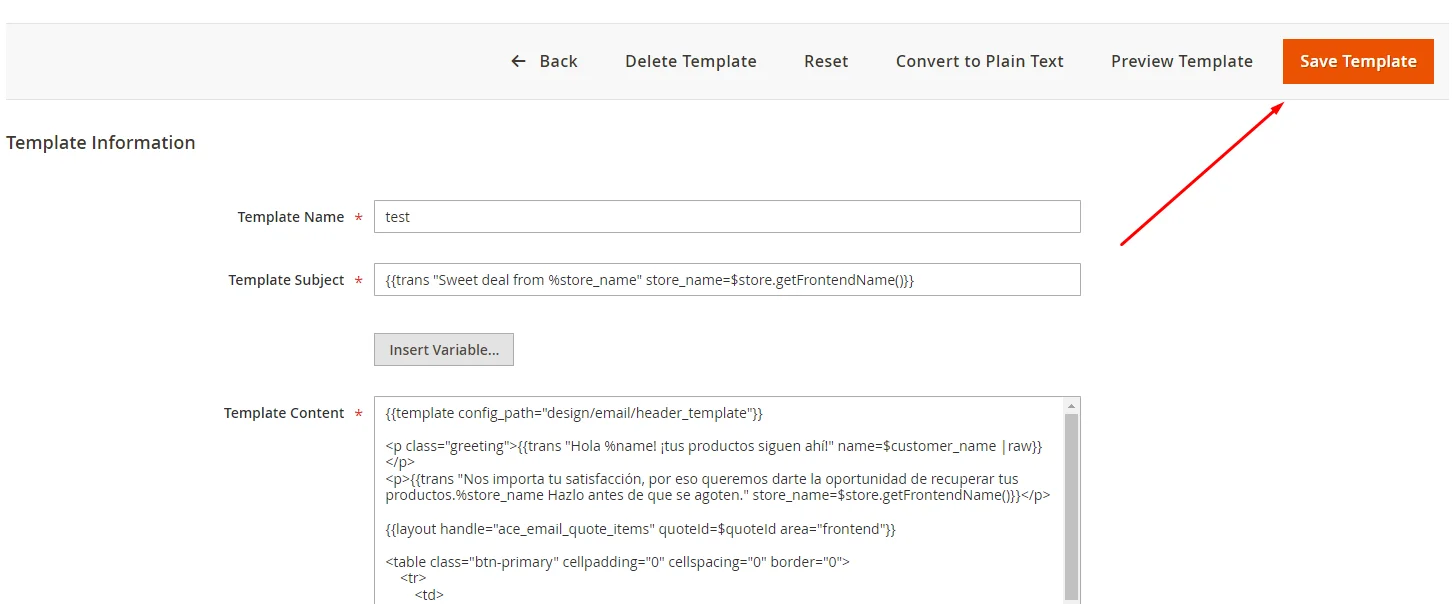
In this step, you can add information for the Template, such as Name, Subject, Content, Variables, and Styles.
- Name for the new template in the
Template Namefield. - Insert the
Template Subjectto organize the templates. The list of templates can be sorted and filtered by the Subject column.

- Customize the HTML as you need in the
Template Contentbox. - Click on
Insert Variableto insert a variable in theTemplate Contentbox.
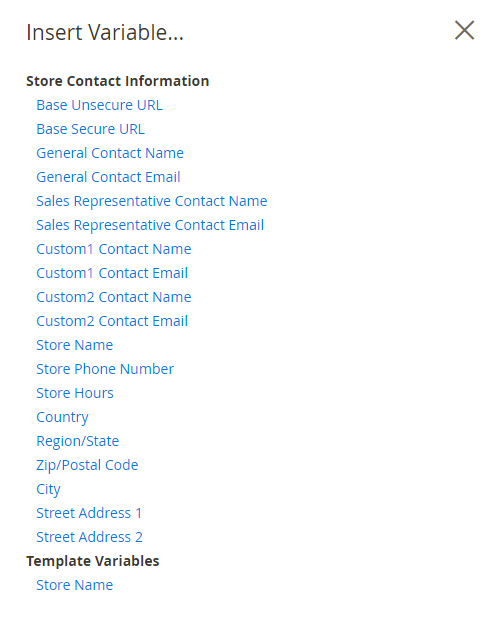
With the inserted variable, you can customize it directly into the template.
- If you want to declare any CSS, enter the styles in the
Template Stylesbox.
Step 3: Preview the Template
After making changes, let’s take a look at how the changes look like in reality via the Template Preview:
- To ensure that the template is applied correctly as you expect, click on
Preview Templateto adjust if needed. Save Templateto complete.
Each completed new template is auto-updated in the list of available Email templates.
Step 4: Apply the new Template
This is the last step in launching the new email template. Complete these settings, and you will be ready to go:
-
Footer/ Header Template
- Go to Magento Admin, follow the path:
Store > Configurations > General > Design, openEmailsection.
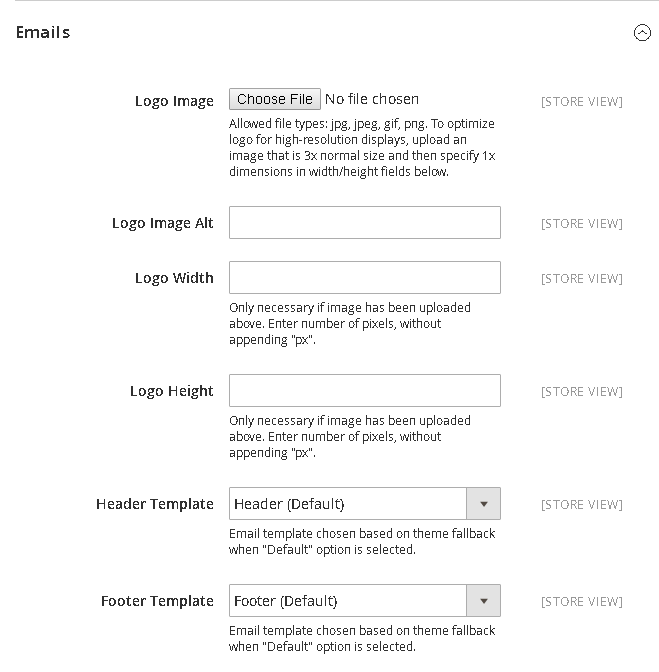
- Set name for new Footer/Header Template
Save Configto complete.
- Go to Magento Admin, follow the path:
-
Message Template
- Go to Magento Admin, follow the path:
Store > Configuration > Customers > Customer Configuration
Based on where the template is placed to open the relevant option, for example, the template belongs to
Create New Account Options:
- Set the new template for
Welcome Email. Save Configto complete
- Go to Magento Admin, follow the path:
## How to Edit Magento 2 Email Templates in the Magento Admin Panel?
Step 1: Navigate to Email Templates
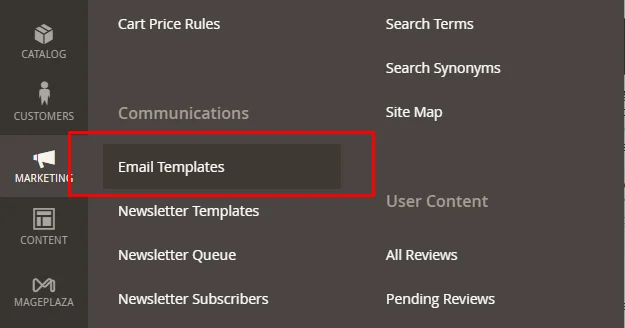
Go to Marketing in the left sidebar, then select Communications, and click on Email Templates.
Step 2: View Existing Email Templates
On the Email Templates page, you can see all your existing Magento 2 email templates.
Step 3: Edit an Existing Email Template
- To edit an existing template, select it from the list.

- Make your change and save.
How to Edit Magento 2 Email Template Files
To edit Magento 2 email template files:
- Connect via FTPS or SSH
- Use FTPS or SSH to connect to your Magento account.
For example, to edit the account_new.html file in the Magento customer module, go to:
<Magento-root-directory>/vendor/<Extension-name>/module-customer/view/frontend/email
Open the file account_new.html using the vi or nano command
How to configure store email addresses
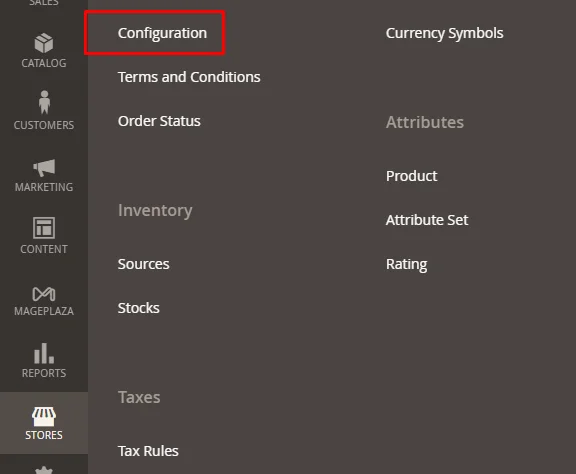
Step 1: From your Magento Admin Panel, click Stores > Settings > Configuration.
Step 2: Under General, click Store Email Addresses.
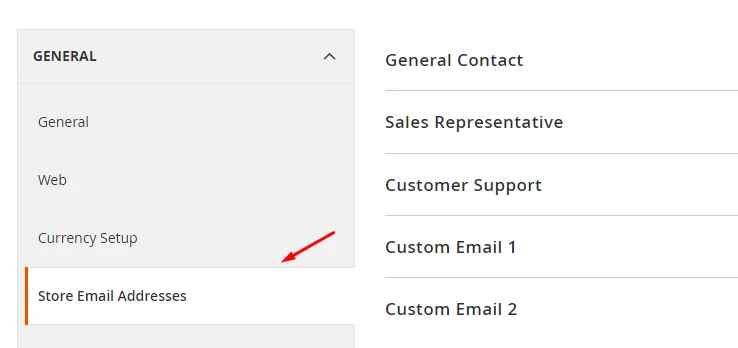
Step 3: Add Sender Name and Sender Email values for General Contact, Sales Representative, and Customer Support as needed.
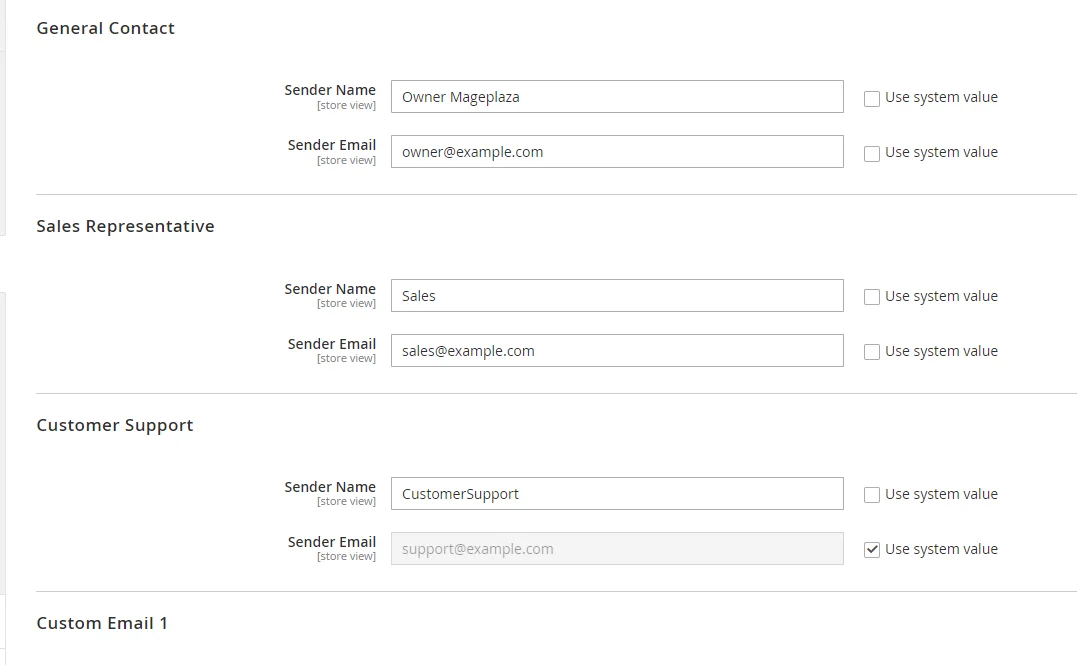
Step 4: If you use Custom Email, add Sender Name and Sender Email values in the Custom Email fields.
Step 5: Click Save Config to save the changes.

How to Create a Brand-New Email Template Using a Theme
To create a new email template for a module, follow these steps:
- Navigate to the module folder where you want to create the email template.
- In the module directory, go to the etc folder:
/app/code/ / /etc. - Create a file named email_templates.xml in this etc folder.
This email_templates.xml file will contain the configurations for your email templates.
Here is a sample of what the contents of the email_templates.xml file should look like:
<?xml version="1.0"?>
<config xmlns:xsi="http://www.w3.org/2001/XMLSchema-instance" xsi:noNamespaceSchemaLocation="urn:magento:module:Magento_Email:etc/email_templates.xsd">
      <template id="noufal_custom_email_template" label="Noufal Custom Email Template" file="noufal_custom_email_template.html" type="html" module="Noufal_email_template" area="frontend"/>
</config>
Note:
- id: The unique identifier for the template
- file: The path to the template file
- type: The format of the email (text or HTML)
- area: The application area You can create email templates for each module using a unique template identifier and file path according to your requirements. Here is an example:
<?xml version="1.0"?>
<config xmlns:xsi="http://www.w3.org/2001/XMLSchema-instance" xsi:noNamespaceSchemaLocation="urn:magento:module:Magento_Email:etc/email_templates.xsd">
   <template id="noufal_first_custom_email_template" label="Noufal Custom Email Template" file="noufal_first_custom_email_template.html" type="html" module="Noufal_email_template" area="frontend"/>
</config>
Personalized Email with better results: Marketing Automation solution
Creating personalized emails in Magento 2 may seem confusing to you, or do you need more than what the platform offers? Don’t worry, we’ve got everything handled for you by the Marketing Automation solution by AVADA. Let’s check out what you can gain using it:
- Save time with ready-made email templates for all needs
- Optimize the email-sending process with automatic email workflows
- Create effective marketing campaigns thanks to appealing and shoppable branded emails
- Retain customers via segmented email campaigns
Reduce time spent to customize emails and optimize transactional email usage; what a deal, isn’t it?
Read More: Configure Magento 2 Contact Form & Email: Detailed Guides
Monitor and Analyze Sales Emails
In business, sending emails alone isn’t enough. It’s crucial to analyze results to understand customer needs and improve future emails. Some questions to consider: Is the content well-received? Are there campaign errors? Can objectives be met? Email analysis also helps tailor messages for different customer groups.
6 Essential Email Performance Metrics to Pay Attention
The number of metrics used to evaluate the effectiveness of each email sent is, of course, not limited to just 6. However, these 6 metrics are the most basic that every business should pay attention to and invest time in optimizing, including:
- Delivery Rate
- Open Rate
- Unique Open Rate
- Open Times Rate
- Click-Through Rate (CTR)
- Bounce Rate
These metrics provide insights into how your email campaigns are performing and can help you adjust your email marketing strategy accordingly. Other metrics, such as conversion rate, list growth rate, and ROI, are also important for a comprehensive understanding of your email marketing efforts.
Steps to Analyze and Monitor Your Sale Email’s Effectiveness
Remember, email is one of the most effective sales channels for businesses. HubSpot stated that the average ROI through email marketing is $36 for every $1 spent. Simply put, if you spend $1 on sending special marketing emails, on average, you get $36 back.
To achieve effectiveness with each sale email you send to your customers, it’s essential to break down each step specifically. Below are 5 fundamental steps you should take if you don’t want to waste time and money on your email campaigns.
Step 1: Analyze Previous Campaigns
First, review the results of emails sent in the past 3 to 12 months. Then, the data will be analyzed for metrics such as open rate, click-through rate, unsubscribe rate, complaint rate, and forward rate.
Step 2: Determine Average Metrics
Next, calculate the average for each metric you analyzed in Step 1 by summing up each value for each metric and then dividing it by the total number of emails sent during that period.
Step 3: Identify Outliers
Once you know your average open rate, check if there are any emails with unusually high or low open rates, and mark these standout metrics.
Step 4: Identify Patterns
Can setting a specific subject achieve better results? Or sending emails at a specific time of day? Pay attention to existing patterns and use them to enhance your future campaigns.
Step 5: Set Specific Goals
Finally, you can set specific targets to achieve in your email marketing. This way, you’ll be able to evaluate whether your emails are performing better or worse.
You can also replicate what worked or discard what didn’t.
For example, suppose one of your emails has a higher open rate than the set standard. Try to deduce the reasons behind its success and test whether those assumptions are correct by focusing on the factors (believed to enhance email effectiveness) in your subsequent emails. This is how you can optimize each email sent in the future based on previous emails.
Effective Tools to Analyze and Monitor Sales Emails in Magento 2
8 out of 10 people prefer email for contact, which is 40 times more effective for sales than Facebook and Twitter combined. To boost your email effectiveness, invest wisely in tracking and analysis tools. Look for tools with: Timely follow-up emails (within 1 hour, increasing success by 700%). Email delivery scheduling to maximize customer contact. Visual email design for multiple devices.
Below is a list of some extensions that can help improve the effectiveness of sending sales emails, which you can consider:
Follow Up Email for Magento 2 (Mageplaza): Stands out with its ability to automate, personalize emails, analyze insight, and conduct effective A/B testing for improved customer engagement
Magento 2 Abandoned Cart Email (Mageplaza): Automated reminders, personalized coupons, Google Analytics integration, and comprehensive email tracking.
Magento 2 Admin Email Notification (MageNest): Instant alerts for key events, customizable email templates, and group notifications for efficient team communication and rapid response to customer actions.
Magento 2 We Miss You Email Extension (Land of Coder): Automated ‘We Miss You’ alerts, customizable delivery schedules, multiple template options, and efficient email management for enhanced customer retention and loyalty.
FAQs
1. Where is The Email Template File in Magento 2?
You can look for the email template files in the app/design/frontend/{Vendor}/{Theme}/Magento_Email/email directory. Here “{Vendor}” and “{Theme}” will be replaced with the actual names of the vendor and theme you are using.
2. How to Get The Custom Email Templates List in Magento 2?
Use the Magento\\Email\\Model\\ResourceModel\\Template\\CollectionFactory.php class to access the collection of email templates stored in the database, which includes all the templates you’ve added or modified through the Magento backend.
3. How to Change Handle Names in Email Templates?
To change a handle name in a Magento 2 email template, locate the XML file linked to the template (typically found at app/code/[Vendor]/[Module]/view/frontend/layout/[Email_Template_Handle].xml).
Inside this file, find the <update> tag containing the current handle name, and modify the handle attribute to your preferred name.
4. Can I add an email option to a template dropdown without changing config files?
Yes, you can add another option to an email template dropdown by going to the Marketing Menu > Email Templates > Add New Template to create a new one or choose an existing template to modify. After making your changes, save the template.
Finally, go to configuration settings and select the new or changed template from the dropdown box.
5. Can I add fields to the Email Template in Magento 2?
Yes, you can add custom fields to the Email Template in Magento 2. This allows you to include additional order or customer information that’s collected during the checkout process.
You can follow these steps:
- Create Custom Attributes: Use an extension like Magento 2 Order Attributes to create custom fields during checkout.
- Retrieve Custom Attributes: Ensure the custom attributes are available in the order data by modifying your Magento 2 code or using a third-party module to make the custom fields accessible in emails.
- Edit the Email Template: Navigate to the Email Templates in the Magento 2 admin panel. You can edit or create a new template and use variables to include your custom attributes. These variables are placeholders that pull the necessary data when the email is generated.
- Test the Template: Send test emails to make sure the custom fields are displayed correctly.
The bottom line
I think sending emails to customers is necessary to maintain communication and show a professional image. This tutorial will hopefully give you knowledge of how to customize email templates in Magento 2. However, we understand that it may be troublesome to customize it on your own. Hence, why don’t you try this Email Marketing solution, where the templates are ready-made and customization is easy and quick? You can contact us for more details or comment in the box below for further discussions.
Explore Marketing Automation tool for your store now
Related topics


