Import Product Images in Magento 2: Step-by-Step Guide
Vinh Jacker | 08-26-2016
In Magento 2, importing product images is a common task for admins; however, if you are doing it manually one by one, it will be a waste of time and effort. That is why you are in need of a guide on how to import images in bulk.
In this topic, you will learn how to import multiple product images to Magento 2 store at once with better organization, leading to a visually appealing shopping experience for your customers with this feature.
One thing to know before making any step is that Magento has its own directory structure for product images, which is alphabetically organized. The path to the specific image is included in the import product file.
Therefore, you can upload the image file on Magento 2 server (we call it “local server”) or take advantage of your external server (after logging with the correct credentials that have permission to manage the Magento folder on the server).
3 Methods to Import Product Images in Magento 2
Method 1: Import Images from the Local Server (or Upload Files on Magento 2 Server)
In this method, you are going to use the Local Server to upload bulk images in Magento 2.
Step 1: Upload the image files to server
- If you’re using Adobe Commerce and Magento Open Source versions 2.3.2 or above: On the Magento 2 server, import product images to the default folder (or subfolder)
pub/media/import. - If you’re using earlier releases of Adobe Commerce and Magento Open Source: You can use a different folder as well on the Magento 2 server, as long as the path to the folder is specified during the import process.
Step 2: Import Product Images with CSV file
- In the CSV data, enter the name of each image file to be imported on the correct row, by SKU, and in the correct column according to image type (
base_image, small_image, thumbnail_image, or additional_images). - Make sure to exclude the path before each file name for images in the default import folder (
var/import/images). - The CSV file needs to include only the SKU column and the related image columns, for example:

- If you want to import multiple images for a single product , insert a blank row below the SKU, enter the additional image file names in the appropriate columns and use commas to separate the image names, for example:
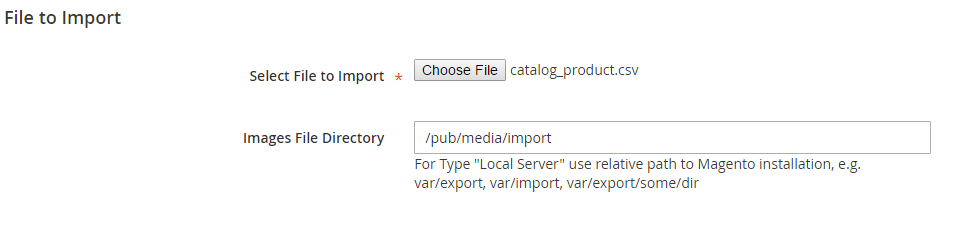
image01.jpg,image02.jpg,image03.jpg. - Follow the instructions for importing products till you fill in the Images File Directory field.
- Enter the path to the folder where you upload your images in the beginning in Images File Directory fields and continue importing products.
Method 2: Import Images from External Server
In case you want to use a remote server to import images for your Magento 2 store, you can use this method.
Step 1: Upload the image files on External Server
- Choose the product images you want to import and then upload them to the selected folder on the external server.
- In the CSV data, enter the full URL for each image file in the correct column based on its type (
base_image, small_image, thumbnail_image, or additional_images). For example:http://example.com/images/image.jpg.
Step 2: Import bulk product images process as same as step 2 of the first method
Method 3: Import product images to Magento 2 with remote storage
In Magento 2, remote storage means keeping media files, such as product images, on an external server or cloud service instead of the local server. By this way of storing, you can save server space and improve performance by shifting media to a separate storage location which can be accessed through URLs.
Step 1: Upload your product image files
- Upload your image files to the
var/import/images folderin the Remote Storage module, or use a subfolder such asvar/import/images/product_images. - From Adobe Commerce and Magento Open Source 2.3.2 and later versions: When importing product images to Magento 2, the path used is
<remote-storage-root-folder>/var/import/images, which connects to the base directory of images. - For other versions, you can use a different folder on the Commerce server and specify its path during the import process.
Step 2: Import Product Images with CSV file
Process as same as the step 2 of the first method.
Tips for Smoothly Importing Product Images in Magento 2
If you’re new to importing product images in Magento 2, these helpful tips will assist you in executing the process with fewer errors:
- Start with simple CSV files containing only 2 to 3 columns (especially SKU and image fields). Gradually increase the CSV record size as you become more familiar with the process. This way, it’s easier to identify any issues that may arise.
- When using a remote server to import product images, check if they are not direct PHP requests (ending with .jpg).
- If you encounter issues while importing product images to your Magento 2 store, double-check if you have specified image extensions as both .JPG and .jpg in the media folder and CSV file.
- Remember to include a “/” before the image name in the CSV file (e.g., /my_image.jpg) when the image path is not found.
- Ensure that the “var” and “pub” folder permissions allow read and write access to avoid permission-related problems.
- Some common mistakes to avoid:
- Add a slash at the beginning, for example: /pub/media/import or /pub/media/import/image.png
- Add a slash at the end, for example: pub/media/import/
While importing product images into Magento 2 may not seem difficult or complex, using CSV files can be challenging for many. Moreover, changes to Magento 2’s filesystem between editions can cause issues during image imports.
To simplify the Magento 2 import product images process, especially for stores with over thousands of products where finding errors can be daunting, you should consider using third-party extensions.
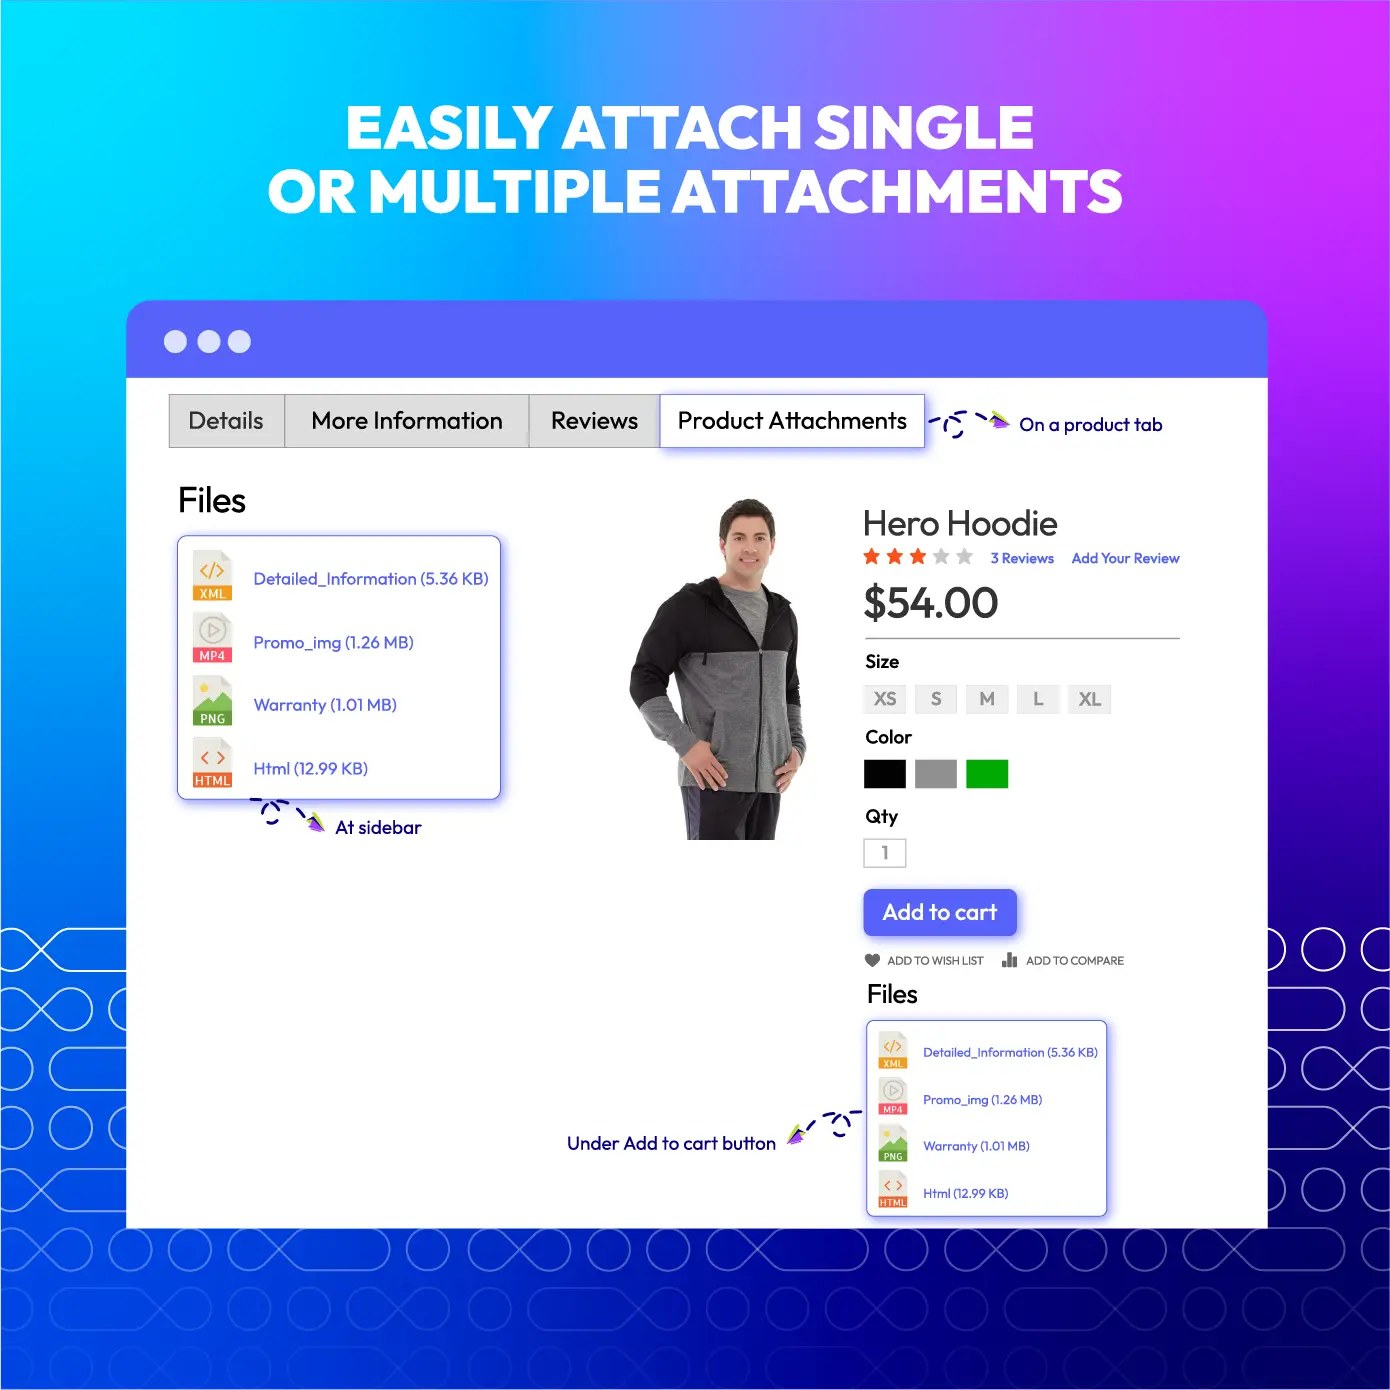
Product Attachments for Magento 2, created by Mageplaza, will streamline the importing of multiple product image files for online merchants, minimizing errors from manual operations. You can effortlessly upload bulk image files for your Magento 2 store by drag-and-drop actions, making it much simpler than creating and editing CSV files with numerous SKU and image fields.
Additionally, Mageplaza’s Product Attachments for Magento 2 extension offers these benefits:
- Attach files in various formats such as images, videos, and documents (PDF, DOC, XLSX, etc.) to provide comprehensive product information.
- Includes pre-made icon packages for popular file types.
- Provides an advanced report on attachment downloads, helping analyze and manage files by product ID, file names, types, download count, and creation dates.
- Allows administrators to configure online viewability for attachments, enabling customers to view files online whenever possible.
FAQs
1. Is it possible to import my products with the paths for where the images are located?
Yes, it is possible to import products into Magento with the paths for where the images are located. However, for Adobe Commerce and Magento Open Source 2.3.2 versions and later editions, your imported product images via the file system cannot be located outside of the var/import folder.
2. How can I automate product image imports in Magento 2?
You can use Magento 2 Web API, scheduled cron jobs, or third-party extensions like Mageplaza Import Export to automate the image import process.
3. Can I update product images without affecting other product details?
Yes, select “Add/Update” when importing and ensure the CSV only contains SKUs and image paths, so other attributes remain unchanged.
4. What should I do if my import process fails?
- Check error messages in the import log.
- Verify that CSV formatting is correct and matches Magento’s required structure.
- Ensure images are uploaded to the correct directory before running the import.
- Set correct file permissions for media folders.
5. How can I assign multiple images to a product during import?
In the CSV file, use the image, small_image, and thumbnail columns to define multiple images. Separate multiple additional images using commas in the media_gallery column.
6. What file types are supported for product images in Magento 2?
Magento 2 supports JPEG, PNG, and GIF file formats for product images.
7. How do I bulk import product images in Magento 2?
- Prepare a CSV file with SKUs and image paths.
- Upload images to /pub/media/import/.
- Use
System → Import → Productsin the Magento Admin Panel. - Select “Add/Update” and match columns properly before running the import.
8. Why are my product images not showing after import?
Common reasons include:
- Incorrect image path format in the CSV file.
- Images not uploaded to the /pub/media/import/ folder before import.
- Cache issues—try clearing cache and reindexing data.
- Folder permissions not set correctly, preventing Magento from accessing images.
9. Where should I place product images before importing?
Upload images to pub/media/import/ or any other valid directory in Magento’s media folder that matches the path in your CSV file.
The bottom line
High-quality images are essential for online sales, shaping the customer’s visual experience and increasing their purchase intent. To keep your store engaging and competitive, regularly update product images as you expand your catalog. Don’t underestimate the importance of using Magento 2 import product images feature or third-party extensions offering the same feature to efficiently manage and centralize your product visuals.
Related Posts

Jacker is the Chief Technology Officer (CTO) at Mageplaza, bringing over 10 years of experience in Magento, Shopify, and other eCommerce platforms. With deep technical expertise, he has led numerous successful projects, optimizing and scaling online stores for global brands. Beyond his work in eCommerce development, he is passionate about running and swimming.
Related Post


Customize the welcome message on your store's homepage to provide a personalized touch for your customers. Improve the user experience with our step-by-step guide.

Configure Magento 2 Contact Form & Email: Detailed Guides
Configure the email address for your Magento 2 store's contact form and ensure that your customers can easily get in touch with you with this informative guide

How to Install Magento 2 with Sample Data
How to install Magento 2 with Sample Data. In this topic we will discuss about How to Install Magento 2 Step by Step in Manage Store topic

6 Steps To Stop Brute Force Attacks
How To Stop Brute Force Attacks in Magento 1, 2. In this topic we will discuss about How To Stop Brute Force Attacks in Manage Store topic

How to set Locale, Language, and Country in Magento 2
Setup Locale State Country in Magento 2 provides setup your store information on Locale Options that determines the timezone, language, country and the days.
Customize the welcome message on your store's homepage to provide a personalized touch for your customers. Improve the user experience with our step-by-step guide.
Configure Magento 2 Contact Form & Email: Detailed Guides
Configure the email address for your Magento 2 store's contact form and ensure that your customers can easily get in touch with you with this informative guide
How to Install Magento 2 with Sample Data
How to install Magento 2 with Sample Data. In this topic we will discuss about How to Install Magento 2 Step by Step in Manage Store topic
6 Steps To Stop Brute Force Attacks
How To Stop Brute Force Attacks in Magento 1, 2. In this topic we will discuss about How To Stop Brute Force Attacks in Manage Store topic
How to set Locale, Language, and Country in Magento 2
Setup Locale State Country in Magento 2 provides setup your store information on Locale Options that determines the timezone, language, country and the days.
& Maintenance Services
Make sure your store is not only in good shape but also thriving with a professional team yet at an affordable price.
Get Started