Change Store Email Addresses - Mageplaza
How to Fix Magento 2 'Invalid Form Key. Please refresh the page' error
Vinh Jacker | 03-17-2025

Magento stands out as a comprehensive platform boasting numerous features and corresponding code. As is the case with any eCommerce platform, encountering errors is an inherent aspect.
Among the most prevalent Magento errors is the “Magento Invalid Form Key. Please refresh the page.” This error may surface in various scenarios, such as when you:
-
Update the Magento platform
-
Create an account on the localhost
-
Establish a configurable product containing multiple child products
-
Include a substantial number of related, cross-sell, and upsell products to any given item
-
Save an attribute with multiple options
-
Allocate numerous related products and posts to a blog article
-
In essence, the “Magento Invalid Form Key. Please refresh the page” error emerges when a substantial volume of data is transmitted to the server during form submission.
Indeed, this detailed guide is for you. In this tutorial, we will help you understand the cause of this error as well as the solutions to fix each error.
Without further ado, let’s get started!
The reasons occur Magento 2 “Invalid Form Key. Please refresh the page” error
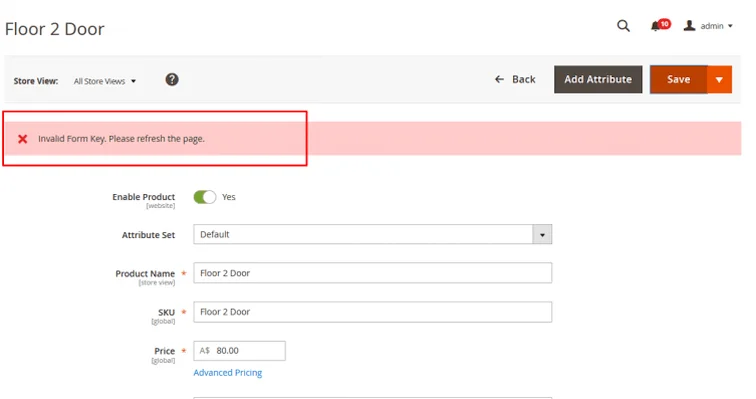
1. PHP Max_input_vars value is not optimized for Magento 2
We have encountered this error a lot on customer sites, even on our Magento 2 site before. The cause of the date error is that the Max_input_vars value is not set correctly for Magento 2. By default, the value of PHP MAx_input_vars in the server is 1000; this means it is not enough for Magento 2.
PHP Max_input_vars can be understood as the maximum number of variables that your server can use for a single function to avoid overloading (this value is used mainly to protect your server from DDOS attacks)
2. Base URL on Localhost not recognized by Magento 2 system
If you are facing this error on Localhost, we are guessing that you are probably using Localhost as the base URL on your website, instead of 127.0.0.1.
Surely, this will cause cookie system error on Magento and generate Magento 2 Invalid Form Key. Please refresh the page on your website.
3. An outdated Magento version or an old form
You might also encounter this error on a storefront when attempting to submit certain forms. This problem arises in cases where you are using an outdated version of Magento or an older form, and not all JavaScript is loaded for the intended action (e.g., adding items to the cart).
In more recent Magento versions, the add to cart button remains disabled until the necessary form _key value is accessible, ensuring that all JavaScript code is fully loaded before the action is executed.
How to fix Magento 2 Invalid Form Key. Please refresh the page
With 2 main causes of this error as the content mentioned above. We will give 2 corresponding solutions for them. Let’s dive into each solution right away.
Solution 1: Increase max_input_vars in php.ini
In most cases, we can solve the Magento 2 error “Invalid Form Key. Please refresh the page” by increasing the value of PHP Max_input_vars to the value that Magento 2 requires to process its functionality.
-
The suggested value for
Magento 2 Max_input_varsis 10000. -
To edit the value of
PHP Max_input_vars, you need to access php.ini on your server.
Follow the below steps carefully to change PHP Max_input_vars.
Step 1: Please log in to your server using SSH with root access if you are using VPS/Dedicated server.

Step 2: Enter this command php -i | grep 'php.ini' to find the path to the php.ini folder. You will see the output sample below.
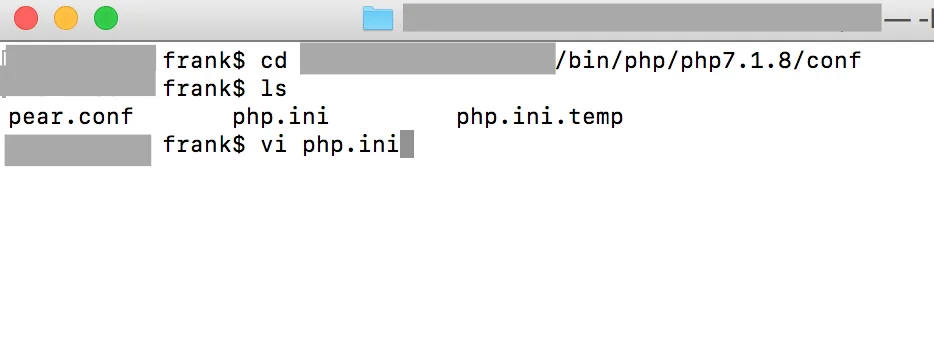
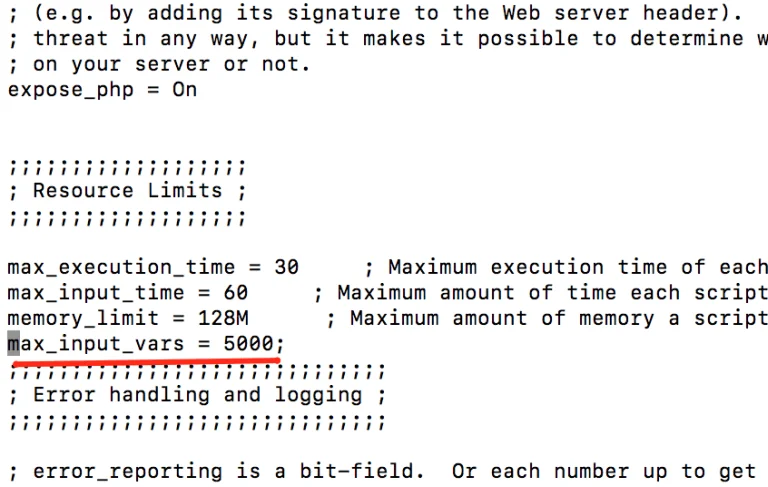
Step 3: Change the value of Max_input_vars to 10000 (or you can also create if it doesn’t exist yet). Then, press the ESC key and type :wq to save this folder.
Step 4: Last but not least, restart your Apache. Now you can save a newly created product without facing any problem.
Solution 2: Change your base URL
Another possible reason for this error is because the Magento 2 system does not recognize your base URL. It usually happens in a Local environment (localhost). To solve this problem, it is straightforward, you just need to change the base URL to “127.0.0.1”.
php bin/magento setup:store-config:set --base-url="http://127.0.0.1:8080/"
Also, you can go to your PHPAdmin and search the following table: core_config_data, then, edit the value of web/unsecure/base_url to 127.0.0.1:

If you install Magento 2 to run on HTTPS, you can change the base-url-secure :
php bin/magento setup:store-config:set --base-url-secure="https://127.0.0.1:8080/"
Finally, after you have changed your base URL, it’s time to flush your cache to save changes by running the following command:
php bin/magento cache:flush
And remove Magento 2 cache folder by running the command below:
sudo rm -rf var/cache var/generation var/page_cache
Last but not least, please refresh your website to see whether the error is fixed.
Solution 3: Regularly update Magento version or improve Magento speed
If you come across the “Invalid Form Key. Please refresh the page” error on a storefront in the latest Magento version, it’s advisable to consult a developer for resolution. They need to modify the Add to Cart button template, ensuring it becomes active only after all JavaScript scripts are fully loaded.
Note: If you’re using a custom extension or theme, there could be various reasons for the issue, and corresponding fixes may be required. It’s recommended to reach out to the developers of the theme or custom extension for assistance.
The “Invalid Form Key. Please refresh the page” error is common in Magento, and having an understanding of how to address it ensures uninterrupted performance for your Magento store.
Solution 4: Adjust a file in the Magento installation directory
Begin by creating a backup of **
Next, follow the steps outlined below:
-
Open the file.
-
Disable the specified entries:
$requestParts = explode('/', trim($request->getRequestUri(), '/'), 3);
$baseUrlPath = trim(parse_url($this->backendUrl->getBaseUrl(), PHP_URL_PATH), '/');
$routeIndex = empty($baseUrlPath) ? 0 : 1;
$requestUri = $this->_url->getUrl($requestParts[$routeIndex]);
- Add the following entry:
$requestUri = $this->_url->getUrl($this->_url->getStartupPageUrl());
- The modified section should appear as follows:
// Checks, whether secret key is required for admin access or request uri is explicitly set
        if ($this->_url->useSecretKey()) {
#            $requestParts = explode('/', trim($request->getRequestUri(), '/'), 3);
#            $baseUrlPath = trim(parse_url($this->backendUrl->getBaseUrl(), PHP_URL_PATH), '/');
#            $routeIndex = empty($baseUrlPath) ? 0 : 1;
#            $requestUri = $this->_url->getUrl($requestParts[$routeIndex]);
            $requestUri = $this->_url->getUrl($this->_url->getStartupPageUrl());
        } elseif ($request) {
            $requestUri = $request->getRequestUri();
        }

        if (!$requestUri) {
            return false;
Best Practices for Magento 2 Users
Launching your Magento 2 store is very exciting at first, but when you encounter some errors like today’s topic, you might wonder if there is a way to prevent this issue as much as possible. Remember: Knowledge is power! The only answer is to learn more about Magento.
In this part, we will discuss the best practices for website performance, helping you improve your site loading for a better shopping experience.
1. Regularly update your data
An indexer is a vital process that keeps your e-commerce shop’s data, such as products, prices, and categories, continuously updated.
As a Magento 2 store owner, you can run an indexer in two ways:
- Update on Save
- Update by Schedule
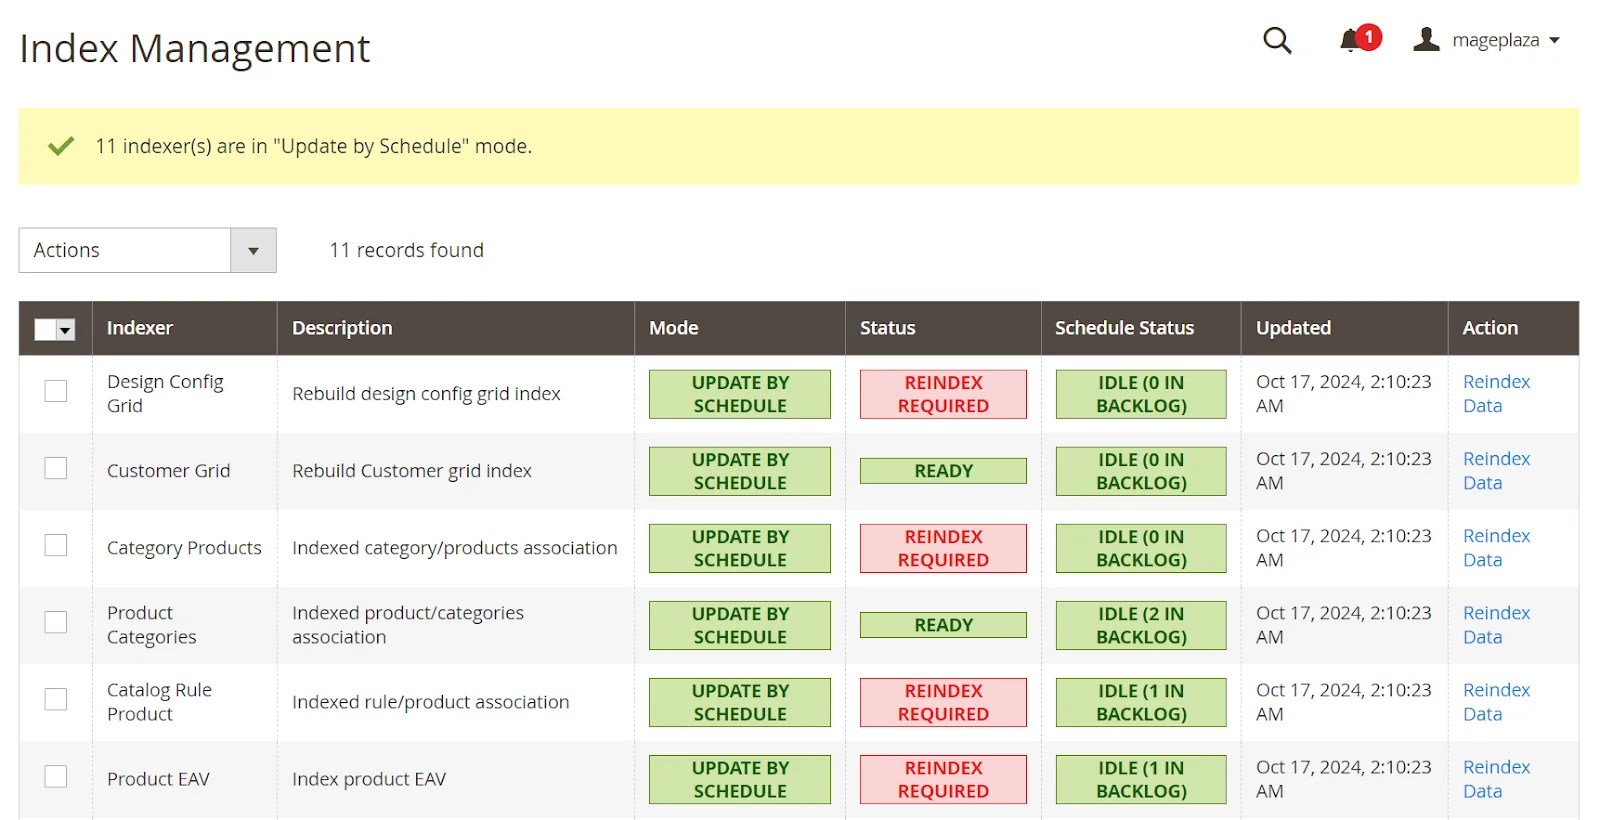
By default, Magento 2 uses Update on Save mode, updating data whenever changes are made in the admin panel. However, we recommend switching to Update on Schedule mode, which updates index tables via a cron job, allowing you to schedule updates at convenient times.
To change the indexer mode from your Magento Admin Panel, go to System > Tools > Index Management > select all indexers and choose Update by Schedule.
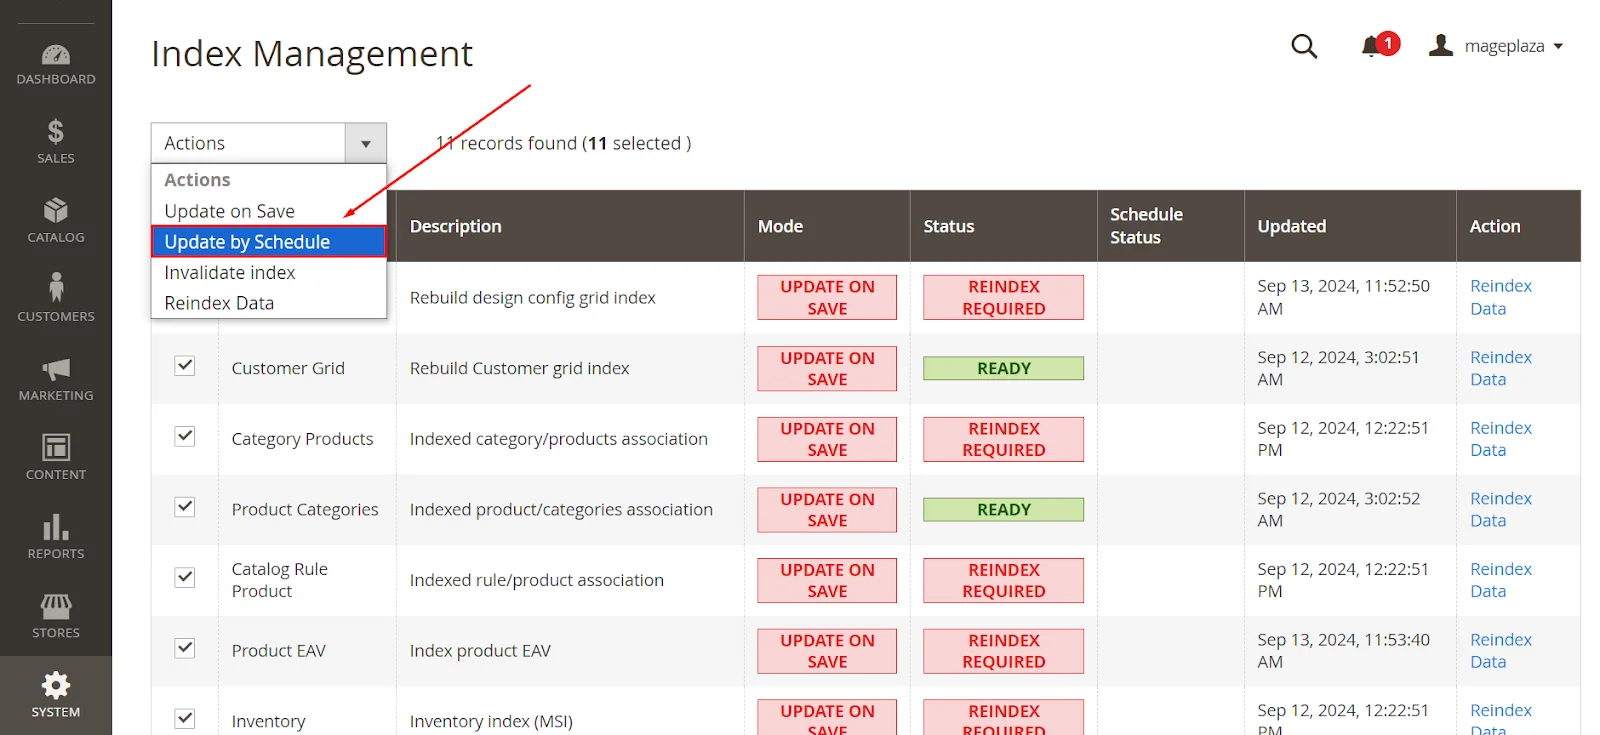
Hit Submit and check the result.
2. Enable Magento cache
Data is frequently accessed and stored in a system called a cache, which helps website content load faster. We highly recommend enabling all cache types on your production server.
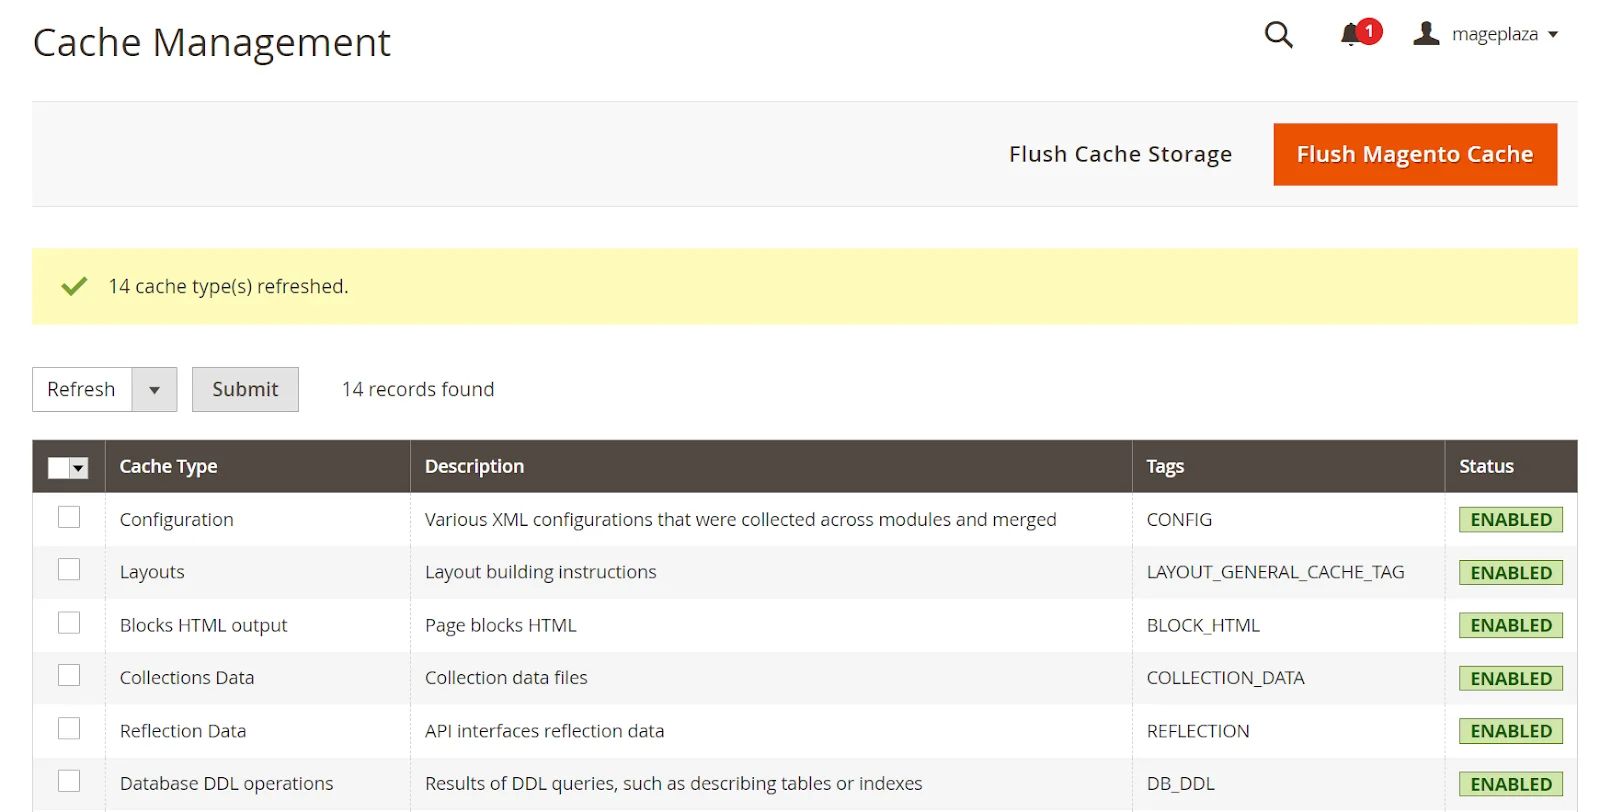
To enable Magento cache, go to System > Tools > Cache Management > pick all the cache types you want to enable and hit Refresh in the action dropdown.
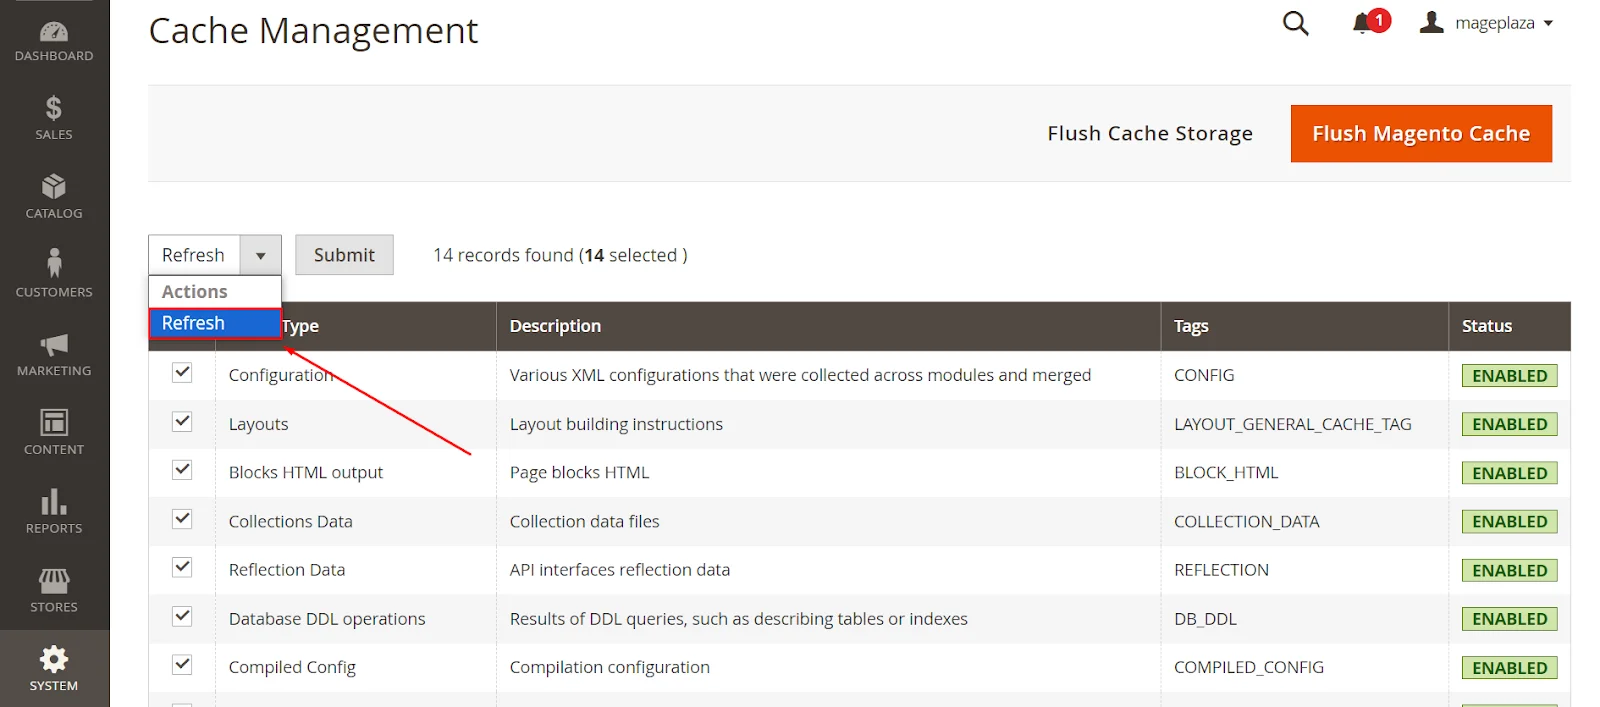
Submit your changes and check the result.
3. Enable Varnish cache
Varnish cache is the most recommended method for boosting your website’s speed. It acts as a proxy server, serving as an intermediary layer before the main server. If you’re not sure how to set it up, check out our guide on installing and configuring Varnish Cache in Magento 2.
- Go to Stores > Settings > Configuration > Advanced > System > and expand the Full Page Cache tab.
- In the Caching Application field, choose Varnish Cache (Recommended)
- In the TTL for public content field, enter the time count by second. If you leave it blank, the system will use the default public content cache lifetime as 86400s (24 hours).
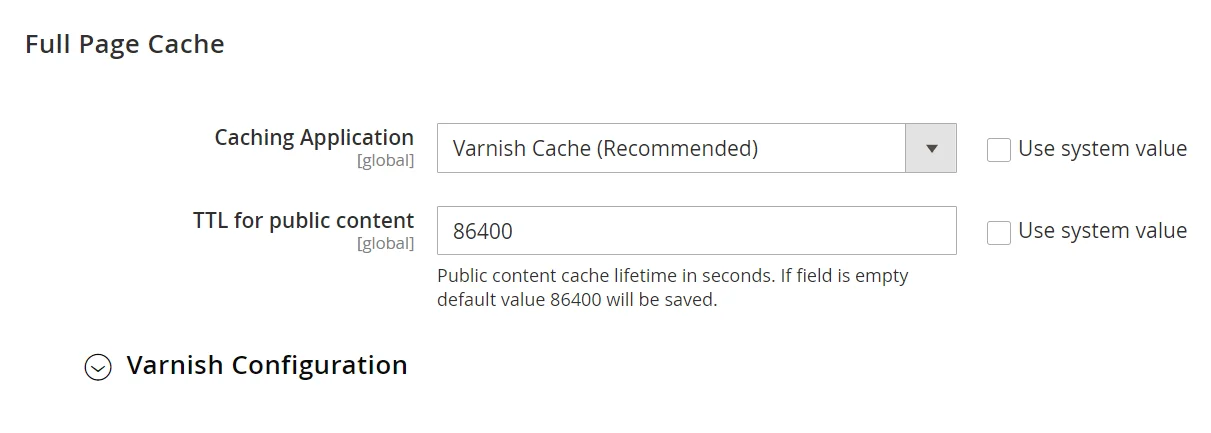
- Expand Varnish Configuration and fill out all the fields in that section
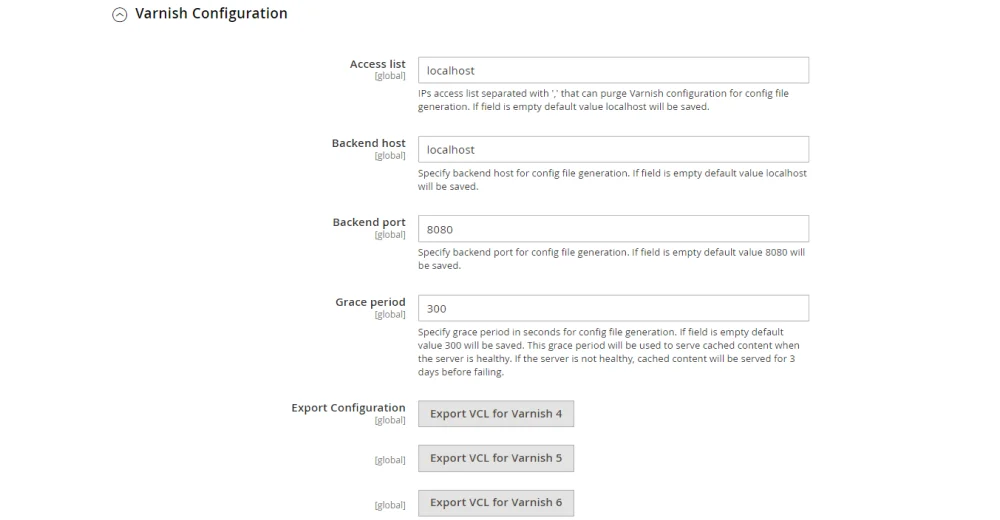
- Save your changes
4. Enable Redis
When you use Redis on your Magento 2 website, it stores data in the server’s RAM for improved performance. Redis is a high-speed, in-memory storage system that quickly transfers frequently used content from disk to RAM.
This means your website won’t need to perform a full scan of cache files each time a user interacts with or requests data from your online store, resulting in faster response times and a better user experience.
Read more: How to Config Redis Cache in Magneto 2
5. Use advanced JavaScript bundling
When your business takes off and the traffic to your website is huge, you need to ensure your server can handle the situation. One effective solution is to use advanced JavaScript bundling.
JavaScript bundling allows you to combine similar pages of your e-commerce store into a single page type. This reduces the number of server requests needed to fetch individual scripts, improving your store’s loading speed.
Magento provides merging and bundling features to help reduce server requests. You can enable these options by following our instructions below:
- Navigate to Stores > Settings > Configuration > Advanced > Developer.
- Expand JavaScript Settings
- Choose Yes in both fields: Merge JavaScript Files and Enable JavaScript Bundling

- Don’t forget to flush cache
- Turn on Magento 2’s built-in bundling by running this command. It helps you combine all assets in your system and distribute them between same-sized bundles.
php -f bin/magento config:set dev/js/enable_js_bundling 1
- To turn on Magento 2’s built-in merging, use the code below. It will merge all synchronous JavaScript files:
php -f bin/magento config:set dev/js/merge_files 1
When you enable both bundling and merging in Magento, it generates a single JavaScript file. If bundling is not enabled, Magento will only combine RequireJS and its configuration. However, since Magento relies on RequireJS, using merging without enabling bundling is not effective.
6. Enable asynchronous indexing
When your store is in the middle of a big sale, Magento has to process your orders quickly, too. This can lead to serious conflicts between read and write operations in the database table and negatively impact your sales. To avoid this situation, you can configure Magento 2 to recognize these two traffic patterns at the database level.
Order data can be stored and indexed asynchronously, allowing orders to be transferred in bulk to the order management grid without conflicts and temporarily stored.
To do so, go to Stores > Settings > Configuration > Advanced > Developer > expand Grid Settings > enable Asynchronous Indexing.

7. Minifying JavaScript, HTML, and CSS
Using minified code significantly speeds up your website’s rendering. This can enhance your site’s performance and improve your Google PageSpeed Insights score.
Follow our step-by-step guide below to minify JavaScript, HTML, and CSS.
- JavaScript: Go to Stores > Settings > Configuration > Advanced > Developer > JavaScript Settings > Select Yes in Minify JavaScript Files
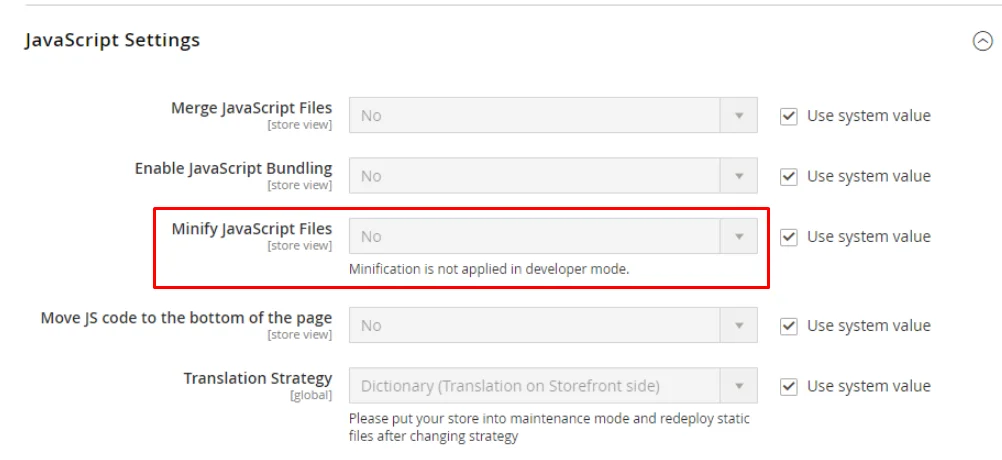
- HTML: Scroll up and expand Template Settings > Select Yes in Minify Html
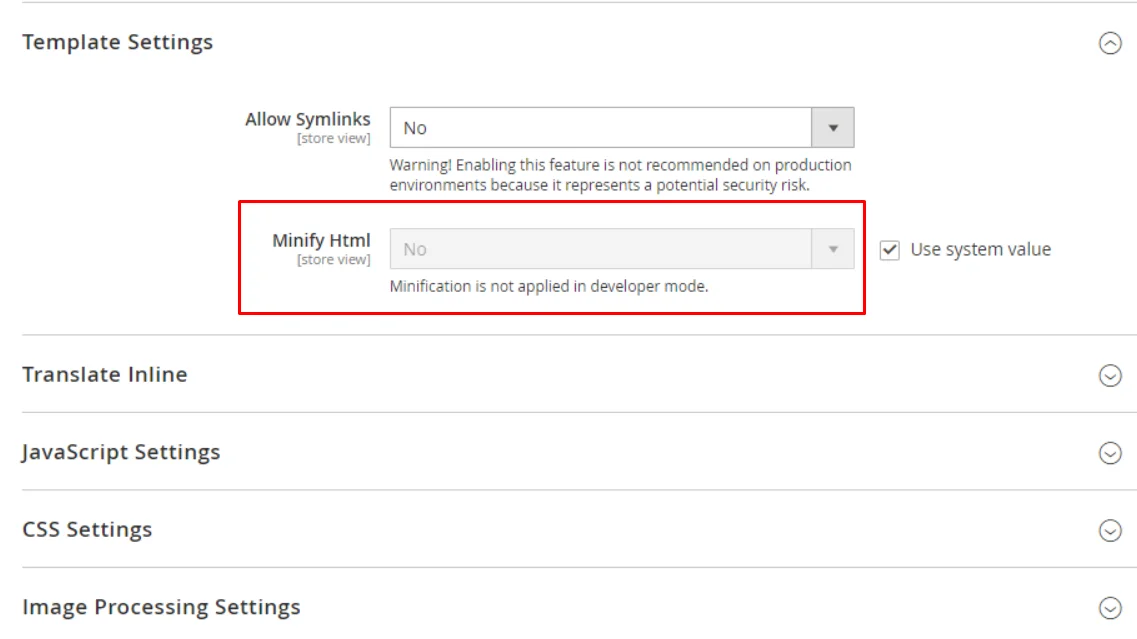
- CSS: Scroll down and expand the CSS Settings section > Select Yes in Merge CSS Files and Minify CSS Files
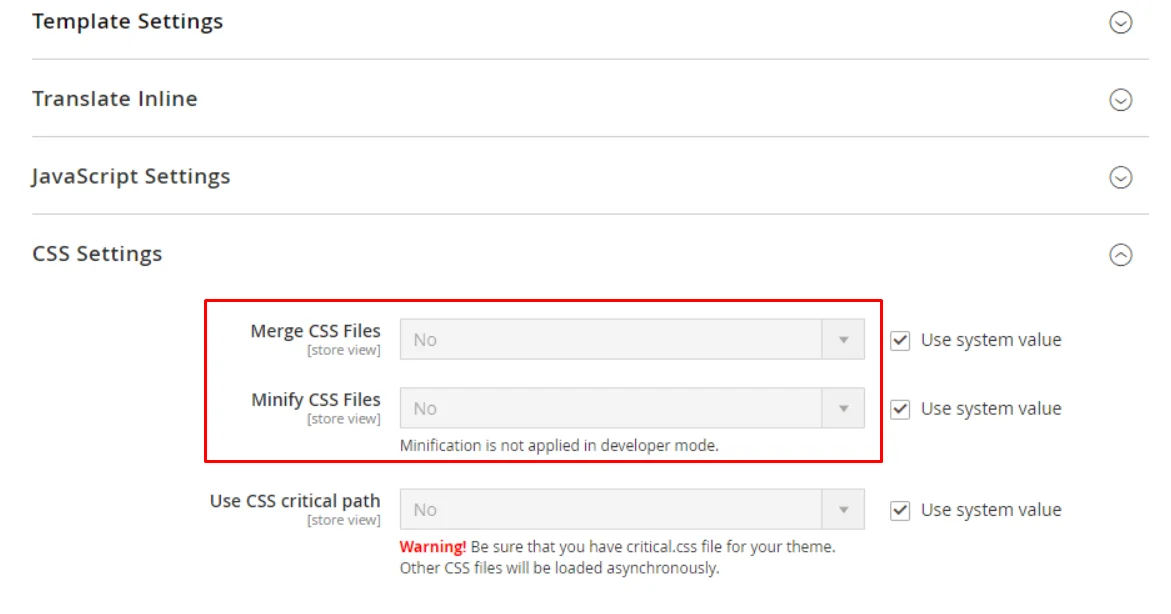
Finally, save your config and flush cache.
Final Words
That’s all. We have just provided detailed instructions to fix the Invalid Form Key error. Please refresh the page in Magento 2.
We hope that you can solve the problem yourself by following the step-by-step instructions above. If your Magento 2 website still doesn’t work properly after applying the above tutorial, you can comment below on the details of the error; our support team will try their best to help you solve it as soon as possible.
Also, don’t forget to share this article with your friends if you find it helpful!
Thanks a lot for reading, and see you in the next post.


